Kenwood CMOS-220 Operation Manual - Page 4
Installation
 |
View all Kenwood CMOS-220 manuals
Add to My Manuals
Save this manual to your list of manuals |
Page 4 highlights
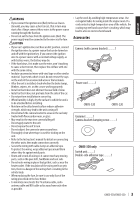
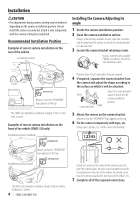
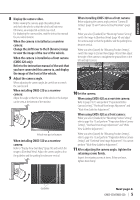
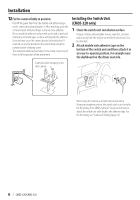
Installation CAUTION • The adjustments during camera setting may be hindered depending on the camera installation position. Do not install the camera securely but attach it only temporarily until the camera setting has completed. Recommended Installation Position Examples of correct camera installation on the rear of the vehicle Installation position Installing the Camera/Adjusting its angle 1 Decide the camera installation position. 2 Clean the camera installation surface. Using a commercially available cleaner, wipe dirt, moisture and oil away from the surface on which the camera bracket is to be attached. 3 Loosen the camera bracket retaining screws. Using a commercially available Phillips screwdriver, loosen the two retaining screws. Mount so that the "KENWOOD" logo appears at the top. The CMOS-320 should be installed at a height of 50 cm (1.64 feet) or more. Examples of correct camera installation on the front of the vehicle (CMOS-320 only) Installation position (standard) Perform steps 4 and 5 only when they are required. 4 If required, separate the camera bracket from the camera and adjust the shape according to the surface on which it will be attached. Bend Camera bracket Bend Adjust the camera bracket shape so that it fits the camera installation position. 5 Mount the camera on the camera bracket. Mount so that the "KENWOOD" logo appears at the top. 6 Fix the camera temporarily with tape, etc. Using a piece of tape, etc., fix the camera temporarily. 12345 Mount so that the "KENWOOD" logo appears at the top. Installation position (lower) The CMOS-320 should be installed at a height of 30cm to 80cm (0.98feet to 2.62feet). 4 | CMOS-320/CMOS-220 Install the camera at the center of the vehicle and not to hide the number plate. And also install straight toward the forward/reverse direction of the vehicle. Be careful not to lean the camera toward other directions of the vehicle, etc. 7 Complete all of the required connections.
-
 1
1 -
 2
2 -
 3
3 -
 4
4 -
 5
5 -
 6
6 -
 7
7 -
 8
8 -
 9
9 -
 10
10 -
11
-
12
-
13
-
14
-
15
-
16
-
17
-
18
-
19
-
20
-
21
-
22
-
23
-
24
-
25
-
26
-
27
-
28
-
29
-
30
-
31
-
32
-
33
-
34
-
35
-
36
-
37
-
38
-
39
-
40
-
41
-
42
-
43
-
44
-
45
-
46
-
47
-
48
-
49
-
50
-
51
-
52
-
53
-
54
-
55
-
56
-
57
-
58
-
59
-
60
 |
 |
