Kenwood CMOS-220 Operation Manual - Page 9
Camera Setting CMOS-320 only
 |
View all Kenwood CMOS-220 manuals
Add to My Manuals
Save this manual to your list of manuals |
Page 9 highlights
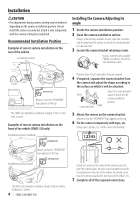
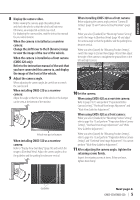
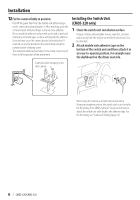
ENGLISH Camera Setting (CMOS-320 only) Switch Unit Operation The switch unit can be used to switch the image display mode, view/hide the guideline display and adjust the camera. View button • Switches the image display mode. • Select an item in the setting mode. • Press and hold to display or hide the guidelines. +/− button Moves across the setting mode items or sets an adjustment value. Preparation Before Camera Setting When the camera is installed as a rearview camera: 1 Stop the vehicle. In a parking space with white lines and tire stoppers, park the vehicle in the center of the white line frame. 2 Advance the vehicle. • Move the vehicle forward until the entire parking space can be viewed in the camera image. • Be sure to apply the parking brake and push the brake pedal so that the vehicle is completely stationary. Perform the setting in a place that will not cause nuisance to other people. When installing the front camera at a height of 50cm (1.64 feet) or more: Prepare as same as the rearview camera. When installing the front camera below 50cm in height: 1 Install the camera at the center of the vehicle (page 4). • If not, the image may not be symmetric in the "Corner View". 2 Move the vehicle on the center of the parking line. • You can use a long stick instead of the parking line if you can not use the 2 parking lots etc. • Be sure to apply the parking brake and push the brake pedal so that the vehicle is completely stationary. Perform the setting in a place that will not cause nuisance to other people. 3 Set the camera. Adjust the "Overhead View Image Adjustment" (page 10, 11) so that the parking line is displayed vertically in the center. CMOS-320/CMOS-220 | 9
-
 1
1 -
2
-
3
-
 4
4 -
 5
5 -
 6
6 -
 7
7 -
 8
8 -
 9
9 -
 10
10 -
 11
11 -
 12
12 -
 13
13 -
 14
14 -
15
-
16
-
17
-
18
-
19
-
20
-
21
-
22
-
23
-
24
-
25
-
26
-
27
-
28
-
29
-
30
-
31
-
32
-
33
-
34
-
35
-
36
-
37
-
38
-
39
-
40
-
41
-
42
-
43
-
44
-
45
-
46
-
47
-
48
-
49
-
50
-
51
-
52
-
53
-
54
-
55
-
56
-
57
-
58
-
59
-
60
 |
 |
