Kenwood DDX419 Instruction Manual - Page 9
Caution on volume setting - remote controller
 |
View all Kenwood DDX419 manuals
Add to My Manuals
Save this manual to your list of manuals |
Page 9 highlights
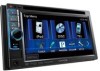
DDX419/DDX4049BT/DDX319/DDX3049 Screen (Touch panel) Monitor panel 1 Loading slot 2 0 (Eject) button Ejects the disc. 3 Remote sensor 4 Reset button/Power indicator/Security indicator • Resets the unit. (☞ page 3) • Lights up while the unit is turned on. • Flashes when the security function is activated. (☞ page 7) 5 MENU/ button • Turns off the power. (Hold) • Turns on the power. (Press) • Displays the screen. (Press) (☞ page 12) 6 AV/AV OUT button • Displays the current source screen. (Press) • Selects the AV source for external monitor or amplifier. (Hold) 7 For DDX419/DDX4049BT: TEL/V.OFF button • Displays the screen. (Press) (☞ page 54) • Turns off/on the screen. (Hold) (☞ page 11) For DDX319/DDX3049: AUD/V.OFF button • Displays the screen. (Press) (☞ page 41) • Turns off/on the screen. (Hold) (☞ page 11) 8 VOL/ATT knob (☞ page 11) • Attenuates the sound. (Press) • Adjusts the audio volume. (Turn) For DDX419/DDX4049BT only: AUD button • Displays the screen. (Hold) (☞ page 41) 9 FNC/R-CAM button • Displays the source control screen. (Press) (☞ page 12) • Displays the picture from the rear view camera. (Hold) p USB input terminal q iPod/AV-IN2 input terminal Caution on volume setting: Digital devices (CD/USB) produce very little noise compared with other sources. Lower the volume before playing these digital sources to avoid damaging the speakers by sudden increase of the output level. You can change the color of the buttons on the monitor panel. (☞ page 43) English 9
-
 1
1 -
2
-
3
-
 4
4 -
 5
5 -
 6
6 -
 7
7 -
 8
8 -
 9
9 -
 10
10 -
 11
11 -
 12
12 -
 13
13 -
 14
14 -
15
-
16
-
17
-
18
-
19
-
20
-
21
-
22
-
23
-
24
-
25
-
26
-
27
-
28
-
29
-
30
-
31
-
32
-
33
-
34
-
35
-
36
-
37
-
38
-
39
-
40
-
41
-
42
-
43
-
44
-
45
-
46
-
47
-
48
-
49
-
50
-
51
-
52
-
53
-
54
-
55
-
56
-
57
-
58
-
59
-
60
-
61
-
62
-
63
-
64
-
65
-
66
-
67
-
68
-
69
-
70
-
71
-
72
-
73
-
74
-
75
-
76
-
77
-
78
-
79
-
80
-
81
-
82
-
83
-
84
-
85
-
86
-
87
-
88
-
89
-
90
-
91
-
92
 |
 |
