Kenwood DNX6180 Quick Start Guide - Page 16
Navigation System - features
 |
UPC - 019048192714
View all Kenwood DNX6180 manuals
Add to My Manuals
Save this manual to your list of manuals |
Page 16 highlights
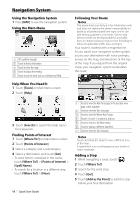
Navigation System Using the Navigation System 1 Press [NAV] to use the navigation system. Using the Main Menu 1 2 3 4 5 1 GPS satellite strength. 2 Touch to find a destination. 3 Touch to view the map. 4 Touch to adjust the settings. 5 Touch to use the tools such as ecoRoute and Help. Following Your Route Notes The speed limit icon feature is for information only and does not replace the driver's responsibility to abide by all posted speed limit signs and to use safe driving judgment at all times. Garmin and Kenwood will not be responsible for any traffic fines or citations that you may receive for failing to follow all applicable traffic laws and signs. Your route is marked with a magenta line. As you travel, your navigation system guides you to your destination with voice prompts, arrows on the map, and directions at the top of the map. If you depart from the original route, your navigation system recalculates the route. 1 2 Help When You Need It 1 Touch [Tools] on Main Menu screen. 2 Touch [Help]. 3 Touch [Search] to search the Help topics for a keyword. Finding Points of Interest 1 Touch [Where To?] on Main Menu screen. 2 Touch [Points of Interest]. 3 Select a category and a subcategory. 4 Select a destination, and touch [Go!]. • To enter letters contained in the name, touch [Where To?] > [Points of Interest] > [Spell Name]. • To search for a location in a different area, touch [Where To?] > [Near]. 4 3 5 6 7 1 Touch to view the Next Turn page or the junction view page, when available. 2 Touch to view the Turn List page. 3 Touch to view the Where Am I? page. 4 Touch [+] and [-] to zoom in and out. 5 Touch to return to the Main menu. 6 Touch to display a different data field. 7 Touch to view the Trip Computer. Notes Touch and drag the map to view a different area of the map. A speed limit icon could appear as you travel on major roadways. Adding a Stop 1 While navigating a route, touch [ ]. 2 Touch [Where To?]. 3 Search for the extra stop. 4 Touch [Go!]. 5 Touch [Add as Via Point] to add this stop before your final destination. 16 | Quick Start Guide
-
 1
1 -
2
-
3
-
4
-
5
-
6
-
7
-
8
-
9
-
10
-
 11
11 -
 12
12 -
 13
13 -
 14
14 -
 15
15 -
 16
16 -
 17
17 -
 18
18 -
 19
19 -
 20
20 -
 21
21 -
22
-
23
-
24
-
25
-
26
-
27
-
28
-
29
-
30
-
31
-
32
-
33
-
34
-
35
-
36
-
37
-
38
-
39
-
40
-
41
-
42
-
43
-
44
-
45
-
46
-
47
-
48
-
49
-
50
-
51
-
52
-
53
-
54
-
55
-
56
-
57
-
58
-
59
-
60
-
61
-
62
-
63
-
64
-
65
-
66
-
67
-
68
-
69
-
70
-
71
-
72
-
73
-
74
-
75
-
76
-
77
-
78
-
79
-
80
-
81
-
82
-
83
-
84
-
85
-
86
-
87
-
88
-
89
-
90
-
91
-
92
 |
 |
