Kenwood TS-990S Operation Manual - Page 176
Selecting The Audio Source For Transmission By Data Send, Vox (voice-operated Transmit)
 |
View all Kenwood TS-990S manuals
Add to My Manuals
Save this manual to your list of manuals |
Page 176 highlights
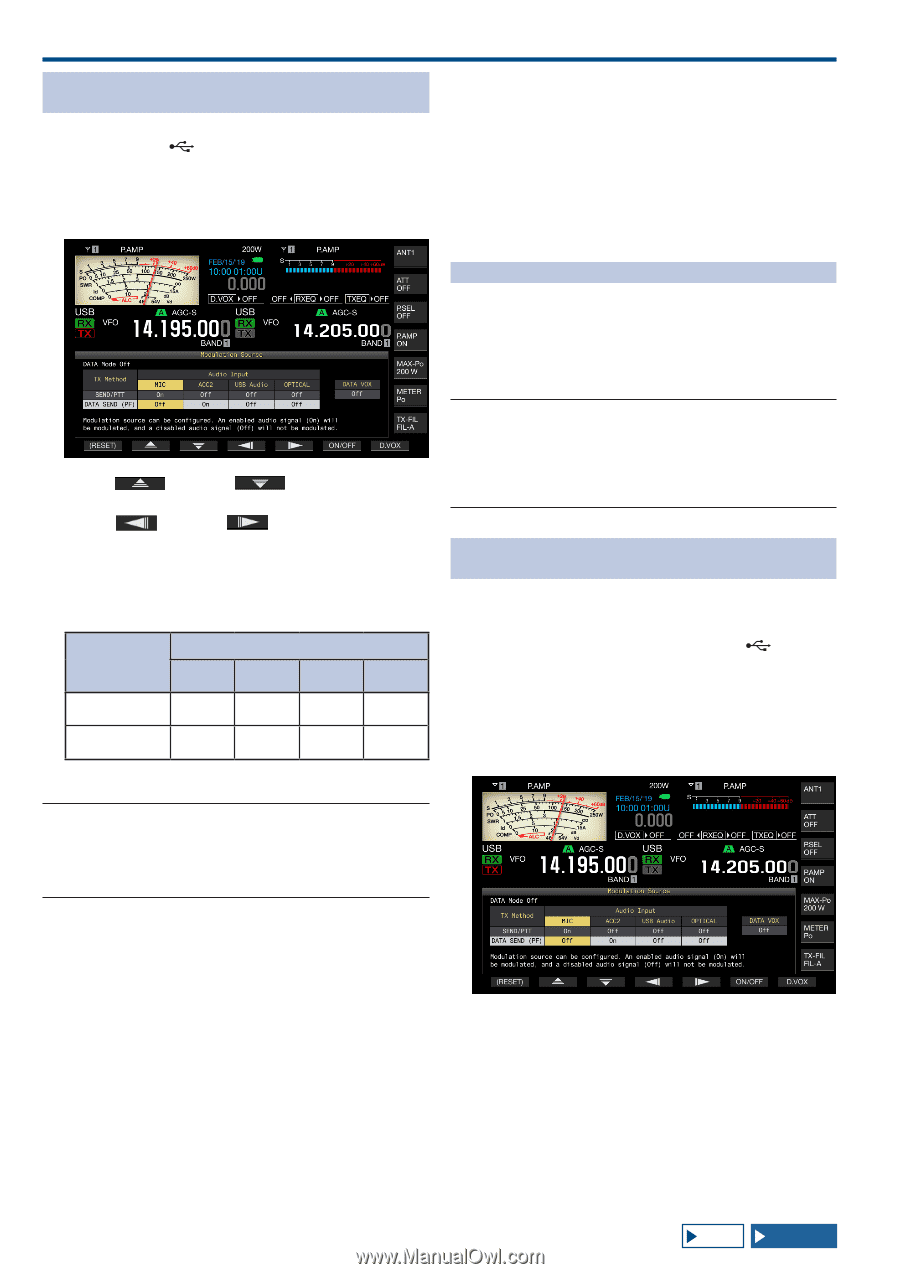
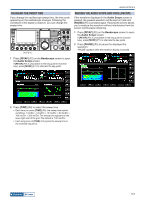
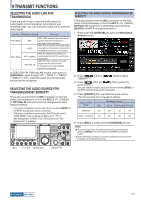
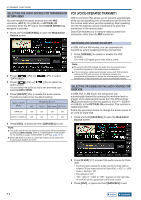
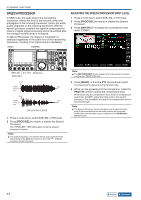
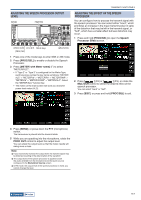
9 TRANSMIT FUNCTIONS SELECTING THE AUDIO SOURCE FOR TRANSMISSION BY DATA SEND You can transmit the audio sourced from the MIC connector, ACC 2, (USB-B), or OPTICAL IN connector when the PF key for which [DATA SEND] was assigned is pressed. 1 Press and hold [DATA/SEL] to open the Modulation Source screen. VOX (VOICE-OPERATED TRANSMIT) VOX is a function that allows you to transmit automatically while you are speaking into a microphone and to revert to the receive state when you stop speaking. After speaking into the microphone, pause momentarily to place the transceiver in the receive state. Data VOX enables you to transmit data sourced from connectors other than the MIC connector. 2 Press [ ] (F2) or [ "DATA SEND". ] (F3) to select 3 Press [ ] (F4) or [ ] (F5) to select the audio source. You can select the audio source to be transmitted upon pressing [DATA SEND]. 4 Press [ON/OFF] (F5) to enable the audio source. The following table shows the default settings. Status of DATA Modulation Source Mode MIC ACC 2 USB Audio OPTICAL DATA Off Off On Off Off DATA 1 to DATA 3 Off Off On Off 5 Press [ESC], or press and hold [DATA/SEL] to exit. Note: ◆◆The audio signal from the selected audio source will be transmitted by pressing [DATA SEND]. Refer to "CONVENIENT FUNCTIONS" for the method to assign "DATA SEND" to a PF key. {page 16-6} ◆◆Both USB Audio and ACC 2 cannot be enabled at the same time. Enabling one disables the other. SWITCHING VOX (VOICE) ON OR OFF In SSB, FM and AM modes, you can automatically transmit by simply speaking into the microphone. 1 Press [VOX/SEL] to enable or disable the VOX function. The "VOX" LED lights green while VOX is active. Note: ◆◆To transmit with VOX enabled, the audio from the microphone is transmitted regardless of the audio source configuration. ◆◆ If the transceiver cannot automatically receive with VOX enabled, reduce the VOX gain, increase the distance between the microphone and speaker or reduce the receive audio volume. Use headphones if the transceiver still cannot automatically receive. SELECTING OR DISABLING THE AUDIO SOURCE FOR DATA VOX In SSB, FM, or AM mode, the transceiver can automatically transmit by entering the minimum level or greater of the data transmit audio from the ANI terminal (ACC 2 connector on the rear panel) or from (USB-A or USB-B), or the OPTICAL IN connector. This function is called Data VOX. Follow the procedure below to change the audio source to be used for Data VOX. 1 Press and hold [DATA/SEL] to open the Modulation Source screen. 2 Press [D.VOX] (F7) to select the audio source for Data VOX. • Each key press cycles the audio source for Data VOX as follows: Off (no audio source for Data VOX) > ACC 2 > USB Audio > Optical > Off. • The default is "Off". • "Off", "ACC 2", "USB" or "OPT." appears on the right side of "D.VOX" on the upper side of the main screen. 3 Press [ESC], or press and hold [DATA/SEL] to exit. 9-2 Index Contents
-
 1
1 -
2
-
3
-
4
-
5
-
6
-
7
-
8
-
9
-
10
-
11
-
12
-
13
-
14
-
15
-
16
-
17
-
18
-
19
-
20
-
21
-
22
-
23
-
24
-
25
-
26
-
27
-
28
-
29
-
30
-
31
-
32
-
33
-
34
-
35
-
36
-
37
-
38
-
39
-
40
-
41
-
42
-
43
-
44
-
45
-
46
-
47
-
48
-
49
-
50
-
51
-
52
-
53
-
54
-
55
-
56
-
57
-
58
-
59
-
60
-
61
-
62
-
63
-
64
-
65
-
66
-
67
-
68
-
69
-
70
-
71
-
72
-
73
-
74
-
75
-
76
-
77
-
78
-
79
-
80
-
81
-
82
-
83
-
84
-
85
-
86
-
87
-
88
-
89
-
90
-
91
-
92
-
93
-
94
-
95
-
96
-
97
-
98
-
99
-
100
-
101
-
102
-
103
-
104
-
105
-
106
-
107
-
108
-
109
-
110
-
111
-
112
-
113
-
114
-
115
-
116
-
117
-
118
-
119
-
120
-
121
-
122
-
123
-
124
-
125
-
126
-
127
-
128
-
129
-
130
-
131
-
132
-
133
-
134
-
135
-
136
-
137
-
138
-
139
-
140
-
141
-
142
-
143
-
144
-
145
-
146
-
147
-
148
-
149
-
150
-
151
-
152
-
153
-
154
-
155
-
156
-
157
-
158
-
159
-
160
-
161
-
162
-
163
-
164
-
165
-
166
-
167
-
168
-
169
-
170
-
 171
171 -
 172
172 -
 173
173 -
 174
174 -
 175
175 -
 176
176 -
 177
177 -
 178
178 -
 179
179 -
 180
180 -
 181
181 -
182
-
183
-
184
-
185
-
186
-
187
-
188
-
189
-
190
-
191
-
192
-
193
-
194
-
195
-
196
-
197
-
198
-
199
-
200
-
201
-
202
-
203
-
204
-
205
-
206
-
207
-
208
-
209
-
210
-
211
-
212
-
213
-
214
-
215
-
216
-
217
-
218
-
219
-
220
-
221
-
222
-
223
-
224
-
225
-
226
-
227
-
228
-
229
-
230
-
231
-
232
-
233
-
234
-
235
-
236
-
237
-
238
-
239
-
240
-
241
-
242
-
243
-
244
-
245
-
246
-
247
-
248
-
249
-
250
-
251
-
252
-
253
-
254
-
255
-
256
-
257
-
258
-
259
-
260
-
261
-
262
-
263
-
264
-
265
-
266
-
267
-
268
-
269
-
270
-
271
-
272
-
273
-
274
-
275
-
276
-
277
-
278
-
279
-
280
-
281
-
282
-
283
-
284
-
285
-
286
-
287
-
288
-
289
-
290
-
291
-
292
-
293
-
294
-
295
-
296
-
297
-
298
-
299
-
300
 |
 |