Kenwood VRS-7200 Instruction Manual - Page 15
Connecting the antennas, Preparing the remote control
 |
View all Kenwood VRS-7200 manuals
Add to My Manuals
Save this manual to your list of manuals |
Page 15 highlights
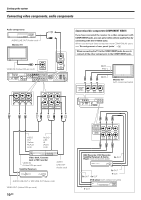
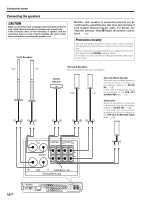
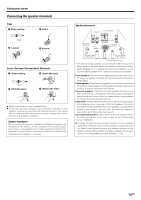
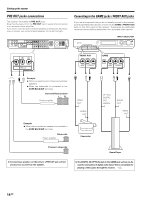
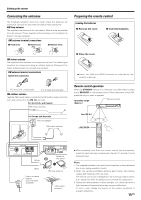
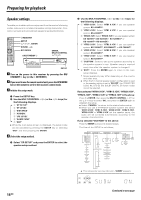
Setting up the system Connecting the antennas The broadcast reception cannot be made unless the antennas are connected. Connect the antennas correctly as instructed below. AM loop antenna The supplied loop antenna is for use indoors. Place it as far as possible from the receiver, TV set, speaker cords and power cord, and adjust the direction for best reception. AM antenna terminal connections 1 Push lever. 2 Insert cord. 3 Release lever. Preparing the remote control Loading the batteries 1 Remove the cover. 2 Insert the batteries. FM indoor antenna The supplied indoor antenna is for temporary use only. For stable signal reception we recommend using an outdoor antenna. Disconnect the indoor antenna when you connect one outdoors. FM antenna terminal connections Insert the connector 3 Close the cover. ¶ Insert two AAA-size (R03) batteries as indicated by the polarity markings. (For the U.S.A. and Canada) (For Europe and Australia) FM outdoor antenna Lead the 75Ω coaxial cable connected to the FM outdoor antenna into the room and connect it to the FM 75Ω terminal. For the U.S.A. and Canada FM indoor antenna For Europe and Australia Antenna adaptor FM indoor antenna Remote control operation When the STANDBY indicator is lit, the power turns ON when you press the RECEIVER on the remote control. When the power comes ON, press the key you want to operate. Operating range (Approx.) Remote sensor 6m (20 ft.) RECEIVER White Black Use an antenna adaptor (Commercially available) Attach to the stand AM loop antenna FM outdoor antenna ¶ When pressing more than one remote control key successively, press the keys securely by leaving an interval of 1 second or more between keys. Notes 1. The supplied batteries may have shorter lives than ordinary batteries due to use during operation checks. 2. When the remote-controllable distance gets shorter than before, replace both batteries with new ones. The remote control unit is designed so that the setup codes stored in it are saved even after the batteries are removed for replacement. 3. Placing the remote sensor in direct sunlight, or in direct light from a high frequency fluorescent lamp may cause a malfunction. In such a case, change the location of the system installation to prevent malfunction. 15 EN
-
 1
1 -
2
-
3
-
4
-
5
-
6
-
7
-
8
-
9
-
 10
10 -
 11
11 -
 12
12 -
 13
13 -
 14
14 -
 15
15 -
 16
16 -
 17
17 -
 18
18 -
 19
19 -
 20
20 -
21
-
22
-
23
-
24
-
25
-
26
-
27
-
28
-
29
-
30
-
31
-
32
-
33
-
34
-
35
-
36
-
37
-
38
-
39
-
40
-
41
-
42
-
43
-
44
-
45
-
46
-
47
-
48
-
49
-
50
-
51
-
52
-
53
-
54
-
55
-
56
-
57
-
58
-
59
-
60
 |
 |
