KitchenAid KBPU182VSS Use & Care Guide - Page 5
Installation Requirements - dimensions
 |
UPC - 883049184746
View all KitchenAid KBPU182VSS manuals
Add to My Manuals
Save this manual to your list of manuals |
Page 5 highlights
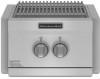
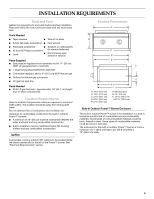
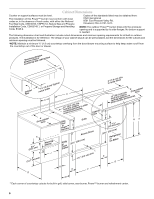
INSTALLATION REQUIREMENTS Tools and Parts Gather the required tools and parts before starting installation. Read and follow the instructions provided with any tools listed here. Tools Needed ■ Tape measure ■ Wrench or pliers ■ Small, flat-blade screwdriver ■ Pipe wrench ■ Flat-blade screwdriver ■ Scissors or cutting pliers ■ #2 and #3 Phillips screwdriver (to remove tiedowns) ■ Level ■ Noncorrosive leakdetection solution Parts Supplied ■ Gas pressure regulator/hose assembly set for 11" (28 cm) WCP LP gas (attached to manifold) ■ 1 single-prong plug transformer assembly ■ Convertible regulator set for 4" (10.2 cm) WCP Natural gas ■ Orifices for Natural gas conversion ■ LP gas fuel tank tray Parts Needed ■ 20 lb LP gas fuel tank - approximately 18" (45.7 cm) height and 12" (30.5 cm) diameter Location Requirements Select a location that provides minimum exposure to wind and traffic paths. The location should be away from strong draft areas. Do not obstruct flow of combustion and ventilation air. Clearance to combustible construction for built-in outdoor Power™ burners: ■ A minimum of 24" (58 cm) must be maintained between the sides and back and any combustible construction. ■ A zero clearance may be maintained below the cooking surface and any combustible construction. Ignition A grounded, 3-prong outdoor GFI outlet is to be located inside the island cabinet and to the left of the Power™ burner. See "Electrical Requirements" section. Product Dimensions A B C D E F G A. 18⁷⁄₈" (47.9 cm) B. 10⁵⁄₈" (27.0 cm) C. 22⁷⁄₈" (58.1 cm) D. 23⁵⁄₈" (60.0 cm) E. 22¼" (56.5 cm) H I F. Manifold pipe G. 3¼" (8.3 cm) H. 19 50.0 cm) I. 20 53.2 cm) Built-In Outdoor Power™ Burner Enclosure This built-in outdoor Power™ burner is for installation in a built-in enclosure constructed of combustible and noncombustible materials. Some types of noncombustible materials could be brick, firewall or steel. Some types of combustible materials could be wood or laminate. The enclosure for the built-in outdoor Power™ burner is to be a minimum of 11" (28.0 cm) high x 20" (50.8 cm) deep x 19" (48.6 cm) wide. 5
-
 1
1 -
 2
2 -
 3
3 -
 4
4 -
 5
5 -
 6
6 -
 7
7 -
 8
8 -
 9
9 -
 10
10 -
 11
11 -
12
-
13
-
14
-
15
-
16
-
17
-
18
-
19
-
20
-
21
-
22
-
23
-
24
-
25
-
26
-
27
-
28
-
29
-
30
-
31
-
32
-
33
-
34
-
35
-
36
-
37
-
38
-
39
-
40
-
41
-
42
-
43
-
44
-
45
-
46
-
47
-
48
 |
 |
