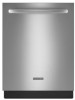
KitchenAid KUDE60FXSS Installation Guide - Page 9
Flush water supply line, Route water supply line, Add 90, elbow fitting to the, water supply line,
 |
UPC - 883049195957
View all KitchenAid KUDE60FXSS manuals
Add to My Manuals
Save this manual to your list of manuals |
Page 9 highlights
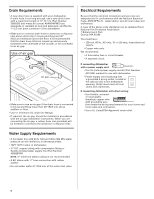
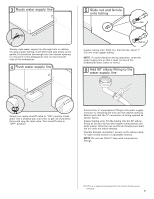
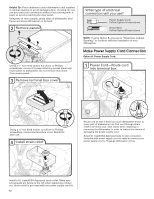
3 Route water supply line 5 Slide nut and ferrule onto tubing Nut Slowly route water supply line through hole in cabinet. (If using copper tubing, it will bend and kink easily, so be gentle.) It should be far enough into the cabinet opening to connect it to the dishwasher inlet on the front left side of the dishwasher. 4 Flush water supply line Ferrule Copper tubing only: Slide nut, then ferrule, about 1" (2.5 cm) onto copper tubing. NOTE: To avoid vibration during operation, route the water supply line so that it does not touch the dishwasher base, frame or motor. 6 Add 90° elbow fitting to the water supply line Slowly turn water shutoff valve to "ON" position. Flush water into a shallow pan until clear to get rid of particles that could clog the inlet valve. Turn shutoff valve to "OFF" position. Connect the ³⁄₈" compression fitting to the water supply line prior to installing the unit into the cabinet opening. Attach such that the ³⁄₄" connection is facing upward as shown above. Copper tubing only: Put the tubing into the 90° elbow fitting as far as it will go (the copper tubing bends and kinks easily). Slide the nut and ferrule forward and start the nut onto the elbow threads. Flexible braided connection: Secure nut to elbow using ⁵⁄₈" open ended wrench or adjustable wrench. NOTE: Do not use Teflon®† tape with compression fittings. †® Teflon is a registered trademark of E.I. Du Pont de Nemours and Company. 9
-
 1
1 -
2
-
3
-
 4
4 -
 5
5 -
 6
6 -
 7
7 -
 8
8 -
 9
9 -
 10
10 -
 11
11 -
 12
12 -
 13
13 -
 14
14 -
15
-
16
-
17
-
18
-
19
-
20
-
21
-
22
-
23
-
24
-
25
-
26
-
27
-
28
-
29
-
30
-
31
-
32
-
33
-
34
-
35
-
36
-
37
-
38
-
39
-
40
-
41
-
42
-
43
-
44
-
45
-
46
-
47
-
48
-
49
-
50
-
51
-
52
 |
 |
