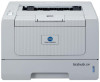
Konica Minolta bizhub 20P bizhub 20P Quick Guide
Konica Minolta bizhub 20P Manual
 |
View all Konica Minolta bizhub 20P manuals
Add to My Manuals
Save this manual to your list of manuals |
Konica Minolta bizhub 20P manual content summary:
- Konica Minolta bizhub 20P | bizhub 20P Quick Guide - Page 1
2 (Support Flap 2) h Face-down Output Tray i Multi-purpose Tray (MP Tray) CD/DVD-ROM (including User's Guide and Network User's Guide) Quick Guide Safety Information Drum Unit and Toner Guide Cartridge Assembly AC Power Cord WARNING Plastic bags are used in the packaging of your printer. To - Konica Minolta bizhub 20P | bizhub 20P Quick Guide - Page 2
you must follow or avoid to prevent possible damage to the printer or other objects. Electrical Hazard icons alert you to a possible electrical shock. Note User's Guide Network User's Guide Hot Surface icons warn you not to touch machine parts that are hot. Notes tell you how you should respond - Konica Minolta bizhub 20P | bizhub 20P Quick Guide - Page 3
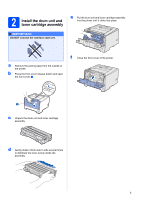
it clicks into place. a Remove the packing tape from the outside of the printer. b Press the front cover release button and open the front cover a. f Close the front cover of the printer. 11 c Unpack the drum unit and toner cartridge assembly. d Gently shake it from side to side several times to - Konica Minolta bizhub 20P | bizhub 20P Quick Guide - Page 4
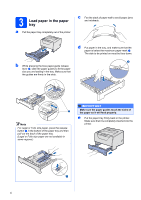
printer. c Fan the stack of paper well to avoid paper jams and misfeeds. b While pressing the blue paper-guide release lever a, slide the paper guides to guides are firmly in the slots. d Put paper in the tray, and make sure that the paper is below the maximum paper mark a. The side to be printed - Konica Minolta bizhub 20P | bizhub 20P Quick Guide - Page 5
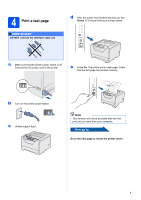
. The printer prints a test page. Check that the test page has printed correctly. b Turn on the printer power switch. c Unfold support flap1. Note This function will not be available after the first print job you send from your computer. Now go to Go to the next page to install the printer driver - Konica Minolta bizhub 20P | bizhub 20P Quick Guide - Page 6
6 - Konica Minolta bizhub 20P | bizhub 20P Quick Guide - Page 7
Windows® Macintosh USB Windows® Parallel 5 Choose your connection type For USB interface cable Windows®, go to page 8 Macintosh, go to page 11 For Parallel interface cable Windows®, go to page 12 For Wired Network Windows®, go to page 14 Macintosh, go to page 19 7 Windows® Macintosh Wired Network - Konica Minolta bizhub 20P | bizhub 20P Quick Guide - Page 8
USB For USB Interface Cable Users 6 Install the printer driver and connect the printer to your computer IMPORTANT DO NOT connect the USB interface cable yet. Windows® d Put the supplied CD/DVD-ROM into your CD/DVD-ROM drive. The opening screen will appear automatically. Choose your language. Note - Konica Minolta bizhub 20P | bizhub 20P Quick Guide - Page 9
the computer. Click Next. Note • For Windows Vista®/Windows® 7, when the User Account Control screen appears, click Continue (Yes). • If you want to install the PS driver (BR-Script Driver), choose Custom setup and then follow the on-screen instructions. When the Select Components screen appears - Konica Minolta bizhub 20P | bizhub 20P Quick Guide - Page 10
USB j Click Finish. Note • If you do not want to set your printer as Default printer, uncheck Set as Default Printer. • If you want to disable the Status Monitor, uncheck Enable Status Monitor. Windows® Finish The installation is now complete. 10 - Konica Minolta bizhub 20P | bizhub 20P Quick Guide - Page 11
Interface Cable Users 6 Connect the printer to your Macintosh and install the driver a Remove the label covering the USB interface connector. e Double-click your printer name icon on your desktop. Double-click the Start Here icon. Follow the on-screen instructions. f The KONICA MINOLTA software - Konica Minolta bizhub 20P | bizhub 20P Quick Guide - Page 12
Parallel Windows® For Parallel Interface Cable Users 6 Install the driver and connect the printer to your computer IMPORTANT DO NOT connect the parallel interface cable yet. d Put the supplied CD/DVD-ROM into your CD/DVD-ROM drive. The - Konica Minolta bizhub 20P | bizhub 20P Quick Guide - Page 13
install the PS driver (BR-Script Driver), choose Custom setup and then follow the on-screen instructions. When the Select Components screen appears, check PS (PostScript Emulation) Driver, and then continue following the on-screen instructions. g When the License Agreement window appears, click Yes - Konica Minolta bizhub 20P | bizhub 20P Quick Guide - Page 14
. Once you are sure that you can print, configure the software settings following the instructions. Connect the printer to your network and install the driver a Connect the network interface cable to the LAN connector marked with a symbol and then connect it to a free port on your hub. Note If the - Konica Minolta bizhub 20P | bizhub 20P Quick Guide - Page 15
Driver, and then continue following the on-screen instructions. g When the License Agreement window appears, click Yes if you agree to the License Agreement. Note You can find your printer's IP Address and the node name by printing out the Printer Settings Page. See Print the Printer Settings Page - Konica Minolta bizhub 20P | bizhub 20P Quick Guide - Page 16
Network k Click Finish. Note • If you do not want to set your printer as Default printer, uncheck Set as Default Printer. • If you want to disable the Status Monitor, uncheck Enable Status Monitor. • If you disabled your Personal Firewall software (e.g. Windows® Firewall), turn it back on. Windows - Konica Minolta bizhub 20P | bizhub 20P Quick Guide - Page 17
• If you want to install the PS driver (BR-Script Driver), choose Custom setup and then follow the on-screen instructions. When the Select Components screen appears, check PS (PostScript Emulation) Driver, and then continue following the on-screen instructions. Windows® Macintosh Wired Network 17 - Konica Minolta bizhub 20P | bizhub 20P Quick Guide - Page 18
Wired Network Windows® e When the License Agreement window appears, click Yes if you agree to the License Agreement. h Click Finish. Note • If you do not want to set your printer as Default printer, uncheck Set as Default Printer. • If you want to disable the Status Monitor, uncheck Enable Status - Konica Minolta bizhub 20P | bizhub 20P Quick Guide - Page 19
by printing out the Printer Settings Page. See Print the Printer Settings Page on page 22. g When this screen appears, click OK. d Double-click bizhub 20P icon on your desktop. Double-click the Start Here icon. Follow the on-screen instructions. Finish The installation is now complete. Windows - Konica Minolta bizhub 20P | bizhub 20P Quick Guide - Page 20
them. Once you are sure that you can print, configure the software settings following the instructions. Install the BRAdmin Light configuration utility Set your IP Address, Subnet Mask and Gateway using BRAdmin Light Note The default password for the print server is 'access'. You can use BRAdmin - Konica Minolta bizhub 20P | bizhub 20P Quick Guide - Page 21
on your network, view the status and configure basic network settings, such as IP Address from a computer running Mac OS X 10.3.9 or greater. The BRAdmin Light software will be installed automatically when you install the printer driver. If you have already installed the printer driver, you don - Konica Minolta bizhub 20P | bizhub 20P Quick Guide - Page 22
, you will need to know the IP Address of the print server. The IP Address of the print server is listed on the Printer Settings Page. Reset the network settings to the factory default To reset all network settings of the print server to its factory default, follow the steps below. a Turn off the - Konica Minolta bizhub 20P | bizhub 20P Quick Guide - Page 23
to Chapter 6 of the User's Guide for how to clean the printer. DO NOT use a vacuum cleaner to clean up scattered toner. Doing this might cause the toner dust to ignite inside the vacuum cleaner, potentially starting a fire. Carefully clean the toner dust with a dry, lint-free cloth and dispose of it - Konica Minolta bizhub 20P | bizhub 20P Quick Guide - Page 24
storm. After you have just used the printer, some internal parts of the printer will be extremely hot. When you open the front or back output tray) of the printer, DO NOT touch the shaded parts shown in the illustration. Inside the printer (Front View) Inside the printer (Back View) IMPORTANT - Konica Minolta bizhub 20P | bizhub 20P Quick Guide - Page 25
-4000 declares, that the products Product name: Model number: Laser Printer bizhub 20P 20P comply with Part 15 of the FCC Rules. Operation is subject to the and, if not installed and used in accordance with the instructions, may cause harmful interference to radio communications. However, there - Konica Minolta bizhub 20P | bizhub 20P Quick Guide - Page 26
Unit should not be opened under any circumstances. Laser Safety This equipment is certified as a Class 1 laser product as defined in IEC 60825-1+A2: 2001 specifications under the U.S. Department of Health and Human Services (DHHS) Radiation Performance Standard according to the Radiation Control - Konica Minolta bizhub 20P | bizhub 20P Quick Guide - Page 27
marked with the above recycling symbol. It means that at the end of the life of the equipment you must dispose of it separately at an appropriate collection point through the normal household wiring. Extension cords used with this printer must be threepin plug type and correctly wired to provide - Konica Minolta bizhub 20P | bizhub 20P Quick Guide - Page 28
transit. We recommend that you save and use the original packaging. The printer should also be adequately insured with the carrier. CAUTION When shipping the printer, the DRUM UNIT and TONER CARTRIDGE assembly must be removed from the printer and put in a plastic bag. Failure to remove the unit and - Konica Minolta bizhub 20P | bizhub 20P Quick Guide - Page 29
LED indicates when errors occur in the back of the printer. b Toner LED The Toner LED indicates when the toner is low or requires replacement. c Drum LED The Drum LED indicates when the drum life will end soon, the drum is at the end of its life or the corona wire needs cleaning. d Paper LED The - Konica Minolta bizhub 20P | bizhub 20P Quick Guide - Page 30
Toner low 3 Replace toner Drum life will end soon 3 Replace drum Yellow Drum error Toner Drum Paper Yellow Yellow Yellow Yellow Yellow Status User's Guide Green Chapter6 Red Chapter6 Green Chapter6 Green Chapter6 Red Chapter4 Printer LED Front cover open Fuser cover Paper jam - Konica Minolta bizhub 20P | bizhub 20P Quick Guide - Page 31
indicated by the LED's on the control panel. For more information about the consumables for your printer, visit us at http://konicaminolta.com/ or contact your local reseller. For replacing the consumable items, see Chapter 6 of the User's Guide on the CD/DVD-ROM. . Toner cartridge Drum unit 31 - Konica Minolta bizhub 20P | bizhub 20P Quick Guide - Page 32
bizhub and PageScope are trademarks or registered trademarks of KONICA MINOLTA BUSINESS TECHNOLOGIES, INC. Microsoft, Windows, Windows this manual has a Software License Agreement specific to ensure that this guide is free of inaccuracies and be copied, in whole or part, nor transferred to any other - Konica Minolta bizhub 20P | bizhub 20P Quick Guide - Page 33
LU80430011
-
 1
1 -
 2
2 -
 3
3 -
 4
4 -
 5
5 -
 6
6 -
 7
7 -
8
-
9
-
10
-
11
-
12
-
13
-
14
-
15
-
16
-
17
-
18
-
19
-
20
-
21
-
22
-
23
-
24
-
25
-
26
-
27
-
28
-
29
-
30
-
31
-
32
-
33
 |
 |
1
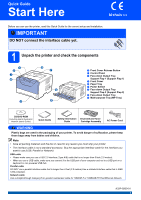
Start Here
Quick Guide
Before you can use the printer, read this Quick Guide for the correct setup and installation.
1
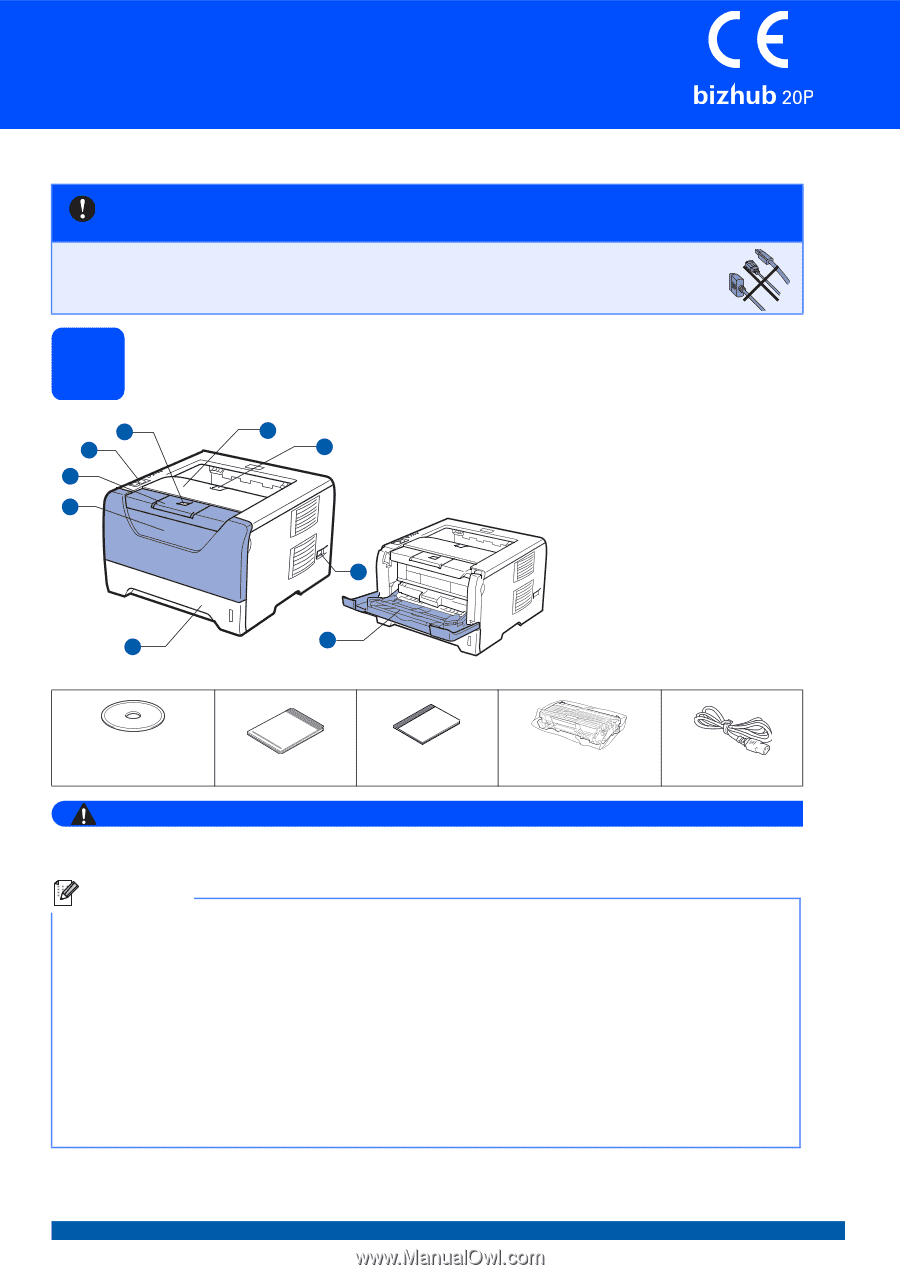
Unpack the printer and check the components
WARNING
Plastic bags are used in the packaging of your printer. To avoid danger of suffocation, please keep
these bags away from babies and children.
IMPORTANT
DO NOT connect the interface cable yet.
a
Front Cover Release Button
b
Control Panel
c
Face-down Output Tray
Support Flap 1 (Support Flap 1)
d
Front Cover
e
Paper Tray
f
Power Switch
g
Face-down Output Tray
Support Flap 2 (Support Flap 2)
h
Face-down Output Tray
i
Multi-purpose Tray (MP Tray)
CD/DVD-ROM
(including User's Guide and
Network User's Guide)
Quick Guide
Safety Information
Guide
Drum Unit and Toner
Cartridge Assembly
AC Power Cord
Note
•
Save all packing materials and the box in case for any reason you must ship your printer.
•
The interface cable is not a standard accessory. Buy the appropriate interface cable for the interface you
want to use (USB, Parallel or Network).
USB cable
•
Please make sure you use a USB 2.0 interface (Type A/B) cable that is no longer than 6 feet (2.0 meters).
•
When you use a USB cable, make sure you connect it to the USB port of your computer and not to a USB port on a
keyboard or non-powered USB hub.
Parallel cable
DO NOT use a parallel interface cable that is longer than 6 feet (2.0 meters).Use a shielded interface cable that is IEEE
1284-compliant.
Network cable
Use a straight-through Category5 (or greater) twisted-pair cable for 10BASE-T or 100BASE-TX Fast Ethernet Network.
1
1
2
3
5
8
6
7
9
4
A32P-9200-01