Konica Minolta bizhub 20P bizhub 20P Quick Guide - Page 1
Konica Minolta bizhub 20P Manual
 |
View all Konica Minolta bizhub 20P manuals
Add to My Manuals
Save this manual to your list of manuals |
Page 1 highlights
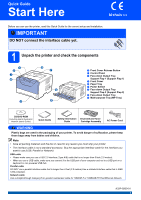
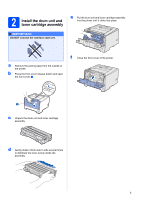
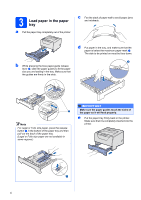
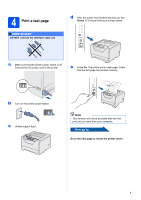
Quick Guide Start Here Before you can use the printer, read this Quick Guide for the correct setup and installation. IMPORTANT DO NOT connect the interface cable yet. 1 Unpack the printer and check the components 11 2 3 4 5 8 7 6 9 a Front Cover Release Button b Control Panel c Face-down Output Tray Support Flap 1 (Support Flap 1) d Front Cover e Paper Tray f Power Switch g Face-down Output Tray Support Flap 2 (Support Flap 2) h Face-down Output Tray i Multi-purpose Tray (MP Tray) CD/DVD-ROM (including User's Guide and Network User's Guide) Quick Guide Safety Information Drum Unit and Toner Guide Cartridge Assembly AC Power Cord WARNING Plastic bags are used in the packaging of your printer. To avoid danger of suffocation, please keep these bags away from babies and children. Note • Save all packing materials and the box in case for any reason you must ship your printer. • The interface cable is not a standard accessory. Buy the appropriate interface cable for the interface you want to use (USB, Parallel or Network). USB cable • Please make sure you use a USB 2.0 interface (Type A/B) cable that is no longer than 6 feet (2.0 meters). • When you use a USB cable, make sure you connect it to the USB port of your computer and not to a USB port on a keyboard or non-powered USB hub. Parallel cable DO NOT use a parallel interface cable that is longer than 6 feet (2.0 meters).Use a shielded interface cable that is IEEE 1284-compliant. Network cable Use a straight-through Category5 (or greater) twisted-pair cable for 10BASE-T or 100BASE-TX Fast Ethernet Network. A32P-9200-01 1
-
 1
1 -
 2
2 -
 3
3 -
 4
4 -
 5
5 -
 6
6 -
 7
7 -
8
-
9
-
10
-
11
-
12
-
13
-
14
-
15
-
16
-
17
-
18
-
19
-
20
-
21
-
22
-
23
-
24
-
25
-
26
-
27
-
28
-
29
-
30
-
31
-
32
-
33
 |
 |