Konica Minolta bizhub 20P bizhub 20P Network User Guide - Page 28
Internet printing for Windows®, Overview, IPP printing for Windows® 2000/XP, Windows Vista®
 |
View all Konica Minolta bizhub 20P manuals
Add to My Manuals
Save this manual to your list of manuals |
Page 28 highlights
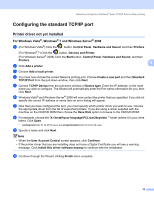
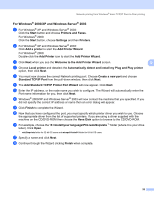
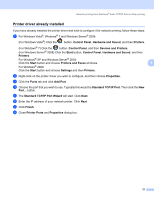
6 Internet printing for Windows® Internet printing for Windows®6 6 Overview 6 Windows® 2000/XP, Windows Vista®, Windows® 7 and Windows Server® 2003/2008 users can print using TCP/IP using the standard Network Printing IPP protocol software built into Windows® 2000/XP, Windows Vista®, Windows® 7 and Windows Server® 2003/2008 installation. Note • You must configure the IP address on your printer before you proceed with this chapter. If you need to configure the IP address, see Chapter 2 first. • Verify the host computer and machine are either on the same subnet, or that the router is properly configured to pass data between the two devices. 6 • The default password for KONICA MINOLTA print servers is "access". • This print server also supports the IPPS printing, see Printing documents securely using IPPS on page 37. IPP printing for Windows® 2000/XP, Windows Vista®, Windows® 7 and Windows Server® 2003/2008 6 Use the following instructions if you wish to use the IPP printing capabilities of Windows® 2000/XP, Windows Vista®, Windows® 7 and Windows Server® 2003/2008. For Windows Vista®, Windows® 7 and Windows Server® 2008 6 a (For Windows Vista®) Click the button, Control Panel, Hardware and Sound, and then Printers. (For Windows® 7) Click the button, Control Panel, and then Devices and Printers. (For Windows Server® 2008) Click the Start button, Control Panel, Hardware and Sound, and then Printers. b Click Add a printer. c Choose Add a network, wireless or Bluetooth printer. d Click The printer that I want isn't listed. e Choose Select a shared printer by name and then enter the following in the URL field: http://printer's IP address:631/ipp (where "printer's IP address" is the printer's IP address or the node name.) Note If you have edited the hosts file on your computer or are using a Domain Name System (DNS), you can also enter the DNS name of the print server. As the print server supports TCP/IP and NetBIOS names, you can 22
-
 1
1 -
2
-
3
-
4
-
5
-
6
-
7
-
8
-
9
-
10
-
11
-
12
-
13
-
14
-
15
-
16
-
17
-
18
-
19
-
20
-
21
-
22
-
 23
23 -
 24
24 -
 25
25 -
 26
26 -
 27
27 -
 28
28 -
 29
29 -
 30
30 -
 31
31 -
 32
32 -
 33
33 -
34
-
35
-
36
-
37
-
38
-
39
-
40
-
41
-
42
-
43
-
44
-
45
-
46
-
47
-
48
-
49
-
50
-
51
-
52
-
53
-
54
-
55
-
56
-
57
-
58
-
59
-
60
-
61
-
62
-
63
-
64
-
65
-
66
-
67
-
68
-
69
-
70
-
71
-
72
-
73
-
74
-
75
-
76
-
77
-
78
-
79
-
80
-
81
 |
 |
