Konica Minolta bizhub 363 bizhub 423/363/283/223 Enlarge Display Operations Us - Page 26
Basic], Settings
 |
View all Konica Minolta bizhub 363 manuals
Add to My Manuals
Save this manual to your list of manuals |
Page 26 highlights
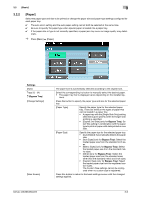
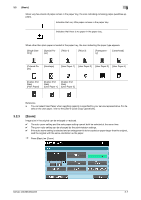
3.2 [Basic] Settings [Background Removal] [Main Screen] 3 [Bleed Removal] Select this setting to remove background prints of the original. Normally, select [Bleed Removal]. [Paper Discoloration Adj] If the original to be scanned has a colored background, adjust the background with this button to remove it before copying. [Background Re- [Light] moval Level] Each time this button is pressed, the background density is lightened by one level. [Standard] Press this button to select the third level from the right (default). [Dark] Each time this button is pressed, the background density is darkened by one level. [Auto] The background density is detected automatically and adjusted to the optimal level. You can specify [Auto] for [Background Removal Level] only when [Standard] is selected for the density. Even if [Auto] is specified for [Background Removal Level], [Auto] is canceled for [Background Removal Level] if the density is selected to other than [Standard]. Press this button to return to the basic settings screen with the changed settings applied. bizhub 423/363/283/223 3-5
-
 1
1 -
2
-
3
-
4
-
5
-
6
-
7
-
8
-
9
-
10
-
11
-
12
-
13
-
14
-
15
-
16
-
17
-
18
-
19
-
20
-
 21
21 -
 22
22 -
 23
23 -
 24
24 -
 25
25 -
 26
26 -
 27
27 -
 28
28 -
 29
29 -
 30
30 -
 31
31 -
32
-
33
-
34
-
35
-
36
-
37
-
38
-
39
-
40
-
41
-
42
-
43
-
44
-
45
-
46
-
47
-
48
-
49
-
50
-
51
-
52
-
53
-
54
-
55
-
56
-
57
-
58
-
59
-
60
 |
 |
