Konica Minolta bizhub 4752 bizhub 4752/4052 Additional Functions User Guide - Page 10
Uninstalling the Windows Printer Driver or Fax Driver, 1.4 macOS 10.13 Printer Driver
 |
View all Konica Minolta bizhub 4752 manuals
Add to My Manuals
Save this manual to your list of manuals |
Page 10 highlights
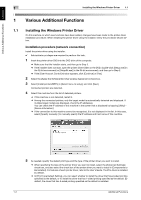
Various Additional Functions Chapter 1 1.3 Uninstalling the Windows Printer Driver or Fax Driver 1 1.3 Uninstalling the Windows Printer Driver or Fax Driver On this machine on which new functions have been added, changes have been made to the driver uninstallation procedure. When uninstalling the driver using the installer, follow the procedure shown below. 0 Administrator privileges are required to perform this task. 1 Insert the driver DVD into the DVD drive of the computer. % Make sure that the installer starts, and then go to Step 2. % If the installer does not start, open the printer driver folder on the DVD, double-click [Setup.exe] (in the 32-bit environment) or [Setup64.exe] (in the 64-bit environment), and then go to Step 2. 2 Select the [Agree the Software End User License Agreement.] check box. 3 Select [Uninstall Printer Driver] in [Select menu to setup], and click [Next]. 4 Select the driver you want to delete, then click [Uninstall]. % From then on, follow the instructions on the pages that follow. 5 If a dialog box prompting you to restart the computer appears, click [OK] to restart the computer. This completes the deletion process of the driver. 1.4 macOS 10.13 Printer Driver The macOS 10.13 printer driver installation method, print functions, and print procedure are the same as for macOS 10.12. Refer to the description of macOS 10.12 in the User's Guide. 1.5 Changing Defaults Some default settings have been changed in this machine and new functions have been added. The table below shows the concrete default settings that have been changed. Settings [Network] - [SMB Setting] [Client Setting] - [SMB Authentication Setting] in Web Connection administrator mode [Utility] - [Administrator Settings] - [Network Settings] [SMB Settings] - [Client Settings] - [SMB Authentication Setting] on Control Panel [Security] - [PKI Settings] [SSL Setting] - [SSL/TLS Version Setting] in Web Connection administrator mode [System Settings] - [Web Browser Setting] - [Detail Setting] - [Security Settings] - [Enable SSL Version] in Web Connection administrator mode Start the Web browser on the Control Panel, and select [Menu] - [Settings] - [Security Settings] - [Enable SSL Version] Description The default was changed to [NTML v1/v2] (however, when new functions are supported by updating firmware, the default is [NTML v1]). The default of [TLSv1.0] was changed to OFF (however, when new functions are supported by updating firmware, the default is ON). The default of [TLS1.0] was changed to [Disable] (however, when new functions are supported by updating firmware, the default is [Enable]). The default of [Minimum] in the security level was changed to [TLS1.1] (however, when new functions are supported by updating firmware, the default is [TLS1.0]). Additional Functions 1-7
-
 1
1 -
2
-
3
-
4
-
 5
5 -
 6
6 -
 7
7 -
 8
8 -
 9
9 -
 10
10 -
 11
11 -
 12
12 -
 13
13 -
 14
14 -
 15
15 -
16
 |
 |
