Konica Minolta bizhub 4752 bizhub 4752/4052 Additional Functions User Guide - Page 7
Installing the Fax Driver, Installation procedure (network connection
 |
View all Konica Minolta bizhub 4752 manuals
Add to My Manuals
Save this manual to your list of manuals |
Page 7 highlights
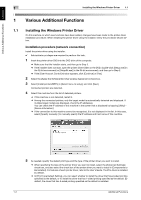
Various Additional Functions Chapter 1 1 1.2 Installing the Fax Driver 1.2 Installing the Fax Driver On this machine on which new functions have been added, changes have been made to the fax driver installation procedure. When installing the fax driver, follow the procedure shown below. Installation procedure (network connection) Install the fax driver on the PC by using the installer. 0 Administrator privileges are required to perform this task. 1 Insert the fax driver DVD into the DVD drive of the PC. % Make sure that the installer starts, and then go to Step 2. % If the installer does not start, open the printer driver folder on the DVD, double-click [Setup.exe] (in the 32-bit environment) or [Setup64.exe] (in the 64-bit environment), and then go to Step 2. % If the [User Account Control] window appears, click [Continue] or [Yes]. 2 Select the [Agree the Software End User License Agreement.] check box. 3 Select [Install printers/MFPs] in [Select menu to setup], and click [Next]. Connected printers are detected. 4 Select this machine from the list of detected printers. % If this machine is not detected, restart it. % Among the connected printers, only the target model is automatically detected and displayed. If multiple target models are displayed, check the IP addresses. You can check the IP address of this machine in the screen that is displayed by tapping [Utility] [Device Information]. % If the connection to this machine cannot be recognized, it is not displayed in the list. In this case, select [Specify manually.] to manually specify the IP address and host name of this machine. 1-4 Additional Functions
-
 1
1 -
 2
2 -
 3
3 -
 4
4 -
 5
5 -
 6
6 -
 7
7 -
 8
8 -
 9
9 -
 10
10 -
 11
11 -
 12
12 -
13
-
14
-
15
-
16
 |
 |
