Kyocera KM-3530 Printing System (N) Operation Guide (Setup Edition)
Kyocera KM-3530 Manual
 |
View all Kyocera KM-3530 manuals
Add to My Manuals
Save this manual to your list of manuals |
Kyocera KM-3530 manual content summary:
- Kyocera KM-3530 | Printing System (N) Operation Guide (Setup Edition) - Page 1
KM-2530/3530/4030 Operation Guide ALWAYS read this Operation Guide thoroughly before use. After reading, maintain it in good condition and keep it together with the Operation Guide for your copier. - Kyocera KM-3530 | Printing System (N) Operation Guide (Setup Edition) - Page 2
- Kyocera KM-3530 | Printing System (N) Operation Guide (Setup Edition) - Page 3
International Business Machines Corporation. • PowerPC is a trademark of International Business Machines Corporation of not be used in this Operation Guide. All rights reserved. No part of this material may be Legal Restriction On Copying • It may be prohibited to copy copyrighted material without - Kyocera KM-3530 | Printing System (N) Operation Guide (Setup Edition) - Page 4
SOFTWARE PROGRAMS ("PROGRAMS") WHICH BELONG TO INTERNATIONAL BUSINESS MACHINES CORPORATION ("IBM"). THIS DOCUMENT DEFINES THE TERMS AND CONDITIONS Programs" means the original and all whole or partial copies of it, including modified copies or portions merged into other programs. IBM retains title - Kyocera KM-3530 | Printing System (N) Operation Guide (Setup Edition) - Page 5
About this Operation Guide This Operation Guide is meant to be read when the Printer Board is installed in your copier and the copier is to be used as a local printer or network printer. It contains explanations on set-up procedures for using the copier as a printer. As the required - Kyocera KM-3530 | Printing System (N) Operation Guide (Setup Edition) - Page 6
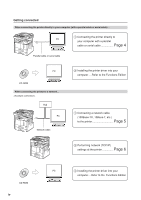
your computer .... Refer to the Functions Edition 1 Connecting a network cable (100Base-TX, 10Base-T, etc.) to the printer Page 5 2 Performing network (TCP/IP) settings at the printer Page 6 CD-ROM iv PC 3 Installing the printer driver into your computer ... Refer to the Functions Edition - Kyocera KM-3530 | Printing System (N) Operation Guide (Setup Edition) - Page 7
2-1 Connecting the printer cable ...4 2-2 Connecting the network cable ...5 2-3 Installing the software ...5 2-4 Network (TCP/IP) settings ...6 3. Troubleshooting ...8 3-1 Canceling printing ...8 3-2 When an error message appears...9 3-3 Basic troubleshooting chart ...13 4. Specifications ...14 1 - Kyocera KM-3530 | Printing System (N) Operation Guide (Setup Edition) - Page 8
CD-ROM x 2 • This Operation Guide • Quick Reference Guide (for Networks) 1-2 Required items • When connecting the printer directly to your computer: Parallel cable (IEEE1284 compliant, 1.5 m or shorter) or serial cable • When connecting the printer to a network: Ethernet cable (100Base-TX or 10Base - Kyocera KM-3530 | Printing System (N) Operation Guide (Setup Edition) - Page 9
error has occurred. Flashes amber when an error that does not interrupt printing has occurred. 3 Printer Priority key (indicator) Press during print out of copies or of a fax the printer mode 6 Printer Menu key Press to set printer defaults. 7 Cancel key Press to stop printing or to clear an error - Kyocera KM-3530 | Printing System (N) Operation Guide (Setup Edition) - Page 10
computer, use either a parallel cable or serial cable. CAUTION: ALWAYS turn the main switch to the printer OFF (O) BEFORE connecting the printer cable. 1 Turn the main switch located on the right side of the printer OFF (O) and then turn the power off to your computer as well. 3 Connect the other - Kyocera KM-3530 | Printing System (N) Operation Guide (Setup Edition) - Page 11
cable To connect the printer to a network, use an Ethernet cable (100BaseTX or 10Base-T). 1 Turn the main switch located on the right side of the printer OFF (O). 2-3 Installing the software Perform the following procedure to install into your computer the printer driver and other software that - Kyocera KM-3530 | Printing System (N) Operation Guide (Setup Edition) - Page 12
be necessary because DHCP server configuration is already enabled as the factory default setting. * To cancel the setting midway through it, press the Stop/Clear key. 1 Press the Printer key. The printer will switch to the printer mode. 5 Use the "L" and "M" cursor keys to select "TCP/IP" and then - Kyocera KM-3530 | Printing System (N) Operation Guide (Setup Edition) - Page 13
in the same way you entered the IP address in steps 8 to 10. 15 When you are finished making all of the network settings, touch the "Close" key. 11 Use the "L" and "M" cursor keys to select "Subnet Mask steps 8 to 10. 17 Touch the "Close" key. The printer will switch back to the printer mode. 7 - Kyocera KM-3530 | Printing System (N) Operation Guide (Setup Edition) - Page 14
3. Troubleshooting 3-1 Canceling printing Perform the following procedure when you want to stop printing or you want to clear data. IMPORTANT! • By performing this operation you will be canceling ALL print jobs that are currently waiting in the printer's memory to be printed. 1 Touch the "Cancel" - Kyocera KM-3530 | Printing System (N) Operation Guide (Setup Edition) - Page 15
. The drawer has run out of paper. Add paper. PLACE PAPER IN PAPER DRAWER. Add staples. Call service. Department code mismatch Exceeded print quantity limit. Exceeded pre-registered printing quantity. Error in printer mode RAM Disk error Press GO The finisher (option) has run out of staples. Refer - Kyocera KM-3530 | Printing System (N) Operation Guide (Setup Edition) - Page 16
Troubleshooting Display message Memory card error Press GO Hard disk error Press GO KPDL error Press GO Memory Card error Insert again Procedure Code:## Check the error code displayed in place of ## and refer to the following. 01: Format error. Reformat the memory card. 02: Memory card load error - Kyocera KM-3530 | Printing System (N) Operation Guide (Setup Edition) - Page 17
3. Troubleshooting Procedure The Memory Card (CompactFlash) could not be detected during an operation in which the printer was reading Code:10 The optional interface board is loaded in the wrong slot. Turn power OFF and load the board in the correct slot. File error. Touch the "GO" key. The printer - Kyocera KM-3530 | Printing System (N) Operation Guide (Setup Edition) - Page 18
3. Troubleshooting Display message Option ROM error Press GO Format error Hard Disk Check chad box Procedure An error occurred when reading the optional ROM. Press the Printer key to switch to the printer mode and then touch the "GO" key to clear the error. Initialize the hard disk. Either the - Kyocera KM-3530 | Printing System (N) Operation Guide (Setup Edition) - Page 19
machine as a printer, refer to the table below to perform minor adjustments. If trouble persists, contact your service representative or an authorized service center. * For information in regard to general mechanical trouble with the machine, refer to the Operation Guide for your copier. Problem - Kyocera KM-3530 | Printing System (N) Operation Guide (Setup Edition) - Page 20
4. Specifications CPU PowerPC 750 (350 MHz) Printing Speed KM-2530: 25 pages/min (A4 [8 1/2" x 11"]) KM-3530: 35 pages/min (A4 [8 1/2" x 11"]) KM-4030: 40 RS-232C serial interface x 1 Network interface x 1 Installed Fonts PCL: 80 KPDL: 136 * Specifications are subject to change without notice. - Kyocera KM-3530 | Printing System (N) Operation Guide (Setup Edition) - Page 21
KM-2530/3530/4030 Guide de fonctionnement TOUJOURS lire entièrement ce Guide de fonctionnement avant d'utiliser l'appareil. Après l'avoir lu, conservez ce guide dans de bonnes conditions avec le Guide de fonctionnement de votre copieur. - Kyocera KM-3530 | Printing System (N) Operation Guide (Setup Edition) - Page 22
système quelconque de stockage et de rappel des informations, sans l'autorisation écrite de l'éditeur. Limitations légales relatives à la copie • Il peut être interdit de copier des documents protégés par des droits d'auteur sans l'autorisation préalable du propriétaire des droits d'auteur. • Il est - Kyocera KM-3530 | Printing System (N) Operation Guide (Setup Edition) - Page 23
Les connexions Pour raccorder directement l'imprimante à votre ordinateur (avec un câble parallèle ou un câble sériel)... 1 Raccordez directement l'imprimante à PC votre ordinateur avec un câble parallèle ou un câble sériel Page 4 Câble parallèle ou un câble sériel PC CD-ROM Pour raccorder l' - Kyocera KM-3530 | Printing System (N) Operation Guide (Setup Edition) - Page 24
Table des matières 1. Préparatifs ...2 1-1 Accessoires ...2 1-2 Pièces nécessaires ...2 1-3 Nomenclature (corps principal) ...2 1-4 Nomenclature (panneau de commande 3 2. Installation ...4 2-1 Raccordement du câble d'imprimante ...4 2-2 Raccordement du câble de réseau ...5 2-3 Installation du - Kyocera KM-3530 | Printing System (N) Operation Guide (Setup Edition) - Page 25
1. Préparatifs 1-1 Accessoires • 2 CD-ROM • Ce Guide de fonctionnement • Guide de référence rapide (Pour les réseaux) 1-2 Pièces nécessaires • Lorsque vous raccordez directement l'imprimante à votre ordinateur: câble parallèle (conforme à IEEE1284, long de 1,5 m ou moins) - Kyocera KM-3530 | Printing System (N) Operation Guide (Setup Edition) - Page 26
1-4 Nomenclature (panneau de commande) Printer Priority 1. Préparatifs 1 Touche d'imprimante (témoin) Appuyez sur cette l'imprimante (témoin) Appuyez sur cette touche pendant l'impression de copies ou pendant la réception d'une télécopie afin d'interrompre l'opération en cours et de donner la - Kyocera KM-3530 | Printing System (N) Operation Guide (Setup Edition) - Page 27
2. Installation 2-1 Raccordement du câble d'imprimante Pour raccorder directement le câble d'imprimante à votre ordinateur, utilisez un câble parallèle ou un câble sériel. ATTENTION: TOUJOURS mettre l'interrupteur principal de l'imprimante sur arrêt (O) AVANT de raccorder le câble d'imprimante. 1 - Kyocera KM-3530 | Printing System (N) Operation Guide (Setup Edition) - Page 28
2-2 Raccordement du câble de réseau Pour raccorder l'imprimante à un réseau, utilisez un câble Ethernet (100Base-TX ou 10Base-T). 1 Mettez l'interrupteur principal situé sur le côté droit de l'imprimante sur arrêt (O). 2. Installation 2-3 Installation du logiciel Exécutez la procédure suivante pour - Kyocera KM-3530 | Printing System (N) Operation Guide (Setup Edition) - Page 29
2. Installation 2-4 Réglages de réseau (protocole TCP/IP) Pour utiliser l'imprimante comme imprimante de réseau, il est nécessaire de régler une adresse IP pour l'imprimante. Remarques • L'adresse IP devant être enregistrée ici est différente en fonction de l'environnement de votre réseau. - Kyocera KM-3530 | Printing System (N) Operation Guide (Setup Edition) - Page 30
7 Utilisez les touche de curseur "L" et "M" pour sélectionner "IP Address", puis effleurez la touche "Change (CHANGER)". (Pouces) 2. Installation 9 Entrez les 3 chiffres suivants et appuyez sur la touche dièse (#). • Pour changer une adresse entrée, appuyez sur la touche dièse (#) pour sélectionner - Kyocera KM-3530 | Printing System (N) Operation Guide (Setup Edition) - Page 31
2. Installation 11 Utilisez les touches de curseur "L" et "M" pour sélectionner "Subnet Mask" et effleurez la touche "Change (CHANGER)". (Pouces) 14 Entrez l'adresse de Gateway de la façon dont vous avez entré l'adresse IP dans les étapes 8 à 10. (Métrique) 15 Lorsque vous avez fini d'effectuer - Kyocera KM-3530 | Printing System (N) Operation Guide (Setup Edition) - Page 32
17 Effleurez la touche "Fermer". L'imprimante retourne au mode d'imprimante. (Pouces) (Métrique) 2. Installation 9 - Kyocera KM-3530 | Printing System (N) Operation Guide (Setup Edition) - Page 33
3. Dépannage 3-1 Annuler une impression Exécutez la procédure suivante lorsque vous désirez arrêter l'impression ou lorsque vous désirez libérer les données. IMPORTANT! • L'exécution de cette opération vous permet d'annuler TOUS les travaux d'impression en attente d'impression dans la mémoire de l' - Kyocera KM-3530 | Printing System (N) Operation Guide (Setup Edition) - Page 34
finisseur (en option) sont épuisées. Reportez-vous au Guide de fonctionnement du finisseur et réapprovisionnez-le en agrafes. Un problème s'est produit dans l'imprimante. Contactez votre technicien de service ou un centre de service agréé. Le code de département entré ne correspond pas à celui qui - Kyocera KM-3530 | Printing System (N) Operation Guide (Setup Edition) - Page 35
se trouve ou non sur la carte mémoire. Disque dur Err/Appuyez ACTION. Code: ## Vérifier le code d'erreur affiché à la place de ## et reportez-vous à ce qui s'est écoulée. Pour plus de renseignements, reportez-vous à "KPDL Error Report print out (Impression du rapport d'erreur KPDL) (page 4-10)" - Kyocera KM-3530 | Printing System (N) Operation Guide (Setup Edition) - Page 36
la carte mémoire. Initialisez la carte mémoire (CompactFlash) actuellement insérée. Code: 10 La carte d'interface en option est chargée dans la mauvaise fente concernant l'ajout de mémoire, contactez votre technicien de service ou un centre de service agréé. • Si la durée de recouvrement automatique - Kyocera KM-3530 | Printing System (N) Operation Guide (Setup Edition) - Page 37
3. Dépannage Message affiché Erreur ROM opt. /Appuyer sur CONT Erreur de format du disque dur Vider le bac de perforation Procédure Une erreur s'est produite lors de la lecture du ROM en option. Appuyez sur la touche d'imprimante pour passer au mode d'imprimante, puis effleurez la touche "Action" - Kyocera KM-3530 | Printing System (N) Operation Guide (Setup Edition) - Page 38
des ajustements mineurs. Si le problème persiste, contactez votre technicien de service ou un centre de service agréé. * Pour les informations concernant les problèmes mécaniques généraux de l'appareil, reportez-vous au Guide de fonctionnement de votre copieur. Problème Point à vérifier Procédure - Kyocera KM-3530 | Printing System (N) Operation Guide (Setup Edition) - Page 39
4. Spécifications Unité centrale de traitement PowerPC 750 (350 MHz) Vitesse d'impression Copieur 25 ppm: 25 pages/minute (A4 [8-1/2 po. x 11 po.]) Copieur 35 ppm: 35 pages/minute (A4 [8-1/2 po. x 11 po.]) Copieur 40 ppm: 40 pages/minute (A4 [8-1/2 po. x 11 po.]) Résolution d'impression Mode Fast - Kyocera KM-3530 | Printing System (N) Operation Guide (Setup Edition) - Page 40
KM-2530/3530/4030 Guía de operación Lea SIEMPRE completamente esta guía de operación antes de utilizar este aparato. Una vez leída, manténgala en buen estado y guárdela junto con la guía de operación para su copiadora. - Kyocera KM-3530 | Printing System (N) Operation Guide (Setup Edition) - Page 41
marcas comerciales de International Business Machines Corporation. • PowerPC es una marca comercial de International Business Machines Corporation de América y su computadora. Acerca del manual en línea El manual en línea para esta guía de operación es un archivo PDF (Portable Document Format o - Kyocera KM-3530 | Printing System (N) Operation Guide (Setup Edition) - Page 42
Conexión Cuando conecte la impresora directamente a su computadora (con un cable paralelo o un cable serial)... Computadora 1 Conexión de la impresora directamente a su computadora con un cable paralelo o cable serial Página 4 Cable paralelo o cable serial Computadora CD-ROM Cuando conecte la - Kyocera KM-3530 | Printing System (N) Operation Guide (Setup Edition) - Page 43
cable de red ...5 2-3 Instalación de los programas ...5 2-4 Ajustes de red (TCP/IP) ...6 3. Localización de averías 9 3-1 Cancelación de la impresión ...9 3-2 Cuando aparece un mensaje de error 10 3-3 Tabla de localización de averías básicas 14 4. Especificaciones ...15 1 - Kyocera KM-3530 | Printing System (N) Operation Guide (Setup Edition) - Page 44
1. Preparación 1-1 Accesorios • 2 CD-ROM • Esta guía de operación • Guía de referencia rápida (para redes) 1-2 Items requeridos • Cuando conecte directamente la impresora a su computadora: Cable paralelo (que cumpla con la norma IEEE 1284, de 1,5 m o menos) o cable serial • Cuando conecte la - Kyocera KM-3530 | Printing System (N) Operation Guide (Setup Edition) - Page 45
1-4 Nombre de las piezas (tablero de controles) Printer Priority 1. Preparación 1 Tecla de impresora (indicador producido un error que no interrumpe la impresión. 3 Tecla de prioridad de impresora (indicador) Pulse esta tecla durante la impresión de copias o durante la recepción de faxes para - Kyocera KM-3530 | Printing System (N) Operation Guide (Setup Edition) - Page 46
principal de la impresora. 2 Conecte el cable de impresora al conector de interfaz paralela o al conector de interfaz serial ubicado en la parte trasera del costado derecho de la impresora. * Para conocer detalles sobre la instalación de la interfaz de impresora, consulte "Functions Edition (Edici - Kyocera KM-3530 | Printing System (N) Operation Guide (Setup Edition) - Page 47
la instalación del programa necesario, consulte "Functions Edition (Edición de funciones)". 2 Conecte el cable de red al conector Ethernet ubicado en la parte trasera del costado derecho de la impresora. 3 Conecte el otro extremo del cable de red a su conexión de terminales. 4 Conecte ( | ) el - Kyocera KM-3530 | Printing System (N) Operation Guide (Setup Edition) - Page 48
2. Instalación 2-4 Ajustes de red (TCP/IP) Para utilizar la impresora como una impresora de red se necesita establecer una dirección IP para la impresora. Notas • La dirección IP que deba registrarse aquí será diferente depend- iendo de la configuración de su red. Confirme con su administrador de - Kyocera KM-3530 | Printing System (N) Operation Guide (Setup Edition) - Page 49
6 Seleccione "Encendido (ON)" bajo el ajuste "TCP/IP" y "Apagado (OFF)" bajo el ajuste "DHCP". (Pulgadas) 2. Instalación 9 Introduzca los 3 dígitos siguientes y pulse la tecla de número (#). • Para cambiar una dirección introducida, pulse la tecla de número (#) para seleccionar un bloque de 3 dí - Kyocera KM-3530 | Printing System (N) Operation Guide (Setup Edition) - Page 50
2. Instalación 12 Introduzca la dirección de máscara subnet de igual forma que introdujo la dirección IP en los pasos 8 a 10. 15 Cuando termine de hacer todos los ajustes de red, toque la tecla "Cerrar". (Pulgadas) 13 Utilice las teclas del cursor "L" y "M" para seleccionar "Gateway" y toque la - Kyocera KM-3530 | Printing System (N) Operation Guide (Setup Edition) - Page 51
3. Localización de averías 3-1 Cancelación de la impresión Realice el procedimiento indicado a continuación cuando quiera detener la impresión o cancelar los datos. ¡IMPORTANTE! • Al realizar esta operación cancelará TODOS los trabajos de impresión que estén esperando en la memoria de la impresora - Kyocera KM-3530 | Printing System (N) Operation Guide (Setup Edition) - Page 52
la administración de copias. Para imprimir más, cambie el ajuste de la administración de copias en la impresora. Este mensaje aparecerá cuando se produzca un error de impresora y el aparato esté en un modo diferente del modo de la impresora. Pulse la tecla de impresora para cambiar a la pantalla del - Kyocera KM-3530 | Printing System (N) Operation Guide (Setup Edition) - Page 53
datos del trabajo están corrompidos. Cód: ## El trabajo de impresión actual no puede continuar. Desde el menú de impresora se puede imprimir un informe de error KPDL. Al tocar la tecla "GO" se imprimen los datos que ya han sido procesados. Si se ha establecido el tiempo de recuperación automática - Kyocera KM-3530 | Printing System (N) Operation Guide (Setup Edition) - Page 54
ías Mensaje visualizado Inserte la misma tarjeta de memoria. Error formato TARJ.MEMORIA Error Opcional interfaz No hay archivo Pulse GO Leer fuentes: Error Leer macro: Error Atención poca memoria Advertencia adapt imagen Printer Data: Overrun. Pulse "Continue" para reanud. tarea Memoria desbordada - Kyocera KM-3530 | Printing System (N) Operation Guide (Setup Edition) - Page 55
cinta de perforaciones. 3. Localización de averías Procedimiento Se produjo un error al leer la ROM opcional. Pulse la tecla de impresora para cambiar al modo de impresora y luego toque la tecla "GO" para cancelar el error. Inicialice el disco duro. La caja de restos de papel perforado no - Kyocera KM-3530 | Printing System (N) Operation Guide (Setup Edition) - Page 56
3. Localización de averías 3-3 Tabla de localización de averías básicas Si tiene problemas durante la utilización de este aparato como impresora, consulte la tabla siguiente antes de realizar pequeños ajustes. Si el problema no desaparece, póngase en contacto con su representante de servicio o con - Kyocera KM-3530 | Printing System (N) Operation Guide (Setup Edition) - Page 57
4. Especificaciones CPU PowerPC 750 (350 MHz) Velocidad de impresión Copiadora de 25 ppm: 25 páginas/min. [A4 (8 1/2" x 11")] Copiadora de 35 ppm: 35 páginas/min. [A4 (8 1/2" x 11")] Copiadora de 40 ppm: 40 páginas/min. [A4 (8 1/2" x 11")] Resolución de impresión Modo Fast 1200 Con suavización - Kyocera KM-3530 | Printing System (N) Operation Guide (Setup Edition) - Page 58
KM-2530/3530/4030 Printer Option Operation Guide Introduction I 1. Operation Keys I 2. Procedure for Making Settings I 3. Menu Flow Chart I 4. Selecting the Printer Settings I 5. Options I 6. KX Driver (Specific function) I Link to the KX Printer Drivers Operation Guide - Kyocera KM-3530 | Printing System (N) Operation Guide (Setup Edition) - Page 59
for the corresponding Printer Drivers. The explanations in this Operation Guide were written with the assumption that the user has a basic understanding of how to work in Microsoft Windows. For further information on using Windows, refer to your Microsoft Windows manual. Trademark Information - Kyocera KM-3530 | Printing System (N) Operation Guide (Setup Edition) - Page 60
SOFTWARE PROGRAMS ("PROGRAMS") WHICH BELONG TO INTERNATIONAL BUSINESS MACHINES CORPORATION ("IBM"). THIS DOCUMENT DEFINES THE TERMS AND CONDITIONS Programs" means the original and all whole or partial copies of it, including modified copies or portions merged into other programs. IBM retains title - Kyocera KM-3530 | Printing System (N) Operation Guide (Setup Edition) - Page 61
mean the digitally encoded, machine readable, scalable outline to Agfa Japan or destroy all copies of the Software and Typefaces specifications. Agfa Japan does not warrant that the Software is free from all bugs, errors and Typefaces is repair or replacement of defective parts, upon their return to - Kyocera KM-3530 | Printing System (N) Operation Guide (Setup Edition) - Page 62
print out of copies or of a fax reception, press this key and the copy/fax print out will be interrupted and priority given to the print job. Numeric keys: Use to enter values for the various settings of this machine. Touch panel: Displays operational procedures, error or trouble information and - Kyocera KM-3530 | Printing System (N) Operation Guide (Setup Edition) - Page 63
2. Procedure for Making Settings 1 Press the Printer key. The machine will switch to the printer mode. 2 Touch the "Printer Menu". The [Printer Menu] screen will appear. 3 Select the desired settings that you want to make. (Refer to "3. Menu Flow Chart" on page 3-1 for a list of the various - Kyocera KM-3530 | Printing System (N) Operation Guide (Setup Edition) - Page 64
3. Menu Flow Chart Printer menu Status Page print out 4-1 Selecting the interface setting 4-3 Selecting 4-4 Stop bit length 4-4 Parity 4-4 Protocol 4-4 Barcode mode ON/OFF 4-4 Selecting the network interface NetWare ON/OFF 4-5 NetWare Frame Type 4-5 TCP/IP ON/OFF 4-5 DHCP ON/ - Kyocera KM-3530 | Printing System (N) Operation Guide (Setup Edition) - Page 65
3. Menu Flow Chart Selecting the emulation PCL6 Code set Line Printer Code set IBM Proprinter Code set Diabro 630 Code set EPSON LQ-850 Code set KPDL KPDL Error Report print out ON/OFF KPDL (Auto) KPDL Error Report print out ON/OFF Auto emulation switching KC-GL KC-GL Page KC-GL Pen Font selection/ - Kyocera KM-3530 | Printing System (N) Operation Guide (Setup Edition) - Page 66
3. Menu Flow Chart Page Settings Number of copies Printing orientation Printing reduction Page Protect mode Linefeed (LF) action Carriage-Return (CR) action Wide A4 ON/OFF Printing Quality settings Smoothing mode ON/OFF - Kyocera KM-3530 | Printing System (N) Operation Guide (Setup Edition) - Page 67
3. Menu Flow Chart Hard disk settings Writing data Partition List print out Format hard disk Reading data Reading program data Deleting data Deleting font data Deleting program data Deleting macro data Memory card settings Writing data Partition List print out Format memory card Reading data Reading - Kyocera KM-3530 | Printing System (N) Operation Guide (Setup Edition) - Page 68
settings Partition List print out Reading data Additional settings Form Feed Time Out Resource Protect mode Auto Continue ON/OFF and Recovery Time Service Maintenance menu Service Representative Status Page print out Printer Reset Dump received data 4-44 4-44 4-46 4-46 4-47 4-47 4-47 4-48 4-48 3-5 - Kyocera KM-3530 | Printing System (N) Operation Guide (Setup Edition) - Page 69
3. Menu Flow Chart e-MPS e-MPS settings Quick copy print out Private print/Stored job print out Virtual Mailbox data print out Virtual Mailbox Data List print out Code Job List print out e-MPS configurations 4-50 4-51 4-52 4-52 4-52 4-53 3-6 - Kyocera KM-3530 | Printing System (N) Operation Guide (Setup Edition) - Page 70
Settings 4-1 Status Page print out Prints out a list of such items as the printer default settings, memory volume, etc. G Accessing the Status Page print out screen Touch the "Print Status Page" key. The [Print Status Page] screen will appear. 1 Status - Kyocera KM-3530 | Printing System (N) Operation Guide (Setup Edition) - Page 71
shown in the following chart. For the most efficient use of the printer functions, select the various settings according to your printing needs. Item Available settings 1 Interface selection Parallel, Serial, Network Sets the interface that will be used for printing. The currently selected - Kyocera KM-3530 | Printing System (N) Operation Guide (Setup Edition) - Page 72
4. Selecting the Printer Settings G Accessing the Interface settings screen Touch the "Interface" key. The [Interface] screen will appear the desired TX/RX mode and then touch the "Close" key. The display will return to the [Printer Menu] screen. • To cancel the setting, touch the "Back" key. 4-3 - Kyocera KM-3530 | Printing System (N) Operation Guide (Setup Edition) - Page 73
4. Selecting the Printer Settings G Selecting the serial interface settings 1 Select "Serial" and display will return to the [Serial] screen. G Selecting the network interface 1 Select "Network" and then touch the "Detail" key. The [Network] screen will appear. 2 Use the "L" and "M" cursor keys - Kyocera KM-3530 | Printing System (N) Operation Guide (Setup Edition) - Page 74
4. Selecting the Printer Settings 9 NetWare ON/OFF Select "ON" or "OFF", as desired, under the "Netware" setting and then touch the "Close" key. The display will return to the [Network] screen. • When "ON" is selected, the Frame Type settings will be displayed. • To cancel the setting, touch the " - Kyocera KM-3530 | Printing System (N) Operation Guide (Setup Edition) - Page 75
4. Selecting the Printer Settings 3 Use the numeric keys to input the first block of 3 digits of the address then press the sharp (#) key in order to input the - Kyocera KM-3530 | Printing System (N) Operation Guide (Setup Edition) - Page 76
4. Selecting the Printer Settings ^ Ether Talk ON/OFF Select "ON" or "OFF", as desired, and then touch the "Close" key. The display will return to the [Network] screen. • To cancel the setting, touch the "Back" key. & Network Card Status Page print out Select "ON" or "OFF", as desired, and then - Kyocera KM-3530 | Printing System (N) Operation Guide (Setup Edition) - Page 77
the emulation Sets the emulation protocol. PCL6, Line Printer, IBM Proprinter, DIABRO 630, EPSON LQ-850, Code set Selects the code set that will be used under each emulation protocol. The code sets that are available for selection will differ depending upon the emulation protocol. 3 KPDL Error - Kyocera KM-3530 | Printing System (N) Operation Guide (Setup Edition) - Page 78
"Back" key. 3 Select the desired emulation and then touch the "Close" key. The display will return to the [Printer Menu] screen. • To cancel the setting, touch the "Back" key. 2 Code set 1 Select one of the following emulation protocols and then touch the "Detail" key. The selecting screen for the - Kyocera KM-3530 | Printing System (N) Operation Guide (Setup Edition) - Page 79
4. Selecting the Printer Settings 3 KPDL Error Report print out ON/OFF 1 Select one of the following emulation protocols and then touch the "Detail" key. The [KPDL (Auto)] screen will appear. KPDL, KPDL (Auto) 2 Select "ON" or "OFF", as desired, under the KPDL error setting and then touch the "Close - Kyocera KM-3530 | Printing System (N) Operation Guide (Setup Edition) - Page 80
4. Selecting the Printer Settings 6 KC-GL Pen 1 Use the "L" and "M" cursor keys to select the desired type of pen under the "Pen Adjust" setting and then touch the " - Kyocera KM-3530 | Printing System (N) Operation Guide (Setup Edition) - Page 81
of the desired font. To select a font that is already installed in the printer, enter "I###" (with the desired font ID entered in place of ###). To verify according to the type of the font as shown below. S: Software font (download) M: Memory card font H: Hardware font H: RAM disk font O: Optional - Kyocera KM-3530 | Printing System (N) Operation Guide (Setup Edition) - Page 82
the [Font] screen. • To cancel the setting, touch the "Back" key. 3 Select "Internal" and then touch the "Close" key. The display will return to the [Printer Menu] screen. • To cancel the setting, touch the "Back" key. 1 Selecting the font 1 Touch the "Font ID" key. The [Font ID] screen will appear - Kyocera KM-3530 | Printing System (N) Operation Guide (Setup Edition) - Page 83
Gothic Select "Regular" or "Dark (bold)", as desired, under the "Letter Gothic" setting and then touch the "Close" key. The display will return to the [Printer Menu] screen. • To cancel the setting, touch the "Back" key. 4 Font List print out Touch the "List of Font" key. The Font List will be - Kyocera KM-3530 | Printing System (N) Operation Guide (Setup Edition) - Page 84
4. Selecting the Printer Settings 1 Selecting a font 1 Touch the "Font ID" key. The [Font ID] screen will appear. 2 Select the font ID by following the same procedure as for the internal fonts. 4 Font List print out Touch the "List of Font" key. The font list will be printed out. 4-15 - Kyocera KM-3530 | Printing System (N) Operation Guide (Setup Edition) - Page 85
4 Page Protect mode If "Auto" is selected here, the machine will monitor the data to avoid any Print Overrun Error and, if necessary, automatically turn Page Protect "ON". If a Print Overrun Error does happen to occur even then, the machine will automatically change the Page protect setting to "ON - Kyocera KM-3530 | Printing System (N) Operation Guide (Setup Edition) - Page 86
4. Selecting the Printer Settings G Accessing the Page Settings screen Touch the "Page set" key. The [Page set] screen will appear. 1 Number of copies 1 Use the "L" and "M" cursor keys to select "Copies" and then touch the "Change" key. The [Copies] screen will appear. 2 Use the "+" and/or "-" key - Kyocera KM-3530 | Printing System (N) Operation Guide (Setup Edition) - Page 87
4. Selecting the Printer Settings 4 Select the desired printing orientation and then touch the "Close" key. The display will return to the [Page set] screen. • To cancel the setting, - Kyocera KM-3530 | Printing System (N) Operation Guide (Setup Edition) - Page 88
4. Selecting the Printer Settings 5 Linefeed (LF) action 1 Use the "L" and "M" cursor keys to select "LF Action" and then touch the "Change" key. The [LF Action] screen will appear. 2 - Kyocera KM-3530 | Printing System (N) Operation Guide (Setup Edition) - Page 89
4. Selecting the Printer Settings 3 Select the desired interface and then touch the "Close" key. The display will return to the [CR Action] screen. • To cancel the setting, touch - Kyocera KM-3530 | Printing System (N) Operation Guide (Setup Edition) - Page 90
the following chart. For the most efficient use of the printer functions, select the various settings according to your printing needs. smoothing process. OFF, ON 2 EcoPrint ON/OFF OFF, ON Allows printing in a toner-saving mode. Use this mode for test pages, etc., when high printing quality is - Kyocera KM-3530 | Printing System (N) Operation Guide (Setup Edition) - Page 91
4. Selecting the Printer Settings G Accessing the Printing Quality settings screen 1 Touch the "Print Quality" key. The [Print Quality] screen will appear. 2 Use the "L" and "M" cursor keys to select - Kyocera KM-3530 | Printing System (N) Operation Guide (Setup Edition) - Page 92
items shown in the following chart. For the most efficient use of the printer functions, select the various settings according to your printing needs. Item 1 optional Duplex Unit is installed. Inner tray, Job separator, Finisher main tray, Finisher sub tray, Mailbox (Face-Up), Mailbox (Face-Down) - Kyocera KM-3530 | Printing System (N) Operation Guide (Setup Edition) - Page 93
4. Selecting the Printer Settings G Accessing the Paper settings screen 1 Touch the "Paper Handling" key. The [Paper Handling] screen will appear. 2 Use the "L" and "M" cursor keys to select the - Kyocera KM-3530 | Printing System (N) Operation Guide (Setup Edition) - Page 94
created is too large, printing speed may actually be decreased or the machine may run out of available memory. WARNING: Resetting the printer or turning the main switch OFF (O) will erase all data written to the RAM Disk. The factory default setting for the RAM Disk is "OFF" . In order to create - Kyocera KM-3530 | Printing System (N) Operation Guide (Setup Edition) - Page 95
4. Selecting the Printer Settings Item 9 Deleting program data Deletes the selected program data from the RAM disk. 0 Deleting macro data Deletes the selected macro data from the RAM - Kyocera KM-3530 | Printing System (N) Operation Guide (Setup Edition) - Page 96
. • If you select "OFF" here, RAM settings will not be possible. 2 Writing data Touch the "Write Data" key. The display will return to the basic printer screen and the machine will enter a "waiting for data" state. • When data is received from a computer, "Processing" will be displayed in the - Kyocera KM-3530 | Printing System (N) Operation Guide (Setup Edition) - Page 97
Mode] screen, touch the "Cancel" key. 3 Touch the "Enter" key. The display will return to the basic printer screen and the data will be read. • "Processing" will be displayed in the basic printer screen while the data is being read. 6 Reading program data 1 Touch the "Program" key under the "Read - Kyocera KM-3530 | Printing System (N) Operation Guide (Setup Edition) - Page 98
] screen, touch the "Cancel" key. 3 Touch the "Delete" key. The display will return to the basic printer screen and the data will be deleted. • "Processing" will be displayed in the basic printer screen while the data is being deleted. 8 Deleting font data 1 Touch the "Font" key under the "Delete - Kyocera KM-3530 | Printing System (N) Operation Guide (Setup Edition) - Page 99
, touch the "Cancel" key. 3 Touch the "Delete" key. The display will return to the basic printer screen and the program data will be deleted. • "Processing" will be displayed in the basic printer screen while the program data is being deleted. 0 Deleting macro data 1 Touch the "Macro" key under - Kyocera KM-3530 | Printing System (N) Operation Guide (Setup Edition) - Page 100
of the printer functions, select the various settings according to your printing needs. Item 1 Writing data If "Write Data" is selected here, the machine will enter Partitions Format Formats the hard disk only when there is a format error on the disk. Select from among the data parti- Displayed - Kyocera KM-3530 | Printing System (N) Operation Guide (Setup Edition) - Page 101
the "Write Data" key. The display will return to the basic printer screen and the machine will enter a "waiting for data" state. • When data is received key. • It is only possible to format the hard disk when there is a format error on the disk. In any other case, the hard disk will NOT be formatted. - Kyocera KM-3530 | Printing System (N) Operation Guide (Setup Edition) - Page 102
Disk] screen, touch the "Cancel" key. 3 Touch the "Enter" key. The display will return to the basic printer screen and the data will be read. • "Processing" will be displayed in the basic printer screen while the data is being read. 5 Reading program data 1 Touch the "Program" key under the "Read - Kyocera KM-3530 | Printing System (N) Operation Guide (Setup Edition) - Page 103
] screen, touch the "Cancel" key. 3 Touch the "Delete" key. The display will return to the basic printer screen and the data will be deleted. • "Processing" will be displayed in the basic printer screen while the data is being deleted. 7 Deleting font data 1 Touch the "Font" key under the "Delete - Kyocera KM-3530 | Printing System (N) Operation Guide (Setup Edition) - Page 104
, touch the "Cancel" key. 3 Touch the "Delete" key. The display will return to the basic printer screen and the program data will be deleted. • "Processing" will be displayed in the basic printer screen while the program data is being deleted. 9 Deleting macro data 1 Touch the "Macro" key under - Kyocera KM-3530 | Printing System (N) Operation Guide (Setup Edition) - Page 105
11 items shown in the following chart. For the most efficient use of the printer functions, select the various settings according to your printing needs. Item 1 Writing data If "Write Data" is selected here, the machine will enter a "waiting for data" state until data is sent from the host computer - Kyocera KM-3530 | Printing System (N) Operation Guide (Setup Edition) - Page 106
4. Selecting the Printer Settings Item Available settings Remarks 6 Reading program data Reads the selected program data from the memory card. Select from among the program partition names that - Kyocera KM-3530 | Printing System (N) Operation Guide (Setup Edition) - Page 107
Touch the "Memory Card" key. The [Memory Card] screen will appear. 1 Writing data Touch the "Write Data" key. The display will return to the basic printer screen and the machine will enter a "waiting for data" state. • When data is received from a computer, "Processing" will be displayed in the - Kyocera KM-3530 | Printing System (N) Operation Guide (Setup Edition) - Page 108
[Memory Card] screen, touch the "Cancel" key. 3 Touch the "Enter" key. The display will return to the basic printer screen and the data will be read. • "Processing" will be displayed in the basic printer screen while the data is being read. 5 Reading font data 1 Touch the "Fonts" key under the "Read - Kyocera KM-3530 | Printing System (N) Operation Guide (Setup Edition) - Page 109
"Macro" key under the "Read" setting. 2 Touch the "Yes" key. The display will return to the basic printer screen and the macro data will be read. • "Processing" will be displayed in the basic printer screen while the macro data is being read. • If you select "No" here, the macro data will not - Kyocera KM-3530 | Printing System (N) Operation Guide (Setup Edition) - Page 110
] screen, touch the "Cancel" key. 3 Touch the "Delete" key. The display will return to the basic printer screen and the data will be deleted. • "Processing" will be displayed in the basic printer screen while the data is being deleted. 9 Deleting font data 1 Touch the "Font" key under the "Delete - Kyocera KM-3530 | Printing System (N) Operation Guide (Setup Edition) - Page 111
, touch the "Cancel" key. 3 Touch the "Delete" key. The display will return to the basic printer screen and the program data will be deleted. • "Processing" will be displayed in the basic printer screen while the program data is being deleted. ! Deleting macro data 1 Touch the "Macro" key under - Kyocera KM-3530 | Printing System (N) Operation Guide (Setup Edition) - Page 112
It is possible to perform ROM (option) settings for the 2 items shown in the following chart. For the most efficient use of the printer functions, select the various settings according to your printing needs. Item 1 Partition List print out Available settings List of Partitions Remarks 2 Reading - Kyocera KM-3530 | Printing System (N) Operation Guide (Setup Edition) - Page 113
4. Selecting the Printer Settings G Accessing the ROM (option) settings screen Touch the "Option ROM" key. The [Option ROM] , touch the "Cancel" key. 3 Touch the "Enter" key. The display will return to the basic printer screen and the data will be read. • "Processing" will be displayed in the basic - Kyocera KM-3530 | Printing System (N) Operation Guide (Setup Edition) - Page 114
Protects downloaded resource the error state maintenance menu used by the service personnel. Print Status Page 5 Printer Reset Resets only the Printer Board without the need to turn off power to the machine. Printer Reset 6 Dump received data Data received by the printer is printed out in hex code - Kyocera KM-3530 | Printing System (N) Operation Guide (Setup Edition) - Page 115
4. Selecting the Printer Settings G Accessing the Additional settings screen Touch the "Others" key. The [Others] screen will appear. 1 Form Feed Time Out 1 Use the "L" and "M" cursor keys to - Kyocera KM-3530 | Printing System (N) Operation Guide (Setup Edition) - Page 116
4. Selecting the Printer Settings 3 Auto Continue ON/OFF and Recovery Time 1 Use the "L" and "M" [Others] screen. • To cancel the setting, touch the "Back" key. 4 Service Maintenance menu 1 Touch the "Service" key. 2 Service Representative Status Page print out Touch the "Print Status Page" key - Kyocera KM-3530 | Printing System (N) Operation Guide (Setup Edition) - Page 117
4. Selecting the Printer Settings 5 Printer Reset 1 Touch the "Printer Reset" key. 2 Touch the "Yes" key. The Printer Board will be reset. • If you select "No" here, the display will return to the [Others] screen. 6 Dump received data 1 Touch the "Print HEX-DUMP" key. 2 Touch the "Yes" - Kyocera KM-3530 | Printing System (N) Operation Guide (Setup Edition) - Page 118
It is possible to use the [Quick copy print out] and [Private print /Stored job print out] of the e-MPS function when "ON" is selected under the RAM disk ON/OFF setting (P4-25). For more information about e-MPS, refer to the KX Printer Drivers Operation Guide. About the e-MPS settings It is possible - Kyocera KM-3530 | Printing System (N) Operation Guide (Setup Edition) - Page 119
4. Selecting the Printer Settings G Accessing the e-MPS settings screen Touch the "e-MPS" key. The [e-MPS] screen will appear. 1 Quick copy print out 1 Touch the "Quick Copy" key. 2 Use the "L" and "M" cursor keys to select your user name and then touch the "Next" key. 3 Use the "L" and "M" cursor - Kyocera KM-3530 | Printing System (N) Operation Guide (Setup Edition) - Page 120
4. Selecting the Printer Settings 2 Private print/Stored job print out 1 Touch the "Private/Stored" key. 2 Use the "L" and "M" cursor keys to select your user name and then touch the "Next" key. 3 Use the "L" and "M" cursor keys to select the desired job. 4 Use the "+" and/or "-" key or the numeric - Kyocera KM-3530 | Printing System (N) Operation Guide (Setup Edition) - Page 121
4. Selecting the Printer Settings 3 Virtual Mailbox data print out 1 Touch the "Print VMB Data" key. 2 Use the print out Touch the "List of VMB" key. A Virtual Mailbox Data List will be printed out. 5 Code Job List print out Touch the "List of Code JOB" key. A Code Job List will be printed out. 4-52 - Kyocera KM-3530 | Printing System (N) Operation Guide (Setup Edition) - Page 122
key. 3 Use the "+" and/or "-" key to select the maximum number of quick copy jobs that can be registered. • To cancel the setting, touch the "Back" key. 4 Temporary protection for code job size/Permanent protection for code job size/VMB size Use the "L" and "M" cursor keys to select the desired item - Kyocera KM-3530 | Printing System (N) Operation Guide (Setup Edition) - Page 123
e-MPS function. Barcode Reader If the optional barcode reader is installed in this machine, the machine can read barcodes that are in the job list and print the corresponding data that is saved on the hard disk. For detailed information, refer to the Instruction Manual for the Barcode Reader. 5-1 - Kyocera KM-3530 | Printing System (N) Operation Guide (Setup Edition) - Page 124
will appear. Copy Management for Driver will now be possible. Job Accounting You can add a check mark in the [Job Accounting] when Copy Management is turned ON in the copier. Use Specific Code Select [Use Specific Code] check box to use the specific code. The setting under [Use Specific Code] does - Kyocera KM-3530 | Printing System (N) Operation Guide (Setup Edition) - Page 125
you send a print command with a DOS "COPY" command, printing will not be possible if you do not use a printer driver. Registering management codes 1 Click on the [Edit list] button. The [Code list] dialog box will appear. 2 Click on the [Add] button. The [Add Code] dialog box will appear. 3 Type in
-
 1
1 -
 2
2 -
 3
3 -
 4
4 -
 5
5 -
 6
6 -
 7
7 -
8
-
9
-
10
-
11
-
12
-
13
-
14
-
15
-
16
-
17
-
18
-
19
-
20
-
21
-
22
-
23
-
24
-
25
-
26
-
27
-
28
-
29
-
30
-
31
-
32
-
33
-
34
-
35
-
36
-
37
-
38
-
39
-
40
-
41
-
42
-
43
-
44
-
45
-
46
-
47
-
48
-
49
-
50
-
51
-
52
-
53
-
54
-
55
-
56
-
57
-
58
-
59
-
60
-
61
-
62
-
63
-
64
-
65
-
66
-
67
-
68
-
69
-
70
-
71
-
72
-
73
-
74
-
75
-
76
-
77
-
78
-
79
-
80
-
81
-
82
-
83
-
84
-
85
-
86
-
87
-
88
-
89
-
90
-
91
-
92
-
93
-
94
-
95
-
96
-
97
-
98
-
99
-
100
-
101
-
102
-
103
-
104
-
105
-
106
-
107
-
108
-
109
-
110
-
111
-
112
-
113
-
114
-
115
-
116
-
117
-
118
-
119
-
120
-
121
-
122
-
123
-
124
-
125
 |
 |
KM-2530/3530/4030
Operation Guide
<Set-up Edition>
ALWAYS read this Operation Guide thoroughly before use. After reading, maintain it in good condition and
keep it together with the Operation Guide for your copier.