Kyocera KM-6030 DF-650/MT-1/BF-1/PH-4A Operation Guide (Multi-Language) - Page 17
Interrupt Mode, English, DF-650, MT-1A, BF-1A, PH-4A AND PH-4C OPERATION GUIDE, Hole Punch
 |
View all Kyocera KM-6030 manuals
Add to My Manuals
Save this manual to your list of manuals |
Page 17 highlights
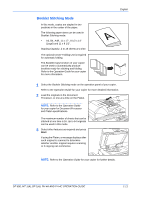
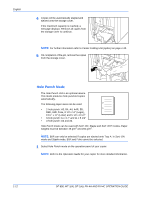
2 Load the originals in the Document Processor, or one at a time on the Platen. Ensure the orientation of the originals is the same as that selected for Hole Punch mode on the copier. English NOTE: Refer to the Operation Guide for your copier for Document Processor and Platen specifications. 3 Select other features as required and press Start. 4 The copies are automatically hole punched and ejected onto Tray B. NOTE: Holes are punched in each copy individually, therefore the location of the holes may vary on each sheet. On completion of the job, remove all the copies. NOTE: If the maximum capacity for Tray B is exceeded, all subsequent copies will be ejected onto Tray A. If Tray A is not engaged when Tray B becomes full, an error message displays. Remove all copies to continue. Interrupt Mode When using Interrupt Mode, the copies for the interrupt job are usually ejected onto the finisher tray not currently in use. If required, a different tray can be selected on the copier Operation Panel. NOTE: Refer to the Operation Guide for your copier for further details. DF-650, MT-1(A), BF-1(A), PH-4A AND PH-4C OPERATION GUIDE 1-13
-
 1
1 -
2
-
3
-
4
-
5
-
6
-
7
-
8
-
9
-
10
-
11
-
 12
12 -
 13
13 -
 14
14 -
 15
15 -
 16
16 -
 17
17 -
 18
18 -
 19
19 -
 20
20 -
 21
21 -
 22
22 -
23
-
24
-
25
-
26
-
27
-
28
-
29
-
30
-
31
-
32
-
33
-
34
-
35
-
36
-
37
-
38
-
39
-
40
-
41
-
42
-
43
-
44
-
45
-
46
-
47
-
48
-
49
-
50
-
51
-
52
-
53
-
54
-
55
-
56
-
57
-
58
-
59
-
60
-
61
-
62
-
63
-
64
-
65
-
66
-
67
-
68
-
69
-
70
-
71
-
72
-
73
-
74
-
75
-
76
-
77
-
78
-
79
-
80
-
81
-
82
-
83
-
84
-
85
-
86
-
87
-
88
-
89
-
90
-
91
-
92
-
93
-
94
-
95
-
96
-
97
-
98
-
99
-
100
-
101
-
102
-
103
-
104
-
105
-
106
-
107
-
108
-
109
-
110
-
111
-
112
-
113
-
114
-
115
-
116
-
117
-
118
-
119
-
120
-
121
-
122
-
123
-
124
-
125
-
126
-
127
-
128
-
129
-
130
-
131
-
132
-
133
-
134
-
135
-
136
-
137
-
138
-
139
-
140
-
141
-
142
-
143
-
144
-
145
-
146
-
147
-
148
-
149
-
150
-
151
-
152
-
153
-
154
-
155
-
156
-
157
-
158
-
159
-
160
-
161
-
162
-
163
-
164
-
165
-
166
-
167
-
168
-
169
-
170
-
171
-
172
-
173
-
174
-
175
-
176
 |
 |
