Kyocera KM-6030 Printing System (V) Operation Guide (Setup Edition) Rev-1 - Page 14
IP Address, TCP/IP, Subnet Mask, Use the same procedure to enter
 |
View all Kyocera KM-6030 manuals
Add to My Manuals
Save this manual to your list of manuals |
Page 14 highlights
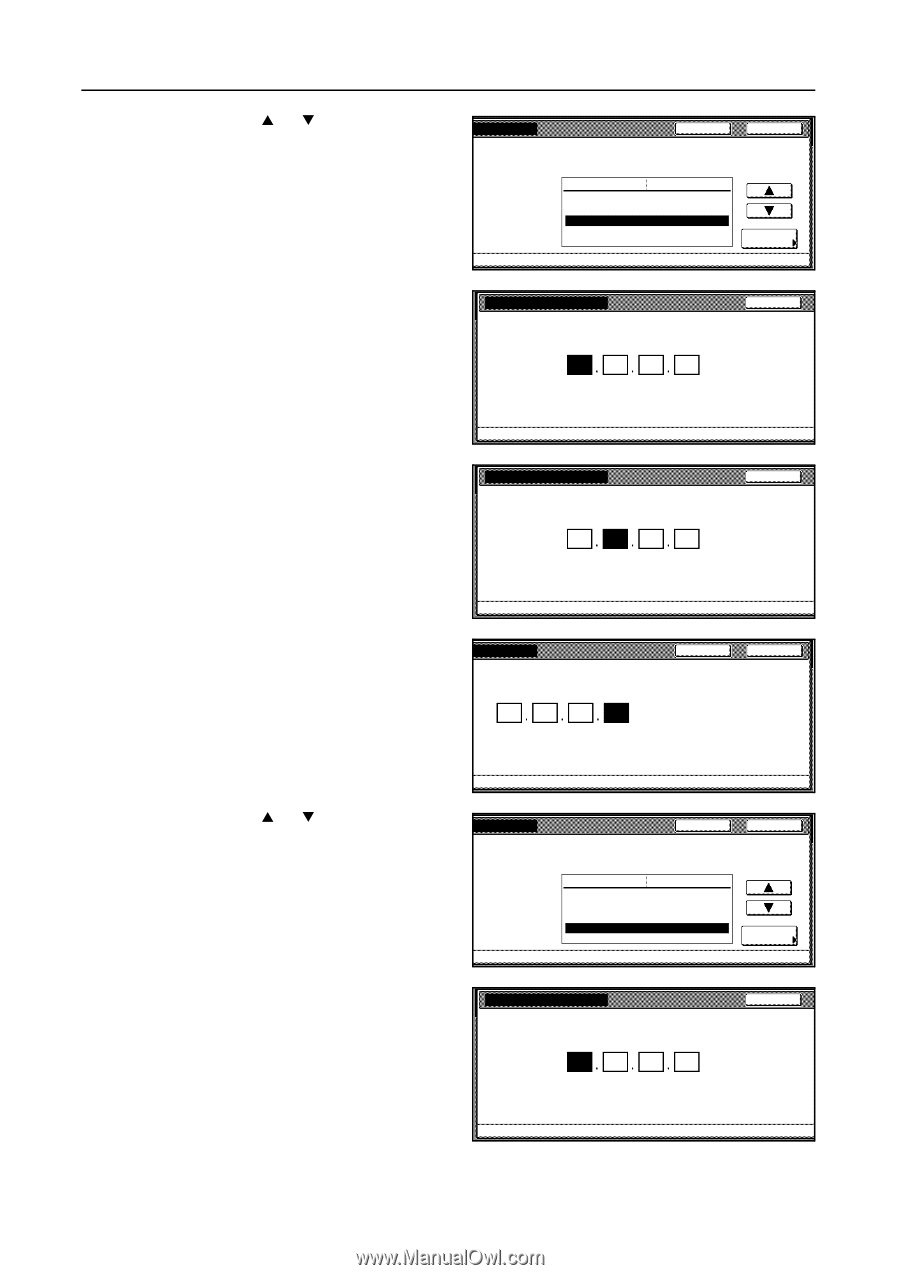
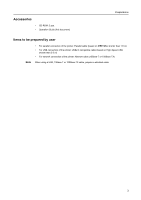
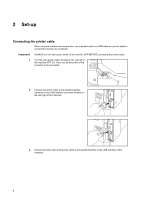
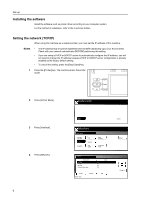
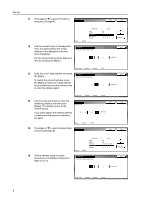
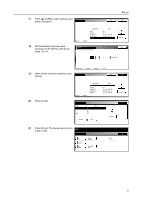
Set-up 11 Press [S] or [T] to select IP Address and press [Change #]. B ack Close Interface - Network Setting Item DHCP B OOT P IP Address Subnet Mask Gateway Value Off Off 0. 0. 0. 0 0. 0. 0. 0 0. 0. 0. 0 Change # 12 Use the numeric keys on the keypad to IP Address B ack enter the address.Enter the 3-digit Confirm per 3 lines pressing # key. address in the highlighted area and press the [#] key. Fix the entered address three digits at a time by pressing the [#] key. 10 0 0 0 (with #key) Printer menu - Interface - Network - TCP/IP 13 Enter the next 3-digit address and press IP Address the [#] key. Confirm per 3 lines pressing # key. To modify the entered address, press the [#] key to select the 3-digit address to be modified and use the numeric keys to enter the address again. 10 141 B ack 0 0 (with #key) Printer menu - Interface - Network - TCP/IP 14 Use the same procedure to enter the remaining address and then press [Close]. The display returns to the TCP/IP screen. s pressing # key. B ack Close If you press [Back], the entered address is cleared and the previous address is set again. 10 141 110 204 (with #key) Interface - Network - TCP/IP 15 Press [S] or [T] to select Subnet Mask and press [Change #]. B ack Close 16 Set the address using the same procedure as IP address setting from steps 12 to 14. Interface - Network Setting Item DHCP B OOT P IP Address Subnet Mask Gateway Value Off Off 10. 141. 110. 204 0. 0. 0. 0 0. 0. 0. 0 Subnet Mask Confirm per 3 lines pressing # key. Change # B ack 0 0 0 0 (with #key) Printer menu - Interface - Network - TCP/IP 8
-
 1
1 -
2
-
3
-
4
-
5
-
6
-
7
-
8
-
 9
9 -
 10
10 -
 11
11 -
 12
12 -
 13
13 -
 14
14 -
 15
15 -
 16
16 -
 17
17 -
 18
18 -
 19
19 -
20
 |
 |