Kyocera TASKalfa 2420w TASKalfa 2420w Windows Driver Operation Guide - Page 17
Installation of the Microsoft Certified Windows Driver, Uninstall Previous Windows Driver Version
 |
View all Kyocera TASKalfa 2420w manuals
Add to My Manuals
Save this manual to your list of manuals |
Page 17 highlights
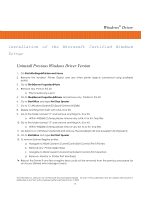
Windows® Driver Installation of the Microsoft Certified Windows Driver Uninstall Previous Windows Driver Version 1. Go StartÆSettingsÆPrinters and Faxes 2. Remove the installed Printer Object and any other printer objects connected using available port(s) 3. Go to FileÆServer PropertiesÆPorts 4. Remove any Ports in this list a. This includes any x port 5. Go to FileÆServer PropertiesÆDrivers and remove any Printers in this list 6. Go to StartÆRun and type Net Stop Spooler 7. Go to C:\Windows\System32\Spool\Drivers\W32x86 8. Delete anything that starts with a KA, KI or KU 9. Go to the folder named "2" and remove anything KA, KI or KU a. Within W32x86\2\temp please remove any a KA, KI or KU .tmp files 10. Go to the folder named "3" and remove anything KA, KI or KU a. Within W32x86\3\temp please remove any KA, KI or KU .tmp files 11. Go back to C:\Windows\System32 and remove the kaw2kppm.dll and kuwxppm.dll (if present) 12. Go to StartÆRun and type Net Start Spooler 13. To remove System Registry entries: a. Navigate to HKLM\System\CurrentControlSet\Control\Print\Printers b. Remove any Printer object keys c. Navigate to HKLM\System\CurrentControlSet\Control\Print\Monitors d. Remove Monitor or Printer Port Monitor(s) 14. Reboot the Server if any files or registry keys could not be removed from the previous procedure (or an Access Denied error message is seen). This information is solely for use of Personnel and Authorized Dealers. No part of this publication may be copied, reproduced or distributed in any form without express written permission from. ” 2009. - 14 -
-
 1
1 -
2
-
3
-
4
-
5
-
6
-
7
-
8
-
9
-
10
-
11
-
 12
12 -
 13
13 -
 14
14 -
 15
15 -
 16
16 -
 17
17 -
 18
18 -
 19
19 -
 20
20 -
 21
21 -
 22
22
 |
 |
