LG L1404R Owners Manual - Page 21
Installation Kits Contents, Suggested Tool Requirements
 |
View all LG L1404R manuals
Add to My Manuals
Save this manual to your list of manuals |
Page 21 highlights
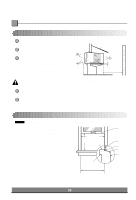
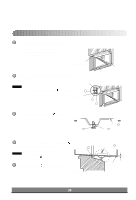
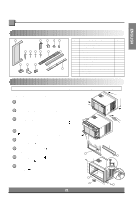
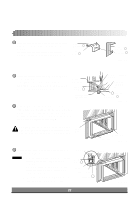
WP Series ENGLISH Installation Kits Contents 1 2 3 4 5 6 7 8 9 10 11 15 12 13 14 NO. NAME OF PARTS 1 FRAME CURTAIN 2 SUPPORT BRACKET 3 SILL BRACKET 4 LOCK NUT 5 SCREW (TYPE A) 6 SCREW (TYPE B) 7 SCREW (TYPE C) 8 SCREW (TYPE D) 9 CARRIAGE BOLT 10 FOAM STRIP 11 FOAM SEAL 12 WINDOW LOCKING BRACKET 13 DRAIN PIPE 14 FOAM-PE 15 FRAME GUIDE Q'TY 2 2 2 4 14 7 5 2 2 1 1 1 1 1 2 Suggested Tool Requirements SCREWDRIVER(Philips and Flatead), RULER, KNIFE, HAMMER, PENCIL, LEVEL PREPARATION OF CHASSIS 1 Remove the screws which fasten the cabinet at both sides and at the back. 2 Slide the unit from the cabinet by gripping the base pan handle and pulling forward while bracing the cabinet. 3 Cut the window sash seal to the proper length. Peel off the backing and attach the Foam-Seal underside of the window sash. to the 4 Remove the backing from the top upper guide Foam-PE and attach it to the bottom of the Upper Guide. 5 Attach the upper guide onto the top of the cabinet with 3 Type A screws . 6 Insert the Frame Guides into the bottom of the cabinet. 7 Insert the Frame Curtain into the Upper Guide and Frame Guides . 8 Fasten the curtains to the unit with 10 Type A screws . COOL FAN DRY INDOOR FAN HEAT DEFROST DESIRED ESNAEVREGRY PRUEARSAUYTITRFAOIRETR Shipping Screws COOL FAN DRY INDOOR FAN HEAT DEFROST DESIRED ESNAEVREGRY PRUEARSAUYTITRFAOIRETR Upper guide 11 Upper guide 14 (Type A) 5 15 21 5 (Type A)
-
 1
1 -
2
-
3
-
4
-
5
-
6
-
7
-
8
-
9
-
10
-
11
-
12
-
13
-
14
-
15
-
 16
16 -
 17
17 -
 18
18 -
 19
19 -
 20
20 -
 21
21 -
 22
22 -
 23
23 -
 24
24 -
 25
25 -
 26
26 -
27
-
28
 |
 |