LG MA8000ST Service Manual - Page 16
Assembly, Removal, Magnetron, Removing, Turntable, Motor
 |
View all LG MA8000ST manuals
Add to My Manuals
Save this manual to your list of manuals |
Page 16 highlights
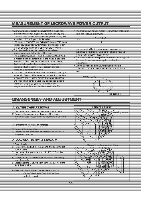
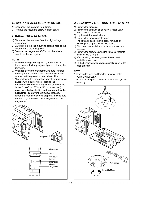
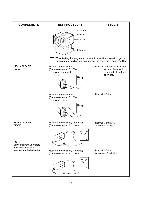
H. AIR DUCT ASSEMBLY REMOVAL 1) Disconnect the leadwire from lamp. 2) Remove the mounting screw to latch board. I. MAGNETRON REMOVAL 1) Disconnect the leadwire from the high voltage transformer. 2) Carefully remove the mounting screws holding the magnetron to the waveguide. 3) Remove the magnetron ASS'Y until the tube is clear from the waveguide. NOTE: 1. When removing the magnetron, make sure its dome does not hit any adjacent parts, or it may be damaged. 2. When replacing the magnetron, be sure to install the magnetron gasket in the correct position and be sure that the gasket is in good condition. 3. After replacing the magnetron, check for microwave leakage with a survey meter around the magnetron. Microwave energy must be below the limit of 5 mW/cm2. (With a 275 ml. water load). Make sure that gasket is rigidly attached to the magnetron. To prevent microwave leakage, tighten the mounting screws properly, making sure there is no gap between the waveguide and the magnetron. J. REMOVING THE TURNTABLE MOTOR 1) Remove the turntable. 2) Remove the turntable shaft VERY CAREFULLY with a slotted screwdriver. 3) Lay the unit down on its back. 4) Remove the turntable motor cover. The turntable base cover is easily removed by pinching the six parts with a wire cutting. 5) Disconnect the leadwire from the turntable motor terminals. 6) Remove the screw securing the turntable motor to the oven cavity ASS'Y 7) After repairing the motor, rotate the removed turntable motor cover. 8) Fit the turntable motor cover's projecting part to the base plate slit. NOTE: 1. Remove the wire lead from the turntable motor VERY CAREFULLY, 2. Be sure to grasp the connector, not the wires, when removing. fot Magnetron 0 0 O C 0 u Waveguide Dome Waveguide Bracket Magnetron Gasket Magnetron 5-5 .0' a. r. - Wire Leads Turntable Motor
-
 1
1 -
2
-
3
-
4
-
5
-
6
-
7
-
8
-
9
-
10
-
 11
11 -
 12
12 -
 13
13 -
 14
14 -
 15
15 -
 16
16 -
 17
17 -
 18
18 -
 19
19 -
 20
20 -
 21
21 -
22
-
23
-
24
-
25
-
26
-
27
-
28
-
29
-
30
-
31
-
32
-
33
-
34
-
35
 |
 |
