LG MVEM1825F INSTALLATION - Page 11
Step 4: Prepare the Wall and Upper, Cabinet
 |
View all LG MVEM1825F manuals
Add to My Manuals
Save this manual to your list of manuals |
Page 11 highlights
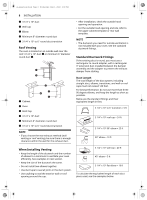
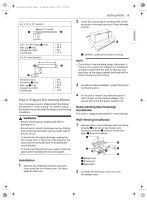
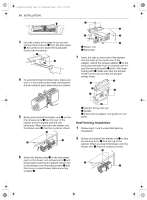
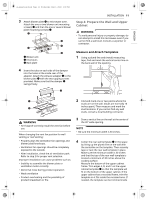
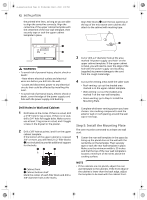
ENGLISH us_main.book.book Page 11 Wednesday, May 4, 2022 1:09 PM 3 Attach blower plate d to microwave oven. Attach the one or two blower unit mounting screw(s) f and then the one or several blower plate mounting screw(s) a. INSTALLATION 11 Step 4: Prepare the Wall and Upper Cabinet WARNING • To avoid personal injury or property damage, do not attempt to install this microwave oven if you cannot find a wall stud. Consult a carpenter or contractor. b Blower unit c Knockouts e Back plate 4 Insert the tabs on each side of the damper into the holes at the inside rear of the adapter. Attach the exhaust adapter a to the blower plate b with the two tapping screws provided. Make sure that the damper c swings freely. Measure and Attach Templates 1 Using a plumb line and (metal) measuring tape, find and mark the vertical center line on the back wall of the opening. WARNING • Fire hazard! Correctly install the vent fan before use. When changing the vent fan position for wall venting or roof venting: • Properly align the ventilation fan openings and blower plate knockouts. • Ventilation fan openings should be completely exposed to the outside. • After installation, check the air ventilation path. Refer to step 2 for proper vent selection. Improper installation can cause problems such as: • Inability to assemble the blower plate or ventilation motor correctly • Abnormal noise during product operation • Weak ventilation • Product overheating and the possibility of product breakdown or fire 2 Find and mark one or two points where the studs are on the wall. (Studs are normally 16 inches apart.) Then measure and mark the stud locations. If you cannot find any wall studs, consult a local building contractor. 3 Draw a vertical line on the wall at the center of the 30″ wide opening. NOTE • Be sure the minimum width is 30 inches. 4 Center the rear wall template b in the space by lining up the plumb line on the wall with the centerline on the template. Then securely tape or tack the rear wall template in place. Make sure the minimum width is 30 inches and that the top of the rear wall template is located a minimum of 30 inches above the cooking surface. Measure the bottom of the upper cabinet frame. Trim edges A, B, and C on the upper cabinet template a so that the template will fit on the bottom of the upper cabinet. If the upper cabinet has a recessed frame, trim the template so it fits inside the recessed area. If needed, the template can be trimmed inside
-
 1
1 -
2
-
3
-
4
-
5
-
 6
6 -
 7
7 -
 8
8 -
 9
9 -
 10
10 -
 11
11 -
 12
12 -
 13
13 -
 14
14 -
 15
15 -
 16
16
 |
 |
