LG MVEM1825F INSTALLATION - Page 9
Step 3: Prepare the Venting Blower
 |
View all LG MVEM1825F manuals
Add to My Manuals
Save this manual to your list of manuals |
Page 9 highlights
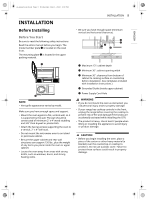
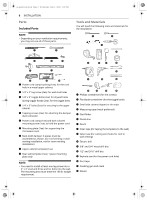
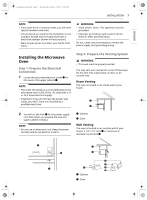
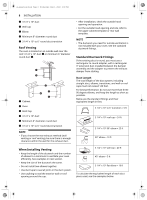
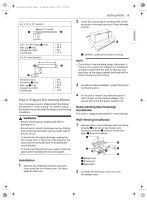
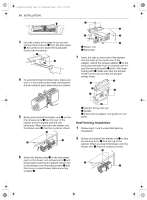
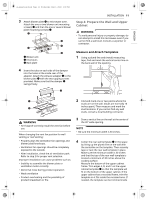
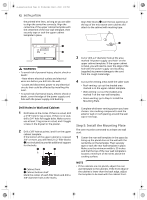
us_main.book.book Page 9 Wednesday, May 4, 2022 1:09 PM For 3 1/4" x 10" systems 6 ft INSTALLATION 9 2 Cover the countertop or cooktop with a thick, protective covering to protect it from damage and dirt. ENGLISH 2 ft 1/4" x 10" 90° elbow a (1ea) Wall cap b(1ea) Straight duct (8 ft) Total length For 6" round systems 6 ft = 25 ft = 40 ft = 8 ft = 73 ft 2 ft Transition (1ea) 90°elbows b (2ea) Wall cap c (1ea) Straight duct (8 ft) Total length = 5 ft = 20 ft = 40 ft = 8 ft = 73 ft Step 3: Prepare the Venting Blower Your microwave oven is shipped with the blower assembled for room venting. You need to adjust the blower if you want wall-venting or roof-venting installation. WARNING • Electric shock hazard! Unplug unit before working on it. • Do not pull or stretch the blower wiring. Pulling and stretching the blower wiring could result in electric shock. • To avoid risk of property damage, unplug the microwave oven or disconnect the power at the source by removing the fuse or throwing the circuit breaker. • To avoid risk of personal injury, wear protective gloves when handling the mounting plate. Installation 1 Remove any shipping materials and parts from inside the microwave oven. Set them aside for later use. a Blanket, cardboard or other covering NOTE • If you have a free-standing range, disconnect it, move it onto a piece of cardboard or hardboard and pull it away from the wall, so that you can get closer to the upper cabinet and back wall for easier measuring and drilling. 3 Locate the exhaust adapter, grease filters and hardware packet. 4 At this point, remove any adhesive tape (if there is any), on the exhaust adapter, the grease filters and the power supply cord. Room-Venting (Recirculating) Installation This oven is shipped assembled for room-venting. Wall-Venting Installation 1 Remove one or several blower plate mounting screw(s) a and one or two blower unit mounting screw(s) f. Remove the blower plate d from the cabinet. b Blower unit c Knockouts e Back plate 2 Carefully lift the blower unit out of the microwave oven.
-
 1
1 -
2
-
3
-
 4
4 -
 5
5 -
 6
6 -
 7
7 -
 8
8 -
 9
9 -
 10
10 -
 11
11 -
 12
12 -
 13
13 -
 14
14 -
15
-
16
 |
 |
