LG MVEM1825F INSTALLATION - Page 13
Step 6: Attach the Oven to the Wall
 |
View all LG MVEM1825F manuals
Add to My Manuals
Save this manual to your list of manuals |
Page 13 highlights
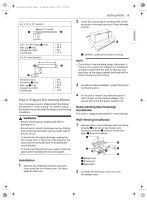
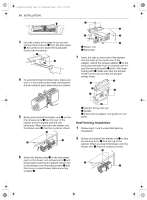
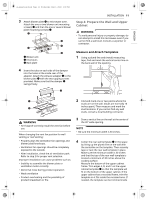
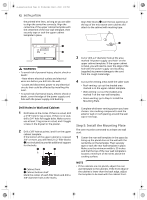
us_main.book.book Page 13 Wednesday, May 4, 2022 1:09 PM ENGLISH 2 Drill holes at points A and B. Drill the third hole inside area C, through one of the bottom holes to match the location of a stud. If there is a stud, drill a 3/16 hole for lag screws. If there is no stud, drill a 5/8 hole for toggle bolts. These holes must be used for mounting. If the holes are not used, the installation will not be secure. The installer must use these holes for proper installation. Use toggle bolts through these holes, unless one of them lines up with a stud. Use a lag screw for studs. Make sure to use at least 1 lag screw in a stud, and 2 toggle bolts in the drywall or the plaster. A B A B C a Minimum 66" from the floor b For wall - venting only c Draw lines on studs d Draw center Line e Mounting plate f Support tab NOTE • Cut out the shaded area marked F on the rear wall template for wall-venting. 3 Remove the template from the rear wall. 4 Attach the plate to the wall e. To use spring toggle head bolts d: Remove the toggle wings c from the bolts. Insert the bolts into the mounting plate a and replace the spring toggle head to 3/4 of the length past the bolt ends. Insert the spring toggle head into the holes in the wall to mount the plate. You may pull forward on the plate to help in tightening the toggle bolts. Tighten all bolts. INSTALLATION 13 b Space more than wall thickness f Bolt end Step 6: Attach the Oven to the Wall WARNING • To avoid risk of personal injury or property damage, you will need two people to install this microwave oven. 1 Carefully lift the microwave oven and hang it on the support tabs at the bottom of the mounting plate. Reaching through the upper cabinet, thread the power supply cord a through the power supply cord hole b in the bottom of the upper cabinet. 2 Rotate the microwave oven upward so the top of the oven is against the bottom of the upper cabinet or cabinet frame. 3 Then insert a bolt down through each hole a in the upper cabinet bottom. Tighten the bolts until the gap between the upper cabinet and microwave oven is closed. 4 Roof venting installation: Install the ductwork through the vent opening in the upper
-
 1
1 -
2
-
3
-
4
-
5
-
6
-
7
-
 8
8 -
 9
9 -
 10
10 -
 11
11 -
 12
12 -
 13
13 -
 14
14 -
 15
15 -
 16
16
 |
 |
