LG MVEM1825F INSTALLATION - Page 6
Parts, Tools and Materials
 |
View all LG MVEM1825F manuals
Add to My Manuals
Save this manual to your list of manuals |
Page 6 highlights
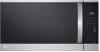
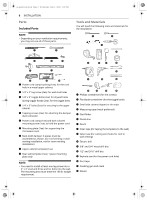
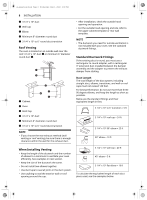
us_main.book.book Page 6 Wednesday, May 4, 2022 1:09 PM 6 INSTALLATION Parts Included Parts NOTE • Depending on your ventilation requirements, you may not use all of these parts. Tools and Materials You will need the following tools and materials for the installation: a Power cord clamp bushing (1ea): for the cord hole in a metal upper cabinet b 1/4" x 2" lag screw (2ea): for wall stud holes c 1/4" x 3" toggle bolts (2ea): for drywall holes Spring toggle heads (2ea): for the toggle bolts d 1/4" x 3" bolts (2ea): for securing to the upper cabinet e Tapping screws (2ea): for attaching the damper duct connector f Power cord clamp (1ea) and dark-colored mounting screw (1ea): to hold the power cord g Mounting plate (1ea): for supporting the microwave oven h Back-draft damper: 2 pieces must be assembled as shown. (for roof venting or wall venting installation, not for room venting installation) i Upper cabinet template (1ea) j Rear wall template (1ea): 1 piece mounting plate only NOTE • You need to install at least one lag screw into a 2" x 4" stud and three anchor bolts into the wall. The mounting area must meet the 150 lb. weight requirement. a Phillips screwdriver (for the screws) b Flat blade screwdriver (for the toggle bolts) c Small side cutters (nipper) or tin snips d Measuring tape (metal preferred) e Stud finder f Plumb line g Pencil h Clear tape (for taping the templates to the wall) i Saber saw (for cutting vent holes for roof or wall venting) j Electric drill k 3/8" and 3/4" wood drill bits l 1/2" and 3/16" drill bits m Keyhole saw (for the power cord hole) n Duct tape o Caulking gun and caulk p Gloves
-
 1
1 -
 2
2 -
 3
3 -
 4
4 -
 5
5 -
 6
6 -
 7
7 -
 8
8 -
 9
9 -
 10
10 -
 11
11 -
 12
12 -
13
-
14
-
15
-
16
 |
 |
