LG RU-42PZ90 Owners Manual - Page 28
Screen Menu Options continued
 |
UPC - 719192166066
View all LG RU-42PZ90 manuals
Add to My Manuals
Save this manual to your list of manuals |
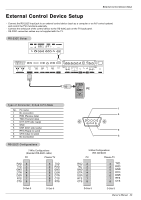
Page 28 highlights
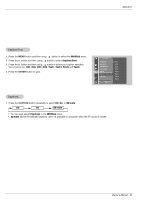
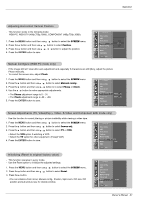
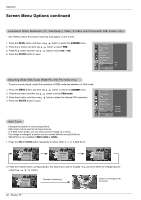
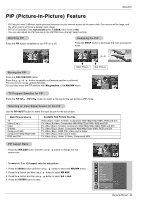
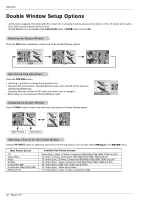
Operation Screen Menu Options continued Luminance Noise Reduction (TV, Video(Exp.), Video, S-Video and Component 480i modes only) - Use YNR to reduce the picture noise that may appear on the screen. 1. Press the MENU button and then use D / E button to select the SCREEN menu. 2. Press the G button and then use D / E button to select YNR. 3. Press the G button and then use D / E button to select On or Off. 4. Press the ENTER button to save. SCREEN Auto config. ARC Zoom in/out Position Manual config. Screen adj. Reset On YNR G Off MENU Prev. Selecting Wide VGA mode (RGB-PC, DVI-PC mode only) - To see a normal picture, match the resolution of RGB mode and selection of VGA mode. 1. Press the MENU button and then use D / E button to select the SCREEN menu. 2. Press the G button and then use D / E button to select VGA mode. 3. Press the G button and then use D / E button to select the desired VGA resolution. 4. Press the ENTER button to save. Split Zoom - Enlarges the picture in correct proportions. - Split Zoom can be used for all input sources. - In 2-Split Zoom mode, you can only move the image up or down. - If an image is enlarged, a section can be viewed without using Split Zoom. - Split Zoom is not available if OSD rotate is rotate. 1. Press the SPLIT ZOOM button repeatedly to select either 2, 4 , or 9 Split Zoom. SCREEN Auto config. ARC Zoom in/out Position Manual config. Screen adj. Reset VGA Mode G MENU Prev. 640x480 848x480 852x480 2-Split zoom 1 4 4-Split zoom 1 2 4 5 9-Split zoom 12 3 45 6 78 9 2. Press the number button corresponding to the section you wish to enlarge. You can move within the enlarged picture using the D / E / F / G button. 9-Split zoom 12 3 45 6 78 9 Example of choosing 5. Section 5 is enlarged to fill the screen. 28 Plasma TV
-
 1
1 -
2
-
3
-
4
-
5
-
6
-
7
-
8
-
9
-
10
-
11
-
12
-
13
-
14
-
15
-
16
-
17
-
18
-
19
-
20
-
21
-
22
-
 23
23 -
 24
24 -
 25
25 -
 26
26 -
 27
27 -
 28
28 -
 29
29 -
 30
30 -
 31
31 -
 32
32 -
 33
33 -
34
-
35
-
36
-
37
-
38
-
39
-
40
-
41
-
42
-
43
-
44
-
45
-
46
-
47
-
48
 |
 |
