Lenovo ThinkPad X60s Hardware Maintenance Manual - Page 100
replacement
 |
View all Lenovo ThinkPad X60s manuals
Add to My Manuals
Save this manual to your list of manuals |
Page 100 highlights
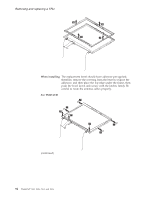
Removing and replacing a FRU 3 3 3 3 When installing: The replacement bezel should have adhesive pre-applied; therefore, remove the covering from the bezel to expose the adhesive, and then place the top edge under the frame, then push the bezel down and secure with the latches firmly. Be careful to route the antenna cables properly. For TMD LCD 1 1 1 1 1 1 1 (continued) 94 ThinkPad® X60, X60s, X61, and X61s
-
 1
1 -
2
-
3
-
4
-
5
-
6
-
7
-
8
-
9
-
10
-
11
-
12
-
13
-
14
-
15
-
16
-
17
-
18
-
19
-
20
-
21
-
22
-
23
-
24
-
25
-
26
-
27
-
28
-
29
-
30
-
31
-
32
-
33
-
34
-
35
-
36
-
37
-
38
-
39
-
40
-
41
-
42
-
43
-
44
-
45
-
46
-
47
-
48
-
49
-
50
-
51
-
52
-
53
-
54
-
55
-
56
-
57
-
58
-
59
-
60
-
61
-
62
-
63
-
64
-
65
-
66
-
67
-
68
-
69
-
70
-
71
-
72
-
73
-
74
-
75
-
76
-
77
-
78
-
79
-
80
-
81
-
82
-
83
-
84
-
85
-
86
-
87
-
88
-
89
-
90
-
91
-
92
-
93
-
94
-
 95
95 -
 96
96 -
 97
97 -
 98
98 -
 99
99 -
 100
100 -
 101
101 -
 102
102 -
 103
103 -
 104
104 -
 105
105 -
106
-
107
-
108
-
109
-
110
-
111
-
112
-
113
-
114
-
115
-
116
-
117
-
118
-
119
-
120
-
121
-
122
-
123
-
124
-
125
-
126
-
127
-
128
-
129
-
130
-
131
-
132
-
133
-
134
-
135
-
136
-
137
-
138
-
139
-
140
-
141
-
142
-
143
-
144
-
145
-
146
-
147
-
148
-
149
-
150
-
151
-
152
-
153
-
154
-
155
-
156
-
157
-
158
-
159
-
160
-
161
-
162
-
163
-
164
-
165
-
166
-
167
-
168
-
169
-
170
-
171
-
172
-
173
-
174
-
175
-
176
-
177
-
178
-
179
-
180
-
181
-
182
-
183
-
184
-
185
-
186
-
187
-
188
-
189
-
190
-
191
-
192
-
193
-
194
-
195
-
196
-
197
-
198
-
199
-
200
-
201
-
202
-
203
-
204
-
205
-
206
-
207
-
208
-
209
-
210
-
211
-
212
-
213
-
214
-
215
-
216
-
217
-
218
-
219
-
220
-
221
-
222
-
223
-
224
-
225
-
226
-
227
-
228
-
229
-
230
 |
 |

3
3
3
3
When
installing:
The
replacement
bezel
should
have
adhesive
pre-applied;
therefore,
remove
the
covering
from
the
bezel
to
expose
the
adhesive,
and
then
place
the
top
edge
under
the
frame,
then
push
the
bezel
down
and
secure
with
the
latches
firmly.
Be
careful
to
route
the
antenna
cables
properly.
For
TMD
LCD
1
1
1
1
1
1
1
(continued)
Removing
and
replacing
a
FRU
94
ThinkPad
®
X60,
X60s,
X61,
and
X61s