Lexmark 20K1100 Setup Guide - Page 35
Load paper, side of the tray which indicates
 |
UPC - 734646641005
View all Lexmark 20K1100 manuals
Add to My Manuals
Save this manual to your list of manuals |
Page 35 highlights
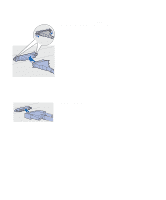
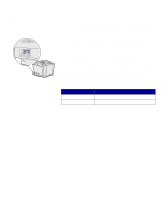
3 Squeeze the tabs at the sides of the length guide together as shown. Slide the guide to the correct position for the size of paper you are loading, according to the size indicators on the bottom front of the tray. 4 Squeeze the tabs at the sides of the width guide together as shown. Slide the width guide to the correct position for the size of paper you are loading, according to the size indicators on the bottom left of the tray. Notice the load line label on the side of the tray which indicates the maximum stack height for your media. 5 Flex the sheets back and forth to loosen them, then fan them. Do not fold or crease the media. Straighten the edges on a level surface. Load paper 30
-
 1
1 -
2
-
3
-
4
-
5
-
6
-
7
-
8
-
9
-
10
-
11
-
12
-
13
-
14
-
15
-
16
-
17
-
18
-
19
-
20
-
21
-
22
-
23
-
24
-
25
-
26
-
27
-
28
-
29
-
 30
30 -
 31
31 -
 32
32 -
 33
33 -
 34
34 -
 35
35 -
 36
36 -
 37
37 -
 38
38 -
 39
39 -
 40
40 -
41
-
42
-
43
-
44
-
45
-
46
-
47
-
48
-
49
-
50
-
51
-
52
-
53
-
54
-
55
-
56
-
57
-
58
-
59
-
60
-
61
-
62
-
63
-
64
-
65
-
66
 |
 |

30
Load paper
3
Squeeze the tabs at the sides of
the length guide together as
shown. Slide the guide to the
correct position for the size of
paper you are loading, according
to the size indicators on the bottom
front of the tray.
4
Squeeze the tabs at the sides of
the width guide together as shown.
Slide the width guide to the correct
position for the size of paper you
are loading, according to the size
indicators on the bottom left of the
tray.
Notice the load line label on the
side of the tray which indicates the
maximum stack height for your
media.
5
Flex the sheets back and forth to
loosen them, then fan them. Do
not fold or crease the media.
Straighten the edges on a level
surface.