Lexmark 22R0010 Menus and Messages - Page 9
Administrative Settings, Utility Menu, Network Menu - printer cartridges
 |
UPC - 734646009553
View all Lexmark 22R0010 manuals
Add to My Manuals
Save this manual to your list of manuals |
Page 9 highlights
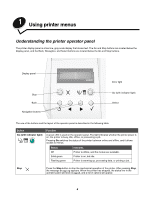
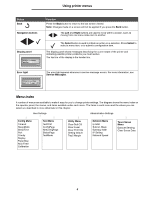
Using printer menus Administrative Settings The Admin menus consist of the Utility Menu, Network Menu, and Toner Sense Menu. To access these menus: 1 Make sure the printer is on and the Ready message appears. 2 Press . 3 Press 4 Press and hold for 3 seconds until you see Utility Menu. 5 Press to choose either the Utility Menu, Network Menu, or Toner Sense Menu, and then press the menu. to enter Utility Menu The Utility Menu is used when resetting maintenance items or restoring factory defaults. Menu selection Clear Belt CG Clear Fuser Clear Print Info Setting default Tray2 Margin Purpose Resets the count for the photodeveloper cartridge. Resets the count for the Fuser. Resets the page count for the printer to zero. Returns printer settings to the factory default values. Specifies the adjustment value of the tray 2 paper feed. Note: This setting will only be available if the optional 530sheet drawer is installed. Values Not Execute Execute -35-35 (0*) If Not Execute is selected, then the User-defined settings remain. To Execute: 1 Press to choose Execute, and then press to perform the action. 2 Once the action is performed, press to return to Ready. 1 Press to choose the value, and then press to save. 2 Once the action is performed, press to return to Ready. Network Menu The Network Menu is used for setting up the internal network adapter. Menu selection Ip Addr Subnet. Mask Gateway Addr Purpose Sets the network port address. Sets the network port subnet mask. Sets the network port gateway Address. Values 0.0.0.0 * to 255.255.255.254 1 Press to choose the menu item, and then press . The address is now available for input. 2 Press to change the first value (or hold down to scroll faster), and then press to save and move to the next value. 3 Repeat until the desired address is entered. 4 Once the address is entered, press to return to Ready. 9
-
 1
1 -
2
-
3
-
 4
4 -
 5
5 -
 6
6 -
 7
7 -
 8
8 -
 9
9 -
 10
10 -
 11
11 -
 12
12 -
 13
13 -
 14
14 -
15
 |
 |
