Lexmark 920dn User's Guide - Page 10

Remove print, media; adjust, width guides., Status / Supplies, View supplies, Ready, Tray 1Low,

Page 10 highlights

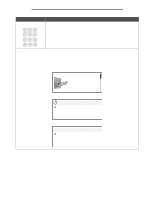
Learning about the printer Button Numeric pad 1 2 3 4 5 6 789 0 # Function The numeric pad consists of numbers, a pound '#' sign, and a backspace button. The 5 button has a raised bump for non-visual orientation. The numbers are used to enter numeric values for items like quantities or PINs. The backspace is used to delete the number to the left of the cursor. Pressing the backspace multiple times will delete additional entries. Note: The pound '#' sign is not used. Display panel The display panel shows messages and graphics describing the current state of the printer and indicating possible printer problems you must resolve. The top line of the display is the header line. If applicable, it will contain the graphic indicating the Back button can be used. It will also display the current status, and the Supplies (Warnings) status. If multiple warnings are present, each warning will be separated by a comma. The other three lines of the display are the body of the screen. This is where you view printer status, supplies messages, show-me screens, and make selections. 1. Remove print media; adjust width guides. Status / Supplies View supplies Ready Tray 1Low Printing pg. 1 Cancel a Job Status / Supplies Held jobs Understanding the printer operator panel 10

  • 1
  • 2
  • 3
  • 4
  • 5
  • 6
  • 7
  • 8
  • 9
  • 10
  • 11
  • 12
  • 13
  • 14
  • 15
  • 16
  • 17
  • 18
  • 19
  • 20
  • 21
  • 22
  • 23
  • 24
  • 25
  • 26
  • 27
  • 28
  • 29
  • 30
  • 31
  • 32
  • 33
  • 34
  • 35
  • 36
  • 37
  • 38
  • 39
  • 40
  • 41
  • 42
  • 43
  • 44
  • 45
  • 46
  • 47
  • 48
  • 49
  • 50
  • 51
  • 52
  • 53
  • 54
  • 55
  • 56
  • 57
  • 58
  • 59
  • 60
  • 61
  • 62
  • 63
  • 64
  • 65
  • 66
  • 67
  • 68
  • 69
  • 70
  • 71
  • 72
  • 73
  • 74
  • 75
  • 76
  • 77
  • 78
  • 79
  • 80
  • 81
  • 82
  • 83
  • 84
  • 85
  • 86
  • 87
  • 88
  • 89
  • 90
  • 91
  • 92
  • 93
  • 94
  • 95
  • 96
  • 97
  • 98
  • 99
  • 100
  • 101
  • 102
  • 103
  • 104
  • 105
  • 106
  • 107
  • 108
  • 109
  • 110
  • 111
  • 112
  • 113
  • 114
  • 115
  • 116
  • 117
  • 118
  • 119
  • 120
  • 121
  • 122
  • 123
  • 124
  • 125
  • 126
  • 127
  • 128
  • 129
  • 130
  • 131
  • 132
  • 133
  • 134
  • 135
  • 136
  • 137
  • 138
  • 139
  • 140
  • 141
  • 142
  • 143
  • 144
  • 145
  • 146
  • 147
  • 148
  • 149
  • 150
  • 151
  • 152
  • 153
  • 154
  • 155
  • 156
  • 157
  • 158
  • 159
  • 160
  • 161
  • 162
  • 163

Understanding the printer operator panel
10
Learning about the printer
The numeric pad consists of numbers, a pound '#' sign, and a backspace button. The 5
button has a raised bump for non-visual orientation.
The numbers are used to enter numeric values for items like quantities or PINs. The
backspace is used to delete the number to the left of the cursor. Pressing the backspace
multiple times will delete additional entries.
Note:
The pound '#' sign is not used.
Display panel
The display panel shows messages and graphics describing the current state of the printer and indicating possible printer
problems you must resolve.
The top line of the display is the header line. If applicable, it will contain the graphic indicating the
Back
button can be
used. It will also display the current status, and the Supplies (Warnings) status. If multiple warnings are present, each
warning will be separated by a comma.
The other three lines of the display are the body of the screen. This is where you view printer status, supplies messages,
show-me screens, and make selections.
Button
Function
1
2
3
4
5
6
7
8
9
0
#
Numeric pad
1. Remove print
media; adjust
width guides.
Status / Supplies
View supplies
Ready
Tray 1Low
Printing pg. 1
Cancel a Job
Status / Supplies
Held jobs