Lexmark C920 User's Guide - Page 25
Installing and removing options, Internal options, Other options - firmware
 |
View all Lexmark C920 manuals
Add to My Manuals
Save this manual to your list of manuals |
Page 25 highlights
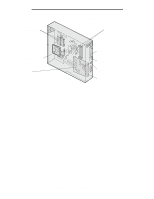
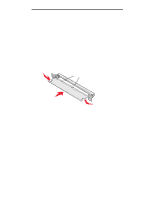
4 Installing and removing options CAUTION: If you are installing memory or option cards sometime after setting up the printer, turn the printer off and unplug the power cord before continuing. If you have any other devices connected to the printer, turn them off as well and unplug any cables going to the printer. You can customize your printer memory capacity and connectivity by adding optional cards. You can also use these instructions to help you locate an option for removal. The instructions in this section cover the following options: Internal options: • Memory cards - Printer memory - Flash memory - Fonts • Firmware cards - Bar Code - ImageQuick™ - IPDS and SCS/TNe - PrintCryption™ Note: Use a Phillips screwdriver to remove the system board access cover. • Other internal options - Printer hard disk - RS-232 serial interface card - Parallel 1284-B interface card - MarkNet N8000 Series internal print servers (also called internal network adapters or INAs) Other options: • Duplex unit (removal instructions only) • Finisher • High capacity feeder • Optional drawer (removal instructions only) Installing and removing options 25
-
 1
1 -
2
-
3
-
4
-
5
-
6
-
7
-
8
-
9
-
10
-
11
-
12
-
13
-
14
-
15
-
16
-
17
-
18
-
19
-
 20
20 -
 21
21 -
 22
22 -
 23
23 -
 24
24 -
 25
25 -
 26
26 -
 27
27 -
 28
28 -
 29
29 -
 30
30 -
31
-
32
-
33
-
34
-
35
-
36
-
37
-
38
-
39
-
40
-
41
-
42
-
43
-
44
-
45
-
46
-
47
-
48
-
49
-
50
-
51
-
52
-
53
-
54
-
55
-
56
-
57
-
58
-
59
-
60
-
61
-
62
-
63
-
64
-
65
-
66
-
67
-
68
-
69
-
70
-
71
-
72
-
73
-
74
-
75
-
76
-
77
-
78
-
79
-
80
-
81
-
82
-
83
-
84
-
85
-
86
-
87
-
88
-
89
-
90
-
91
-
92
-
93
-
94
-
95
-
96
-
97
-
98
-
99
-
100
-
101
-
102
-
103
-
104
-
105
-
106
-
107
-
108
-
109
-
110
-
111
-
112
-
113
-
114
-
115
-
116
-
117
-
118
-
119
-
120
-
121
-
122
-
123
-
124
-
125
-
126
-
127
-
128
-
129
-
130
-
131
-
132
-
133
-
134
-
135
-
136
-
137
-
138
-
139
-
140
-
141
-
142
-
143
-
144
-
145
-
146
-
147
-
148
-
149
-
150
-
151
-
152
-
153
-
154
-
155
-
156
-
157
-
158
-
159
-
160
-
161
-
162
-
163
 |
 |
