Lexmark Forms Printer 2590n Lexmark Forms Printer 2500+ Series User's Guide - Page 13
Printing a network setup Printing from Windows or DOS, Windows
 |
View all Lexmark Forms Printer 2590n manuals
Add to My Manuals
Save this manual to your list of manuals |
Page 13 highlights
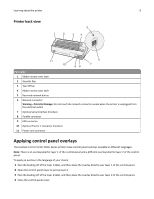
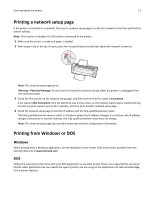
Learning about the printer 13 Printing a network setup page If the printer is attached to a network, then print a network setup page to verify the network connection and find the printer address. Note: This function is disabled if a USB cable is connected to the printer. 1 Make sure the printer is ready and paper is loaded. 2 With a paper clip or the tip of a pen, press the recessed button located just above the network connector. Note: The network setup page prints. Warning-Potential Damage: Do not touch the network connector except when the printer is unplugged from the electrical outlet. 3 Check the first section on the network setup page, and then confirm that the status is Connected. If the status is Not Connected, then the LAN drop may not be active, or the network cable may be malfunctioning. Consult a system support person for a solution, and then print another network setup page. 4 Check the network setup page to find the IP address and the fully qualified domain name. The fully qualified domain name is useful in situations where the IP address changes. For instance, the IP address changes if the printer is moved; however, the fully qualified domain name does not change. Note: The network setup page also provides important network configuration information. Printing from Windows or DOS Windows When printing from a Windows application, use the Windows Forms Printer 2500 Series driver available from the Lexmark Web site at www.lexmark.com. DOS Follow the instructions that came with your DOS application to see what printer drivers are supported for your level of DOS. Most applications let you specify the type of printer you are using so the application can take full advantage of the printer features.
-
 1
1 -
2
-
3
-
4
-
5
-
6
-
7
-
 8
8 -
 9
9 -
 10
10 -
 11
11 -
 12
12 -
 13
13 -
 14
14 -
 15
15 -
 16
16 -
 17
17 -
 18
18 -
19
-
20
-
21
-
22
-
23
-
24
-
25
-
26
-
27
-
28
-
29
-
30
-
31
-
32
-
33
-
34
-
35
-
36
-
37
-
38
-
39
-
40
-
41
-
42
-
43
-
44
-
45
-
46
-
47
-
48
-
49
-
50
-
51
-
52
-
53
-
54
-
55
-
56
-
57
-
58
-
59
-
60
-
61
-
62
-
63
-
64
-
65
-
66
-
67
-
68
-
69
-
70
-
71
-
72
-
73
-
74
-
75
-
76
-
77
-
78
-
79
-
80
-
81
-
82
-
83
-
84
-
85
 |
 |