Lexmark MX410 Quick Reference
Lexmark MX410 Manual
 |
View all Lexmark MX410 manuals
Add to My Manuals
Save this manual to your list of manuals |
Lexmark MX410 manual content summary:
- Lexmark MX410 | Quick Reference - Page 1
. Note: The menus are available only when the printer is in ready state. • Show the current printer status such as Ready or Busy. • Show printer supply conditions such as Imaging unit low or Cartridge Low. • Show intervention messages and the instructions on how to clear them. 1 Touch 7 Status - Lexmark MX410 | Quick Reference - Page 2
may vary depending on your home screen customization settings, administrative setup, and active embedded applications. Some applications are supported only on select printer models. • There may be additional solutions and applications available for purchase. To learn more, inquire at your point - Lexmark MX410 | Quick Reference - Page 3
Macintosh users Note: scan and print both sides of a card on a single page, saving paper scan image with a border around it. 4 Click Apply. To use the application, touch Card Copy on the printer home screen, and then follow the instructions. Using MyShortcut Use To Create shortcuts on the printer - Lexmark MX410 | Quick Reference - Page 4
of the computer" on page 3. 4 Click Apply. To use the application, touch Multi Send on the printer home screen, and then follow the instructions on the printer display. Setting up Scan to Network Use To Scan a document and send it to a shared network folder. You can define up to 30 unique folder - Lexmark MX410 | Quick Reference - Page 5
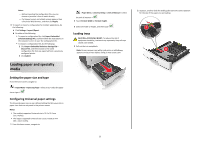
to: > Paper Menu > Paper Size/Type > select a tray > select the paper size or type > Configuring Universal paper settings The Universal paper size is a user‑defined setting that lets you print on paper sizes that are not preset in the printer menus. Notes: • The smallest supported Universal size is - Lexmark MX410 | Quick Reference - Page 6
length. • When loading legal‑size paper, the length guide extends beyond the base leaving the paper exposed to dust. To protect the paper from dust, you can purchase a dust cover separately. For more information, contact customer support. • If you are loading A6-size paper in the standard tray, then - Lexmark MX410 | Quick Reference - Page 7
paper size and type to avoid paper jams and print quality problems. Loading the multipurpose feeder Use the multipurpose feeder when printing on different paper and open. 7 From the printer control panel, set the paper size and paper type in the Paper menu to match the paper loaded in the tray. 7 - Lexmark MX410 | Quick Reference - Page 8
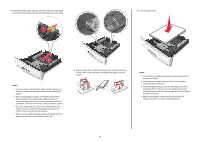
media into the multipurpose feeder. • Make sure the paper or specialty media is below the maximum paper fill indicator located on the paper guides. Overfilling may cause paper jams. 3 Prepare the paper or specialty media for loading. • Flex sheets of paper back and forth to loosen them, and then fan - Lexmark MX410 | Quick Reference - Page 9
damage the printer. 5 From the printer control panel, set the paper size and paper type in the Paper menu to match the paper or specialty > Paper Menu > Custom Types. 3 Select a custom paper type name, and then select a paper type Note: Paper is the factory default paper type for all user‑defined - Lexmark MX410 | Quick Reference - Page 10
printer model, touch , , or Submit. Printing a document 1 From the Paper menu on the printer control panel, set the paper type and size to match the paper loaded. 2 Send the print job: For Windows users Menu > Toner Darkness. 3 Adjust the setting, and then click Submit. Using the printer control - Lexmark MX410 | Quick Reference - Page 11
supported. 11 Recommended flash drives File type Many flash drives are tested and approved for use with Documents: the printer. For more information, contact the place where you purchased the printer. • .pdf • .xps Images For Windows users 1 Open the printers folder. In Windows 8 From the Search - Lexmark MX410 | Quick Reference - Page 12
. 2 If you are loading a document into the ADF tray, then adjust the paper guides. Note: To avoid a cropped image, make sure the size of the original document and the size of the copy paper are the same. 3 From the printer control panel, press . Copying using the ADF 1 Load an original document - Lexmark MX410 | Quick Reference - Page 13
is loaded properly. 2 If you are loading a document into the ADF tray, then adjust the paper guides. 3 From the home screen, touch Fax. 4 From the printer control panel keypad, enter the fax number or the shortcut number. Note: To add recipients, touch , and then enter the recipient's telephone - Lexmark MX410 | Quick Reference - Page 14
loading a document into the ADF tray, then adjust the paper guides. 3 From the printer control panel, press #, and then enter the shortcut information. Scanning Using Scan to Network Scan to Network lets you scan your documents to network destinations specified by your system support person. - Lexmark MX410 | Quick Reference - Page 15
are loading a document into the ADF tray, then adjust the paper guides. 3 From the printer control panel, press # on the keypad, and then enter the FTP shortcut number. 4 Touch Scan It. Scanning to a computer or flash drive Scanning to a computer using the Embedded Web Server 1 Open a Web browser - Lexmark MX410 | Quick Reference - Page 16
xx] 16 Jam access area Printer control panel message What to do 3 Front door [x]‑page jam, open front door. [20y.xx] Open the front door, then remove the toner cartridge and imaging unit, and then the jammed paper. 4 Multipurpose [x]‑page jam, clear Remove all paper from feeder manual the - Lexmark MX410 | Quick Reference - Page 17
the green flap in front of the printer. 1 2 Pull the toner cartridge out using the handle. Warning-Potential Damage: Do not touch the shiny blue photoconductor drum under the imaging unit. Doing so may affect the quality of future print jobs. 6 Firmly grasp the jammed paper on each side, and then - Lexmark MX410 | Quick Reference - Page 18
on the side rails inside the printer, and then insert the imaging unit into the printer. [x]‑page jam, open rear door. [20y.xx] 1 Open the front door to loosen the jammed paper in the rear door. 2 Note: Make sure all paper fragments are removed. 8 Insert the toner cartridge by aligning the side - Lexmark MX410 | Quick Reference - Page 19
surface to cool before touching it. 1 Pull the tray completely out of the printer. 3 Firmly grasp the jammed paper on each side, and then gently pull it out. Note: Make sure all paper fragments are removed. 2 Firmly grasp the jammed paper on each side, and then gently pull it out. Note: Make sure - Lexmark MX410 | Quick Reference - Page 20
, touch to clear the message and continue printing. For non‑touch‑screen printer models, select Next > > Clear the jam, press OK > . [x]‑page jam, clear manual feeder. [25y.xx] 1 From the multipurpose feeder, firmly grasp the jammed paper on each side, and then gently pull it out. Note: Make
-
 1
1 -
 2
2 -
 3
3 -
 4
4 -
 5
5 -
 6
6 -
 7
7 -
8
-
9
-
10
-
11
-
12
-
13
-
14
-
15
-
16
-
17
-
18
-
19
-
20
 |
 |

Quick Reference
Learning about the printer
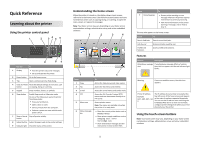
Using the printer control panel
1
7
8
2
3
4
5
6
9
Use the
To
1
Display
•
View the printer status and messages.
•
Set up and operate the printer.
2
Home button
Go to the home screen.
3
Tips
Open a context-sensitive Help dialog.
4
Clear all / Reset
button
Reset the default settings of a function, such
as copying, faxing, or scanning.
5
Keypad
Enter numbers, letters, or symbols.
6
Sleep button
Enable Sleep mode or Hibernate mode.
Do one of the following to wake the printer
from Sleep mode:
•
Press any hard button.
•
Open a door or cover.
•
Send a print job from the computer.
•
Perform a power
‑
on reset with the main
power switch.
7
Stop or Cancel
button
Stop all printer activity.
8
Submit button
Submit changes made in the printer settings.
9
Indicator light
Check the status of the printer.
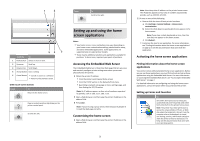
Understanding the home screen
When the printer is turned on, the display shows a basic screen,
referred to as the home screen. Use the home screen buttons and icons
to initiate an action such as copying, faxing, or scanning; to open the
menu screen; or respond to messages.
Note:
Your home screen may vary depending on your home screen
customization settings, administrative setup, and active embedded
solutions.
1
2
3
4
5
6
7
Touch
To
1
Copy
Access the Copy menus and make copies.
2
Fax
Access the Fax menus and send fax.
3
E
‑
mail
Access the E-mail menus and send e
‑
mails.
4
FTP
Access the File Transfer Protocol (FTP)
menus and scan documents directly to an
FTP server.
5
Menu icon
Access printer menus.
Note:
The menus are available only when
the printer is in ready state.
6
Status message
bar
•
Show the current printer status such as
Ready
or
Busy
.
•
Show printer supply conditions such as
Imaging unit low
or
Cartridge Low
.
•
Show intervention messages and the
instructions on how to clear them.
Touch
To
7
Status/Supplies
•
Show a printer warning or error
message whenever the printer requires
intervention to continue processing.
•
View more information on the printer
warning or message, and on how to
clear it.
This may also appear on the home screen:
Touch
To
Search Held Jobs
Search current held jobs.
Jobs by user
Access print jobs saved by user.
Profiles and
Solutions
Access profiles and solutions.
Features
Feature
Description
Attendance message
alert
If an attendance message affects a function,
then this icon appears and the red indicator light
blinks.
Warning
If an error condition occurs, then this icon
appears.
Printer IP address
Example:
123.123.123.12
3
The IP address of your printer is located at the
top left corner of the home screen and appears
as four sets of numbers separated by periods.
You can use the IP address when accessing the
Embedded Web Server to view and remotely
configure printer settings even when you are not
physically near the printer.
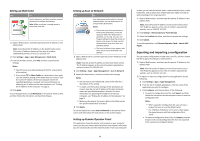
Using the touch-screen buttons
Note:
Your home screen may vary, depending on your home screen
customization settings, administrative setup, and active embedded
solutions.
1