Lexmark MX410 Quick Reference - Page 18
jam, open rear door. [20y.xx], jam, clear standard bin. [20y.xx]
 |
View all Lexmark MX410 manuals
Add to My Manuals
Save this manual to your list of manuals |
Page 18 highlights
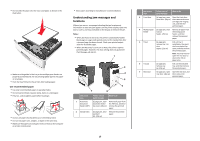
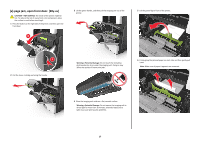
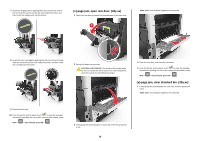
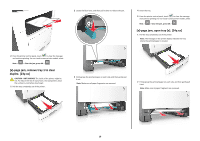
7 Insert the imaging unit by aligning the arrows on the side rails of the unit with the arrows on the side rails inside the printer, and then insert the imaging unit into the printer. [x]‑page jam, open rear door. [20y.xx] 1 Open the front door to loosen the jammed paper in the rear door. 2 Note: Make sure all paper fragments are removed. 8 Insert the toner cartridge by aligning the side rails of the cartridge with the arrows on the side rails inside the printer, and then insert the cartridge into the printer. 1 2 Gently pull down the rear door. CAUTION-HOT SURFACE: The inside of the printer might be hot. To reduce the risk of injury from a hot component, allow the surface to cool before touching it. 4 Close the rear door, and then the front door. 5 From the printer control panel, touch to clear the message and continue printing. For non‑touch‑screen printer models, select Next > > Clear the jam, press OK > . [x]‑page jam, clear standard bin. [20y.xx] 1 Firmly grasp the jammed paper on each side, and then gently pull it out. Note: Make sure all paper fragments are removed. 9 Close the front door. 10 From the printer control panel, touch to clear the message and continue printing. For non‑touch‑screen printer models, select Next > > Clear the jam, press OK > . 3 Firmly grasp the jammed paper on each side, and then gently pull it out. 18
-
 1
1 -
2
-
3
-
4
-
5
-
6
-
7
-
8
-
9
-
10
-
11
-
12
-
 13
13 -
 14
14 -
 15
15 -
 16
16 -
 17
17 -
 18
18 -
 19
19 -
 20
20
 |
 |
