Lexmark MX410 Quick Reference - Page 9
Linking and unlinking trays
 |
View all Lexmark MX410 manuals
Add to My Manuals
Save this manual to your list of manuals |
Page 9 highlights
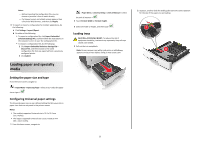
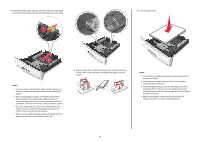
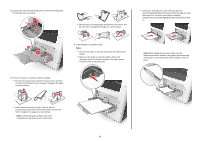
• Load letterhead faceup with the top edge entering the printer first. For two‑sided (duplex) printing, load letterhead facedown with the bottom edge entering the printer first. • Load envelopes with the flap on the left side facedown. Warning-Potential Damage: Never use envelopes with stamps, clasps, snaps, windows, coated linings, or self‑stick adhesives. These envelopes may severely damage the printer. 5 From the printer control panel, set the paper size and paper type in the Paper menu to match the paper or specialty media loaded in the multipurpose feeder. Linking and unlinking trays When one linked tray becomes empty, paper feeds from the next linked tray. We recommend giving all custom paper, such as letterhead and different colored plain papers, a different custom type name so that the trays they are in do not automatically link. Linking and unlinking trays 1 Open a Web browser, and then type the printer IP address in the address field. Notes: • View the printer IP address on the printer home screen. The IP address appears as four sets of numbers separated by periods, such as 123.123.123.123. • If you are using a proxy server, then temporarily disable it to load the Web page correctly. 2 Click Settings > Paper Menu. 3 Change the paper size and type settings for the trays you are linking. • To link trays, make sure the paper size and type for the tray match that of the other tray. • To unlink trays, make sure the paper size or type for the tray does not match that of the other tray. 4 Click Submit. Note: You can also change the paper size and type settings using the printer control panel. For more information, see "Setting the paper size and type" on page 5. Warning-Potential Damage: Paper loaded in the tray should match the paper type name assigned in the printer. The temperature of the fuser varies according to the specified paper type. Printing issues may occur if settings are not properly configured. Creating a custom name for a paper type Using the Embedded Web Server 1 Open a Web browser, and then type the printer IP address in the address field. 9 Notes: • View the printer IP address on the printer home screen. The IP address appears as four sets of numbers separated by periods, such as 123.123.123.123. • If you are using a proxy server, then temporarily disable it to load the Web page correctly. 2 Click Settings > Paper Menu > Custom Names. 3 Select a custom name, and then type a custom paper type name. 4 Click Submit. 5 Click Custom Types, and then verify if the new custom paper type name has replaced the custom name. Using the printer control panel 1 From the home screen, navigate to: > Paper Menu > Custom Names 2 Select a custom name, and then type a custom paper type name. 3 Touch . 4 Touch Custom Types, and then verify that the new custom paper type name has replaced the custom name. Assigning a custom paper type Using the Embedded Web Server Assign a custom paper type name to a tray when linking or unlinking trays. 1 Open a Web browser, and then type the printer IP address in the address field. Notes: • View the printer IP address on the printer home screen. The IP address appears as four sets of numbers separated by periods, such as 123.123.123.123. • If you are using a proxy server, then temporarily disable it to load the Web page correctly. 2 Click Settings > Paper Menu > Custom Types. 3 Select a custom paper type name, and then select a paper type Note: Paper is the factory default paper type for all user‑defined custom names. 4 Click Submit.
-
 1
1 -
2
-
3
-
 4
4 -
 5
5 -
 6
6 -
 7
7 -
 8
8 -
 9
9 -
 10
10 -
 11
11 -
 12
12 -
 13
13 -
 14
14 -
15
-
16
-
17
-
18
-
19
-
20
 |
 |
