Lexmark MX410 Quick Reference - Page 5
Loading paper and specialty, media - instructions
 |
View all Lexmark MX410 manuals
Add to My Manuals
Save this manual to your list of manuals |
Page 5 highlights
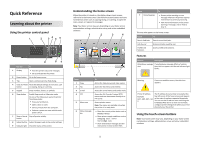
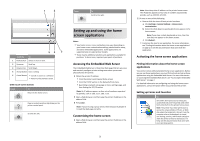
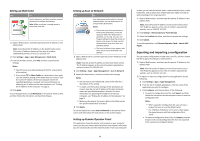
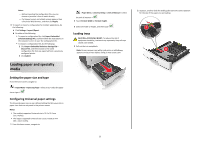
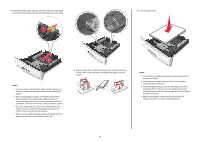
Notes: - Before importing the configuration file, you can choose to preview it first or load it directly. - If a timeout occurs and a blank screen appears, then refresh the Web browser, and then click Apply. 3 To export or import a configuration for multiple applications, do the following: a Click Settings > Import/Export. b Do either of the following: • To export a configuration file, click Export Embedded Solutions Settings File, and then follow the instructions on the computer screen to save the configuration file. • To import a configuration file, do the following: 1 Click Import Embedded Solutions Settings File > Choose File, and then browse to the saved configuration file that was exported from a previously configured printer. 2 Click Submit. Loading paper and specialty media Setting the paper size and type From the home screen navigate to: > Paper Menu > Paper Size/Type > select a tray > select the paper size or type > Configuring Universal paper settings The Universal paper size is a user‑defined setting that lets you print on paper sizes that are not preset in the printer menus. Notes: • The smallest supported Universal size is 76.2 x 76.2 mm (3 x 3 inches). • The largest supported Universal size is 215.9 x 359.92 mm (8.5 x 14.17 inches). 1 From the home screen, navigate to: > Paper Menu > Universal Setup > Units of Measure > select the unit of measure > 2 Touch Portrait Width or Portrait Height. 3 Select the width or height, and then touch . Loading trays CAUTION-POTENTIAL INJURY: To reduce the risk of equipment instability, load each tray separately. Keep all trays closed until needed. 1 Pull out the tray completely. Note: Do not remove trays while a job prints or while Busy appears on the printer display. Doing so may cause a jam. 2 Squeeze, and then slide the width guide tab to the correct position for the size of the paper you are loading. 1 LGLLTR A4 EXEC B5 A5 2 5
-
 1
1 -
 2
2 -
 3
3 -
 4
4 -
 5
5 -
 6
6 -
 7
7 -
 8
8 -
 9
9 -
 10
10 -
 11
11 -
12
-
13
-
14
-
15
-
16
-
17
-
18
-
19
-
20
 |
 |
