Lexmark X864 IPDS Emulation User's Guide - Page 15
Changing IPDS Settings Using the MFP Touch Screen, 2.3.1 Accessing the IPDS MENU - power settings
 |
View all Lexmark X864 manuals
Add to My Manuals
Save this manual to your list of manuals |
Page 15 highlights
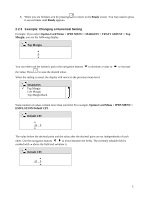
2.3 Changing IPDS Settings Using the MFP Touch Screen 2.3.1 Accessing the IPDS MENU The IPDS emulation options and settings are accessed from the IPDS MENU. To reach the menu: 1. Make sure the printer is powered ON and the Ready message appears. 2. Touch the key icon (Menus) on the touch screen. 3. Use the icons or to scroll through the main menus displayed on the screen. 4. Touch Option Card Menu. 5. Now you will see a list of options. Touch IPDS MENU. The same method is used to scroll through lists of menus and options. As you move through the menus, the top line in the screen shows the navigation path, so that you can always see the name of the group (menu or option) to which the displayed items (options or settings) belong. When you select an option, you will either scroll through the list of values presented, as shown in section 2.3.2 on page 15, or enter a number as shown in section 2.3.3 on page 16. User-selected default settings remain in effect until you save new settings or restore the factory defaults. Concerning activation of saved settings, see section 2.3.4 on page 17. 2.3.2 Example: Selecting a New Value as a Setting 1. Navigate to IPDS MENU as explained in section 2.3.1 on page 15. 2. For this example, touch EMULATION, which happens to be the first option group on the list. 3. Now you will see a list of options. Touch or to scroll through the options until you see the item you need. In this example, locate and touch Host Resolution. 4. Now you will see a list of settings. The currently active setting, in this example Auto, is always presented first. Touch or to scroll through the settings until you see the item you need. In this example locate "300 dpi". 5. Touch (Submit). Note: If you just want to check the active setting of an option without making changes, touch (Back) and no changes will be saved. 6. While the printer is saving the setting, Submitting Selection will be displayed. 7. When the setting is saved, the screen will revert to the previous menu level. 8. If you need to change multiple settings within the same menu - such as EMULATION, scroll through the menu options and change the settings. When you touch changes will be saved. (Submit), all 15
-
 1
1 -
2
-
3
-
4
-
5
-
6
-
7
-
8
-
9
-
 10
10 -
 11
11 -
 12
12 -
 13
13 -
 14
14 -
 15
15 -
 16
16 -
 17
17 -
 18
18 -
 19
19 -
 20
20 -
21
-
22
-
23
-
24
-
25
-
26
-
27
-
28
-
29
-
30
-
31
-
32
-
33
-
34
-
35
-
36
-
37
-
38
-
39
-
40
-
41
-
42
-
43
-
44
-
45
-
46
-
47
-
48
-
49
-
50
-
51
-
52
-
53
-
54
-
55
-
56
-
57
-
58
-
59
-
60
-
61
-
62
-
63
-
64
-
65
-
66
-
67
-
68
-
69
-
70
-
71
-
72
-
73
-
74
-
75
-
76
-
77
-
78
-
79
-
80
-
81
-
82
-
83
-
84
-
85
-
86
-
87
-
88
-
89
-
90
-
91
-
92
-
93
-
94
-
95
-
96
-
97
-
98
-
99
-
100
-
101
-
102
-
103
-
104
-
105
-
106
-
107
-
108
-
109
-
110
-
111
-
112
-
113
-
114
-
115
-
116
-
117
-
118
-
119
 |
 |
