Lexmark X864 IPDS Printer and Host Setup Guide - Page 10
Step 4, Con the Printer's Print Server TCP/IP Settings, Activation Timer, NOMAX, bold.
 |
View all Lexmark X864 manuals
Add to My Manuals
Save this manual to your list of manuals |
Page 10 highlights
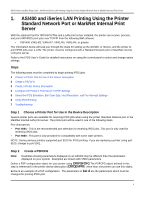
IPDS Printer and Host Setup Guide AS/400 and iSeries LAN Printing Using the Printer Standard Network Port or MarkNet Internal Print Server Example CRTDEVPRT with parameters to change shown in bold. Remote network identifier RMTNETID Workstation customizing object........ WSCST Library Authority AUT *NETATR *NONE *LIBCRTAUT Note 1: Setting the Activation Timer to *NOMAX allows multiple writers or multiple hosts to use the same printer. The writer does not time out while waiting on the printer to start a new job. Step 4 Configure the Printer's Print Server TCP/IP Settings To enable IPDS printing with a Standard Network port or a MarkNet internal LAN print server, several settings must be verified. You can verify these settings from the printer control panel as shown below. 1 From a Ready state press the MENU button (printers) or touch (Menus on MFPs). 2 Use the navigation buttons or icons to scroll to Network/Ports. 3 Select Network/Ports. TIp: To do this on printers, press the Select button ; on MFPs just touch Network/Ports. 4 Now you will see a list of menus. Select the Standard Network menu. 5 Select Std Network Setup. 6 Select TCP/IP. 7 Use the navigation buttons or icons to scroll through the options. Check each of the following settings and change them as needed to configure TCP/IP communication. TCP/IP Settings Parameter Value Activate On (Printers: Must be "On" to enable TCP/IP communi- cations. MFPs: not displayed.) Address 157.184.67.102 (Address available from your network administrator) Netmask 255.255.255.0 (Appropriate netmask for your network) Gateway 157.184.67.1 (IP address of your IP gateway) Enable DHCP On or Off (On, if you use a DHCP server.) (Off, if you set the IP address another way.) 10
-
 1
1 -
2
-
3
-
4
-
 5
5 -
 6
6 -
 7
7 -
 8
8 -
 9
9 -
 10
10 -
 11
11 -
 12
12 -
 13
13 -
 14
14 -
 15
15 -
16
-
17
-
18
-
19
-
20
-
21
-
22
-
23
-
24
-
25
-
26
-
27
-
28
-
29
-
30
-
31
-
32
-
33
-
34
-
35
-
36
-
37
-
38
-
39
-
40
-
41
 |
 |
