LiftMaster GH GH LOGIC VERSION 2 Manual - Page 15
Wiring Type Program Settings Cont'd, Self Monitoring Safety Device Options - nema 4
 |
View all LiftMaster GH manuals
Add to My Manuals
Save this manual to your list of manuals |
Page 15 highlights
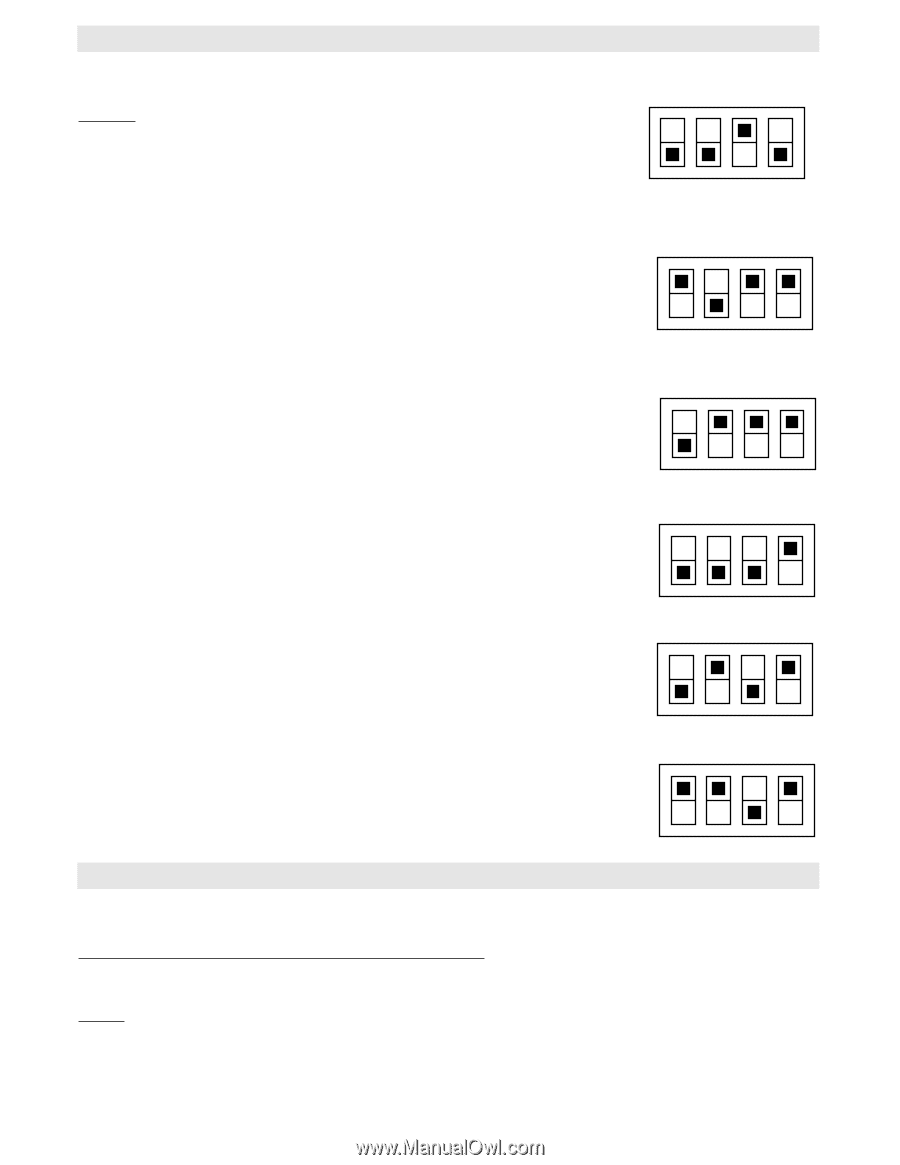
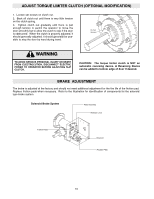
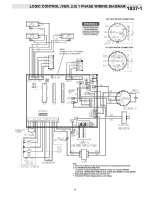
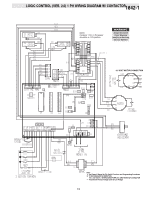
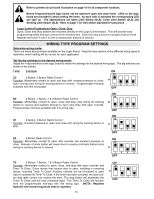
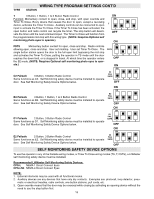
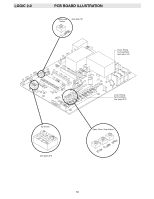
WIRING TYPE PROGRAM SETTINGS CONT'D TYPE STATION T 3 Button, 1 Button, 1 & 3 Button Radio Control ON Function: Momentary contact to open, close, and stop, with open override and ON Timer To Close. Every device that causes the door to open, except a reversing device, activates the Timer To Close. Auxiliary controls can be connected to open T input to activate the Timer To Close. If the Timer To Close has been activated, the open button and radio control can recycle the timer. The stop button will deactivate the timer until the next command input. The Timer to Close will function from 1 2 3 4 OFF the programmable mid-stop with this wiring type. (NOTE: Requires Optional self monitoring photo eyes to operate.) ON ON FSTS Momentary button contact for open, close and stop. Radio controls allowing open, close and stop. User set midstop. User set Timer To Close. The FSTS single button station opens the door to the full open limit bypassing the mid stop and activates the Timer To Close, putting the operator in TS mode until the door reaches the down limit, or is stopped in travel. At which time the operator enters 1 2 3 4 OFF the B2 mode. (NOTE: Requires Optional self monitoring photo eyes to oper- ate.) ON ON C2 C2 Failsafe 3 Button, 3 Button Radio Control FAIL SAFE Same functions as C2. Self Monitoring safety device must be installed to operate 1 2 3 4 door. See Self Monitoring Safety Device Options below. OFF ON ON B2 B2 Failsafe 3 Button, 1 Button, 1 & 3 Button Radio Control FAIL SAFE Same functions as B2. Self Monitoring safety device must be installed to operate 1 2 3 4 door. See Self Monitoring Safety Device Options below. OFF ON ON D1 D1 Failsafe 2 Button, 3 Button Radio Control FAIL SAFE Same functions as D1. Self Monitoring safety device must be installed to operate 1 2 3 4 door. See Self Monitoring Safety Device Options below. OFF ON ON E2 E2 Failsafe 2 Button, 3 Button Radio Control FAIL Same functions as E2. Self Monitoring safety device must be installed to operate SAFE door. See Self Monitoring Safety Device Options below. 1 2 3 4 OFF SELF MONITORING SAFETY DEVICE OPTIONS To use the operator in any of the Failsafe wiring modes, or Timer To Close wiring modes (TS, T, FSTS), a LiftMaster self monitoring safety device must be installed. Recommended LiftMaster Self Monitoring Safety Devices: CPS-L NEMA 1 Direct Connect Eyes CPS-LN4 NEMA 4 Direct Connect Eyes NOTE: 1. External interlocks may be used with all functional modes. 2. Auxiliary devices are any devices that have only dry contacts. Examples are: photocell, loop detector, pneu- matic or electrical treadles, radio controls, one button stations, pull cords, etc. 3. Open override means that the door may be reversed while closing by activating an opening device without the need to use the stop button first. 15
-
 1
1 -
2
-
3
-
4
-
5
-
6
-
7
-
8
-
9
-
 10
10 -
 11
11 -
 12
12 -
 13
13 -
 14
14 -
 15
15 -
 16
16 -
 17
17 -
 18
18 -
 19
19 -
 20
20 -
21
-
22
-
23
-
24
-
25
-
26
-
27
-
28
 |
 |