LiftMaster GH GH -Mechanical New style w/ thermal overload change Manual - Page 6
Install Ation
 |
View all LiftMaster GH manuals
Add to My Manuals
Save this manual to your list of manuals |
Page 6 highlights
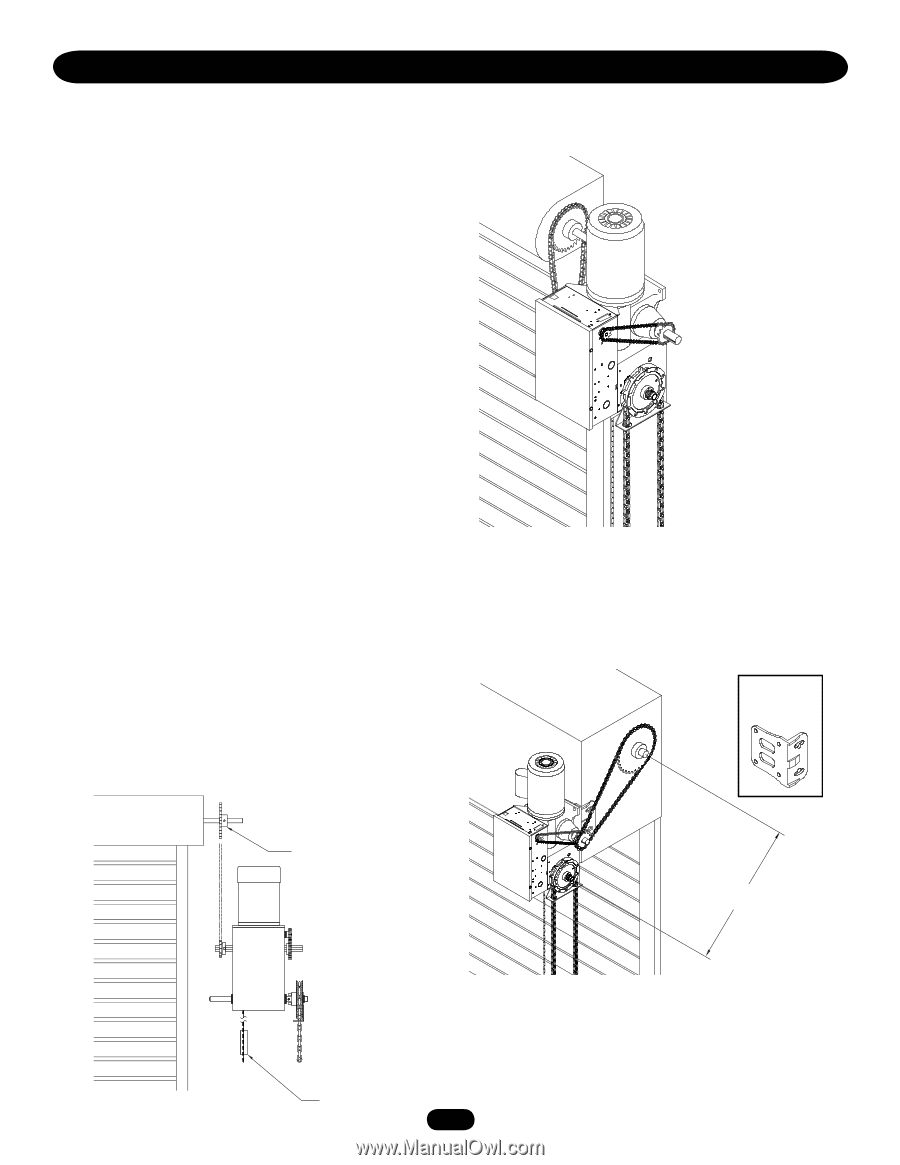
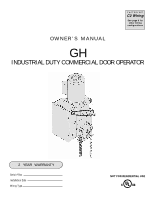
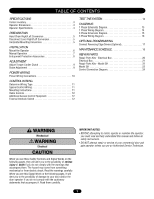
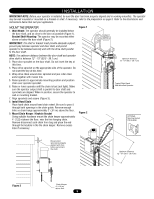
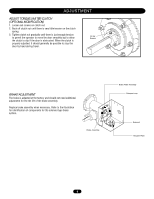
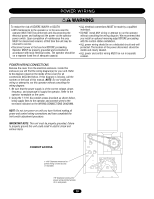
I N S TA L L AT I O N IMPORTANT NOTE: Before your operator is installed, be sure the door has been properly aligned and is working smoothly. The operator may be wall mounted or mounted on a bracket or shelf. If necessary, refer to the preparation on page 5. Refer to the illustrations and instructions below that suit your application. MOUNT THE OPERATOR 1. Wall Mount: The operator should generally be installed below the door shaft, and as close to the door as possible (Figure 1). Bracket Shelf Mounting: The operator may be mounted either above or below the door shaft (Figure 2). IMPORTANT: The shelf or bracket must provide adequate support, prevent play between operator and door shaft, and permit operator to be fastened securely and with the drive shaft parallel to the door shaft. NOTE: The optimum distance between the door shaft and operator drive shaft is between 12" - 15" (30.5 - 38.1 cm). 2. Place door sprocket on the door shaft. Do not insert the key at this time. 3. Place drive sprocket on the appropriate side of the operator. Do not insert the key at this time. 4. Wrap drive chain around door sprocket and join roller chain ends together with master link. 5. Raise operator to approximate mounting position and position chain over operator sprocket. 6. Raise or lower operator until the chain is taut (not tight). Make sure the operator output shaft is parallel to door shaft and sprockets are aligned. When in position, secure the operator to wall or mounting bracket. 7. Align sprockets and secure (Figure 3). 8. Install Hand Chain Place hand chain around hand chain wheel. Be sure to pass it through both openings in the chain guide. Remove enough links so chain hangs approximately 2' (.61 m) above the floor. 9. Mount Chain Keeper / Keyhole Bracket Using suitable hardware mount the chain keeper approximately 4' (1.22 m)above the floor, near the free hanging chain. Remove disconnect sash chain from bag and place the end through the keyhole in the the chain keeper. Remove excess links if necessary. Figure 1 Figure 2 OpOtimptuimmuDmisDtaisntcaence 12 - 151"2(3-01.55"- 38.1 cm) Typical Right Hand Wall Mounted Operator OPTIONAL Mounting Bracket P/N 08-9098 Be sure door sprocket is properly aligned with drive before securing to the shaft. OOppttiimmuumm DDiissttaannccee 12 - 15" (3102.5- 1-53"8.1 cm) Figure 3 Chain Keeper 4' (1.22 m) aCbohvaeinflKoeoer per 6
-
 1
1 -
 2
2 -
 3
3 -
 4
4 -
 5
5 -
 6
6 -
 7
7 -
 8
8 -
 9
9 -
 10
10 -
 11
11 -
 12
12 -
13
-
14
-
15
-
16
-
17
-
18
-
19
-
20
-
21
-
22
-
23
-
24
 |
 |