LiftMaster H J - NEW STYLE DISCONNECT Manual - Page 10
BRAKE ADJUSTMENT, CLUTCH ADJUSTMENT AND AUXILIARY REVERSAL SYSTEM, Auxiliary Reversal System
 |
View all LiftMaster H manuals
Add to My Manuals
Save this manual to your list of manuals |
Page 10 highlights
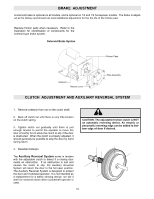
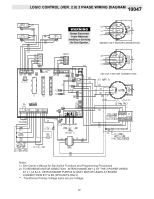
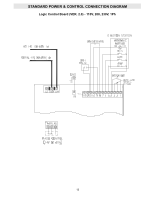
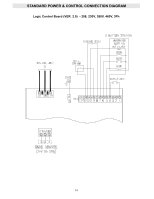
BRAKE ADJUSTMENT A solenoid brake is optional on all models, and is optional on 1/3 and 1/2 horsepower models. The brake is adjusted at the factory and should not need additional adjustment for the the life of the friction pad. Replace friction pads when necessary. Refer to the illustration for identification of components for the solenoid type brake system. Solenoid Brake System Friction Pads Solenoid Release Lever Plate Assembly CLUTCH ADJUSTMENT AND AUXILIARY REVERSAL SYSTEM 1. Remove cotterpin from nut on the clutch shaft. 2. Back off clutch nut until there is very little tension on the clutch spring. 3. Tighten clutch nut gradually until there is just enough tension to permit the operator to move the door smoothly but to allow the clutch to slip if the door is obstructed. When the clutch is properly adjusted, it should generally be possible to stop the door by hand during travel. 4. Reinstall Cotterpin. The Auxiliary Reversal System works in tandem with the adjustable clutch to detect if a closing door meets an obstruction. If an obstruction is met and causes the clutch to slip, the Auxiliary Reversal System will return the door to the full open position. The Auxiliary Reversal System is designed to protect the door and motorized operator. It is not intended as a replacement for a safety sensing device, nor will it work for sectional doors when a jackshaft operator is used. WARNING CAUTION: The adjustable friction clutch is NOT an automatic reversing device. An electric or pneumatic reversing edge can be added to bottom edge of door if desired. CAUTION Adjusting Nut Spring Clutch Pad Clutch Plate Cotterpin Washer Clutch Pulley 10 WA
-
 1
1 -
2
-
3
-
4
-
 5
5 -
 6
6 -
 7
7 -
 8
8 -
 9
9 -
 10
10 -
 11
11 -
 12
12 -
 13
13 -
 14
14 -
 15
15 -
16
-
17
-
18
-
19
-
20
-
21
-
22
-
23
-
24
-
25
-
26
-
27
-
28
-
29
-
30
-
31
-
32
 |
 |
