LiftMaster H J - NEW STYLE DISCONNECT Manual - Page 21
Trouble Shooting, Step 1
 |
View all LiftMaster H manuals
Add to My Manuals
Save this manual to your list of manuals |
Page 21 highlights
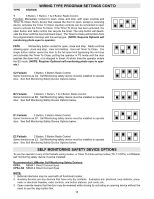
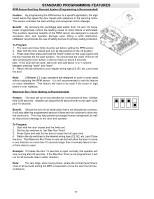
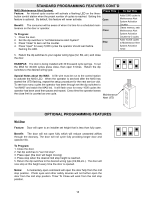
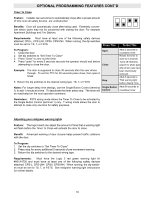
TROUBLESHOOTING GUIDE TROUBLE SHOOTING SYMPTOM Each open command will open the door about a foot and a half then stop, after reaching the open limit each close command will close the door about a foot and a half then reverses back to full open. The door will open some but not completely. And the door will close some and not completely. Extra commands are able to get the door to move completely The door will open some but not completely. An extra open command is able to get the door to open completely The door will open but will only close after a 5 second delay with constant pressure on the close button. The operator will not respond to any commands PROBABLE CAUSE RPM sensor is not adjusted correctly. The Maximum run timer is not set correctly. There may be a Mid Stop set. a) The Photo Eyes, edge or other sensing device is obstructed or activated. b) The Logic board thinks that the direct connect photo eyes are attached and blocked a) Operator control station is wired wrong b) Motor is malfunctioning RESOLUTION Reset the RPM sensor. Also verify that the software is version 260 or better. Order replacement chips from Parts and Service. Reset the Maximum Run Timer Reset the mid-stop by programming it to be at the open limit. a) Remove the obstruction, check the safety device wires for continuity and shorts. b) Unlearn the photo eyes from the memory (see clear memory section). Also verify that the Logic Board Chip is Version 260 or better. Order replacement Chips from Parts and Service. a) Use the LEDs to help check correct wiring (see Diagnostic procedure) Verify that the board is accepting commands by using the onboard control station. b) Verify voltage getting to the motor. Clearing The Memory 3 - steps STEP 1: To reset most of the user installed settings back to factory defaults: 1. Turn all the dip switches ON. 2. Press and hold the Learn button about 5 seconds. 3. The Learn LED will turn off while you hold the button down and turn back on about 5 seconds later. 4. Return the dip switches to the desired wiring type. Note: A. The Max Run Timer is now set to 90 seconds B. The Timer to Close is now set to 0 seconds C. The Mid Stop is now deactivated D. The Maintenance Alert System is now deactivated Note: To clear the Mid Stop only Set/Program the Mid Stop at the open limit. The logic board understands this to mean that no mid stop is desired. 21
-
 1
1 -
2
-
3
-
4
-
5
-
6
-
7
-
8
-
9
-
10
-
11
-
12
-
13
-
14
-
15
-
 16
16 -
 17
17 -
 18
18 -
 19
19 -
 20
20 -
 21
21 -
 22
22 -
 23
23 -
 24
24 -
 25
25 -
 26
26 -
27
-
28
-
29
-
30
-
31
-
32
 |
 |
