MSI X460DX User Manual - Page 49
Installing the Battery Pack
 |
View all MSI X460DX manuals
Add to My Manuals
Save this manual to your list of manuals |
Page 49 highlights
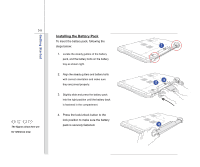
3-5 The figures show here are for reference only. Getting Started Installing the Battery Pack To insert the battery pack, following the steps below: 1. Locate the steady gutters of the battery pack, and the battery bolts on the battery tray as shown right. 2. Align the steady gutters and battery bolts with correct orientation and make sure they are joined properly. 3. Slightly slide and press the battery pack into the right position until the battery back is fastened in the compartment. 4. Press the lock/unlock button to the lock position to make sure the battery pack is securely fastened. 11 3 2 4
-
 1
1 -
2
-
3
-
4
-
5
-
6
-
7
-
8
-
9
-
10
-
11
-
12
-
13
-
14
-
15
-
16
-
17
-
18
-
19
-
20
-
21
-
22
-
23
-
24
-
25
-
26
-
27
-
28
-
29
-
30
-
31
-
32
-
33
-
34
-
35
-
36
-
37
-
38
-
39
-
40
-
41
-
42
-
43
-
 44
44 -
 45
45 -
 46
46 -
 47
47 -
 48
48 -
 49
49 -
 50
50 -
 51
51 -
 52
52 -
 53
53 -
 54
54 -
55
-
56
-
57
-
58
-
59
-
60
-
61
-
62
-
63
-
64
-
65
-
66
-
67
-
68
-
69
-
70
-
71
-
72
-
73
-
74
-
75
-
76
-
77
-
78
-
79
-
80
-
81
-
82
-
83
-
84
-
85
-
86
-
87
-
88
-
89
-
90
-
91
-
92
-
93
-
94
-
95
-
96
-
97
-
98
-
99
-
100
-
101
-
102
-
103
-
104
-
105
-
106
-
107
-
108
-
109
-
110
-
111
-
112
 |
 |

3-5
Getting Started
Installing the Battery Pack
To insert the battery pack, following the
steps below:
1.
Locate the steady gutters of the battery
pack, and the battery bolts on the battery
tray as shown right.
2.
Align the steady gutters and battery bolts
with correct orientation and make sure
they are joined properly.
3.
Slightly slide and press the battery pack
into the right position until the battery back
is fastened in the compartment.
4.
Press the lock/unlock button to the
lock position to make sure the battery
pack is securely fastened.
The figures show here are
for reference only.
1
4
3
2
1