MSI X460DX User Manual - Page 57
Using TurboBattery+ Setting menu
 |
View all MSI X460DX manuals
Add to My Manuals
Save this manual to your list of manuals |
Page 57 highlights
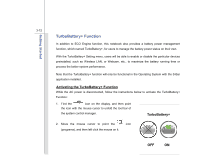
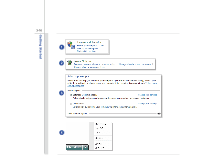
3-13 Note that the devices listed in TurboBattery+ Setting menu may vary from the actual ones, depending on the model users purchased. Getting Started 3. Move the mouse cursor to point the icon (TurboBattery+), and then left click the mouse on it to activate the TurboBattery+ Function. 4. Users may also press the TurboBattery+ Quick Launch Button, if equipped on the notebook, to activate the TurboBattery+ function promptly and directly without going through the above steps. 5. When the TurboBattery+ Function is activated, the display will be turned into monochrome. Read the icon on the tool bar of the system control manager to learn the function status. Using TurboBattery+ Setting menu This TurboBattery+ Function provides a setting menu for users to decide that which devices preinstalled in the notebook should be switched off manually, such as Bluetooth, Wireless LAN, or Webcam, etc., when these devices are not going to be used temporarily to achieve the demand of power saving. To proceed the setting, follow the instructions below: 1. Find the icon on the display, and then point the icon with the mouse cursor to unfold the tool bar of the system control manager. 2. Move the mouse cursor to point the icon (programs), and then left click the mouse on it. 3. Move the mouse cursor to point the TurboBattery+ Setting menu. icon, and then left click the mouse on it to bring up the
-
 1
1 -
2
-
3
-
4
-
5
-
6
-
7
-
8
-
9
-
10
-
11
-
12
-
13
-
14
-
15
-
16
-
17
-
18
-
19
-
20
-
21
-
22
-
23
-
24
-
25
-
26
-
27
-
28
-
29
-
30
-
31
-
32
-
33
-
34
-
35
-
36
-
37
-
38
-
39
-
40
-
41
-
42
-
43
-
44
-
45
-
46
-
47
-
48
-
49
-
50
-
51
-
 52
52 -
 53
53 -
 54
54 -
 55
55 -
 56
56 -
 57
57 -
 58
58 -
 59
59 -
 60
60 -
 61
61 -
 62
62 -
63
-
64
-
65
-
66
-
67
-
68
-
69
-
70
-
71
-
72
-
73
-
74
-
75
-
76
-
77
-
78
-
79
-
80
-
81
-
82
-
83
-
84
-
85
-
86
-
87
-
88
-
89
-
90
-
91
-
92
-
93
-
94
-
95
-
96
-
97
-
98
-
99
-
100
-
101
-
102
-
103
-
104
-
105
-
106
-
107
-
108
-
109
-
110
-
111
-
112
 |
 |