Magnavox 20MF500T User Manual - Page 29
Normal, Cool, or Warm.
 |
UPC - 961613016614
View all Magnavox 20MF500T manuals
Add to My Manuals
Save this manual to your list of manuals |
Page 29 highlights
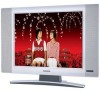
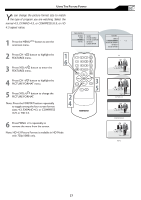
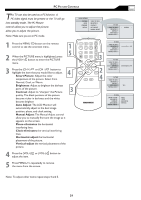
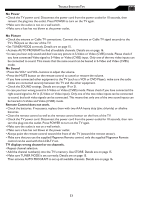
PC PICTURE CONTROLS T his TV can also be used as a PC Monitor. A PC video signal must be present or the TV will go into standby mode. The PC Picture controls allow you to adjust the picture. allow you to adjust the picture. Note: Make sure you are in PC mode. 1 Press the MENU MENU button on the remote control to see the onscreen menu. 1 2 When the PICTURE menu is highlighted, press the (VOL+) button to enter the PICTURE 5 menu. 3 Press the (CH +) or (CH -) button to highlight the item that you would like to adjust. 4 Smart Picture: Adjust the color temperature of the picture. Select from Normal, Cool, or Warm. Brightness: Adjust to brighten the darkest parts of the picture. Contrast: Adjust to "sharpen" the Picture 3 quality. The black portions of the picture become richer in darkness and the white become brighter. Auto Adjust: The LCD Monitor will automatically adjust to the best image position, phase, and clock setting. Manual Adjust: The Manual Adjust control allow you to manually fine tune the image as it appears on the screen. Phase-eliminates the horizontal interfering lines. Clock-eliminates the vertical interfering lines. Horizontal-adjust the horizontal placement of the picture. Vertical-adjust the vertical placement of the picture. 4 Press the (VOL+) or (VOL-) button to adjust the item. 5 Press MENU MENU repeatedly to remove the menu from the screen. MAIN CONTROLS PICTURE AUDIO FEATURES INSTALL SMART PICTURE BRIGHTNESS CONTRAST AUTO ADJUST MANUAL ADJUST MENU OK SOURCE CC 3 2 PIP 4 PICTURE SMART PICTURE BRIGHTNESS CONTRAST AUTO ADJUST MANUAL ADJUST NORMAL PICTURE SMART PICTURE BRIGHTNESS 60 CONTRAST AUTO ADJUST MANUAL ADJUST PICTURE SMART PICTURE BRIGHTNESS CONTRAST 60 AUTO ADJUST MANUAL ADJUST PICTURE SMART PICTURE BRIGHTNESS CONTRAST AUTO ADJUST YES MANUAL ADJUST PICTURE SMART PICTURE BRIGHTNESS CONTRAST AUTO ADJUST MANUAL ADJUST PHASE CLOCK HORIZONTAL VERTICAL Note: To adjust other items repeat steps 4 and 5. 29
-
 1
1 -
2
-
3
-
4
-
5
-
6
-
7
-
8
-
9
-
10
-
11
-
12
-
13
-
14
-
15
-
16
-
17
-
18
-
19
-
20
-
21
-
22
-
23
-
 24
24 -
 25
25 -
 26
26 -
 27
27 -
 28
28 -
 29
29 -
 30
30 -
 31
31 -
 32
32 -
 33
33 -
 34
34 -
35
-
36
-
37
-
38
-
39
 |
 |