Magnavox 32MV319R/F7 Owners Manual_EN - Page 20
Personalize your Home screen, Typical connected Home screen, United States
 |
View all Magnavox 32MV319R/F7 manuals
Add to My Manuals
Save this manual to your list of manuals |
Page 20 highlights
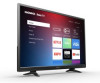
20 .English Typical connected Home screen, United States Typical connected Home screen, Canada 1 Home screen menu - shows options available to you when you are on the Home screen 2 Highlighted option - press OK on the remote to select. 3 TV input tiles - select an input to watch the connected device. 4 Streaming channel and app tiles - select a tile to go to the indicated streaming channel or application. 5 Options hint-press A on the remote for options when this symbol is present. 6 Next screen hint-press the Right arrow on the remote to see the next screen. Typical non-connected Home screen 1 Home screen menu-shows options available to you when you are on the Home screen. 2 Highlighted option-press OK on the remote to select. 3 TV input tiles-select an input to watch the connected device. 4 Options hint-press A on the remote for options when this symbol is present. 5 Next screen hint-press the Right arrow on the remote to see the next screen. Personalize your Home screen There are many things you can do to personalize your Home screen and make it just right for you and your family: ● Only in connected mode: Add streaming channels by using the Streaming Channels menu option to browse the Roku Channel Store. ● Only in connected mode: Change the screen theme by going to Settings > Themes to find and pick one to suit your mood. ● Only in connected mode on U.S. models: Hide Featured Free or Movie Store and TV Store as explained in Configuring parental controls L p. 48. ● Remove a tile by highlighting it and pressing A . Then highlight Remove input or Remove channel and press OK. ● Move a tile by highlighting it and pressing A . Then highlight Move input or Move channel and press OK. Use the arrows to move the tile, and then press OK to lock it in its new location. ● Rename a TV input tile by highlighting it and pressing . Then highlight Rename input and press OK. Highlight a new name in the list, and then press OK to assign that name to the tile. Rather than using the predefined names and icons, you can set a custom name and icon. To do so, scroll up or down to highlight Set custom name & icon, and then press OK. Follow the instructions on the screen to enter a name and select an icon for the input. Note(s) ● If you have renamed the inputs, you cannot use voice commands to switch inputs. Voice commands can only switch among inputs that have their original names, such as "AV," and "HDMI 1."
-
 1
1 -
2
-
3
-
4
-
5
-
6
-
7
-
8
-
9
-
10
-
11
-
12
-
13
-
14
-
 15
15 -
 16
16 -
 17
17 -
 18
18 -
 19
19 -
 20
20 -
 21
21 -
 22
22 -
 23
23 -
 24
24 -
 25
25 -
26
-
27
-
28
-
29
-
30
-
31
-
32
-
33
-
34
-
35
-
36
-
37
-
38
-
39
-
40
-
41
-
42
-
43
-
44
-
45
-
46
-
47
-
48
-
49
-
50
-
51
-
52
-
53
-
54
-
55
-
56
-
57
-
58
-
59
-
60
-
61
-
62
-
63
-
64
-
65
-
66
 |
 |
