Magnavox NB500MG9 Owners Manual - Page 9
Remote Control - support
 |
UPC - 053818570708
View all Magnavox NB500MG9 manuals
Add to My Manuals
Save this manual to your list of manuals |
Page 9 highlights
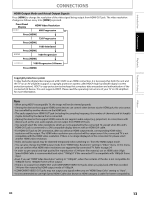
FUNCTIONAL OVERVIEW Introduction Connections Playback Function Setup Others Remote Control 1 STANDBY-ON DISPLAY HDMI OPEN/ CLOSE 2 PIP ANGLE 3 REPEAT SEARCH 4 CLEAR A-B 5 TOP MENU 6 POP MENU/ MENU 7 OK SETUP 8 SUBTITLE 9 10 11* 12 13 RETURN AUDIO MODE 14 15* 16 17 18 19 20 21 22 23 24 25 26 27 28 * The unit can also be turned on by pressing these buttons. 1. DISPLAY button • Press to display the on-screen display menu. 2. STANDBY-ON ybutton • Press to turn the unit on or off. 3. Number buttons • Press to enter the title, chapter, track or file number. • Press to enter values in the input field. 4. SEARCH button • Press to display the search menu. 5. Red / Green / Blue / Yellow button • Press to select items on some BD menus. 6. TOP MENU button • Press to display the top menu. 7. Cursor K / L / { / B buttons • Press to select items or settings. 8. SETUP button • Press to display the setup menu. 9. SUBTITLE button • Press to display the subtitle menu. 10. REV E button • During playback, press to fast reverse the playback. EN 11. PLAY B button* • Press to start playback or resume playback. 12. SKIP H button • During playback, press once to return to the beginning of the current title, chapter or track. • During the JPEG playback, press to return to the previous file. • During playback, press twice to return to the previous title, chapter or track. 13. PAUSE F button • Press to pause playback. • When playback is in pause mode, press repeatedly to forward the playback step by step. 14. HDMI button • Press to set the HDMI output mode. 15. OPEN/CLOSE A button* • Press to open or close the disc tray. 16. PIP button • Press to switch picture-in-picture feature on or off (only applicable to BD-video which supports the PIP function). 17. ANGLE button • Press to access various camera angles on the disc. • Press to rotate the JPEG files. 18. REPEAT button • Press to toggle between various repeat modes. 19. A-B button • Press to play back a defined section between point A and B repeatedly. 20. CLEAR button • Press to clear the information once entered, to clear the marker settings, or to cancel the programming for audio CD, etc. 21. POP MENU/MENU button • Press to display the pop-up menu / disc menu. 22. OK button • Press to confirm or select menu items. 23. RETURN button • Press to return to the previously displayed menu screen. 24. AUDIO button • Press to display the audio menu. 25. FWD D button • During playback, press to fast forward the playback. • In pause mode, press to slow forward the playback. 26. STOP C button • Press to stop playback. 27. SKIP G button • During playback, press to skip to the next title, chapter, track or file. 28. MODE button • During playback, press to display the picture adjustment menu. • During the JPEG playback, press to display menus for changing the visual effect for switching the image or changing the size of the image. • In stop mode with BD inserted, press to display a menu for setting the BD audio mode. • In stop mode with audio CD, or JPEG files inserted, press to display menus for program and random playback. 9
-
 1
1 -
2
-
3
-
 4
4 -
 5
5 -
 6
6 -
 7
7 -
 8
8 -
 9
9 -
 10
10 -
 11
11 -
 12
12 -
 13
13 -
 14
14 -
15
-
16
-
17
-
18
-
19
-
20
-
21
-
22
-
23
-
24
-
25
-
26
-
27
-
28
-
29
-
30
-
31
-
32
-
33
-
34
-
35
-
36
-
37
-
38
-
39
-
40
-
41
-
42
-
43
-
44
-
45
-
46
-
47
-
48
-
49
-
50
 |
 |
