Makita BTD130FW Owners Manual - Page 7
Maintenance
 |
View all Makita BTD130FW manuals
Add to My Manuals
Save this manual to your list of manuals |
Page 7 highlights
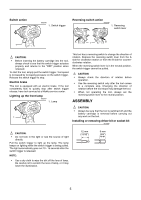
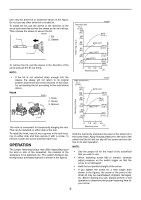
The fastening torque is affected by a wide variety of factors including the following. After fastening, always check the torque with a torque wrench. 1. When the battery cartridge is discharged almost completely, voltage will drop and the fastening torque will be reduced. 2. Driver bit or socket bit Failure to use the correct size driver bit or socket bit will cause a reduction in the fastening torque. 3. Bolt • Even though the torque coefficient and the class of bolt are the same, the proper fastening torque will differ according to the diameter of bolt. • Even though the diameters of bolts are the same, the proper fastening torque will differ according to the torque coefficient, the class of bolt and the bolt length. 4. The manner of holding the tool or the material of driving position to be fastened will affect the torque. 5. Operating the tool at low speed will cause a reduction in the fastening torque. MAINTENANCE Raise the arm part of the spring and then place it in the recessed part of the housing with a slotted bit screw- driver of slender shaft or the like. 006260 1. Spring 1 2. Arm 3. Recessed part 2 3 Use pliers to remove the carbon brush cap of the carbon brushes. Take out the worn carbon brushes, insert the new ones and replace the carbon brush cap in reverse. 006261 1. Carbon brush cap 1 CAUTION: • Always be sure that the tool is switched off and the battery cartridge is removed before attempting to perform inspection or maintenance. Replacing carbon brushes 006258 1. Limit mark Make sure that the carbon brush cap have fit into the holes in brush holders securely. 006304 1 1. Hole 2. Carbon brush cap 2 1 Replace when they wear down to the limit mark. Keep the carbon brushes clean and free to slip in the holders. Both carbon brushes should be replaced at the same time. Use only identical carbon brushes. Use a screwdriver to remove two screws then remove the rear cover. 006259 1. Rear cover 1 2. Screws Reinstall the rear cover and tighten two screws securely. After replacing brushes, insert the battery cartridge into the tool and break in brushes by running tool with no load for about 1 minute. Then check the tool while running and electric brake operation when releasing the switch trigger. If electric brake is not working well, ask your local Makita service center for repair. To maintain product SAFETY and RELIABILITY, repairs, any other maintenance or adjustment should be performed by Makita Authorized Service Centers, always using Makita replacement parts. 2 7
-
 1
1 -
 2
2 -
 3
3 -
 4
4 -
 5
5 -
 6
6 -
 7
7 -
 8
8 -
 9
9 -
 10
10 -
 11
11 -
 12
12 -
13
-
14
-
15
-
16
-
17
-
18
-
19
-
20
-
21
-
22
-
23
-
24
-
25
-
26
-
27
-
28
 |
 |
