Makita EK6101 Operation Manual
Makita EK6101 Manual
 |
View all Makita EK6101 manuals
Add to My Manuals
Save this manual to your list of manuals |
Makita EK6101 manual content summary:
- Makita EK6101 | Operation Manual - Page 1
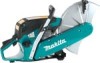
Operator's and Safety Manual for Gasoline Power Cuts (page 2 - 29) Manuel d'instructions et de sécurité de découpeuse thermiques (page 30 - 57) EK6100 EK6101 WARNING! Read and understand this Manual. Always follow safety precautions in the Operator's and Safety Manual. Improper use can cause serious - Makita EK6101 | Operation Manual - Page 2
part will be repaired or replaced by MAKITA. OWNER'S WARRANTY RESPONSIBILITIES: • As the small off-road engine owner, you are responsible for performance of the required maintenance listed in your owner's manual. MAKITA to a MAKITA distribution center or service center as soon as the problem exists. - Makita EK6101 | Operation Manual - Page 3
policies within five working days of request by the Air Resources Board. WARRANTED PARTS LIST (EVAPORATIVE): The repair or replacement of any warranted part otherwise eligible for warranty coverage may be excluded from such warranty coverage if MAKITA demonstrates that the small off-road engine has - Makita EK6101 | Operation Manual - Page 4
start spring 24 Instructions for periodic maintenance 25 Replacing/cleaning the spark arrester screen 25 Service, spare parts and guarantee 26 Troubleshooting 27 SPECIAL ACCESSORIES Diamond cutting discs, water tank 27 Extract from spare parts list 28-29 Packing Your MAKITA Power Cut is - Makita EK6101 | Operation Manual - Page 5
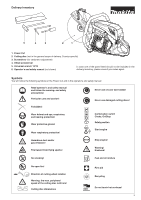
for carburetor adjustment) 4. Offset screwdriver 5. Universal wrench 13/19 6. Operator's and safety manual (not shown) In case one of the parts listed should not be included in the delivery inventory, please consult your sales agent. Symbols You will notice the following symbols on the Power Cut - Makita EK6101 | Operation Manual - Page 6
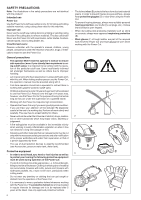
work with this unit. When letting another person use the Power Cut, 1 this operator's manual must be provided along with it. ‑ First‑time operators should ask a specialist to instruct them in working with gasoline‑powered cutoff saws. ‑ Children and persons under 18 years of age must not be - Makita EK6101 | Operation Manual - Page 7
qualities whenever working with the cutoff saw. Fuels / Refuelling - Go approx. 10 feet) from where you fuelled the Power Cut (7), but not within the extended swing range wheel is in good condition(replace immediately if torn, damaged is properly mounted, the V-belt has the proper tension, the - Makita EK6101 | Operation Manual - Page 8
IS PROPER VENTILATION WHEN USING POWER CUTTER IN TRENCHES OR OTHER CONFINED SPACES. - Switch off the Power Cut immediately if you observe any changes in its operating behavior. - Switch off the engine before inspecting the V-belt tension or tightening it, replacing the cutting wheel or eliminating - Makita EK6101 | Operation Manual - Page 9
bend in the knees. Save your back! 17 - Guide the Power Cut in such a way that no part of your body is within the extended swing range of speed. Injury hazard! - When cutting workpieces down to length use a firm support. If necessary, secure the workpiece from slipping, but do not steady it - Makita EK6101 | Operation Manual - Page 10
speed, to cut a guide groove before going to top speed and applying more pressure to the Power Cut. - Keep the with a long cut. - When cutting material under stress (supported material or material in structures), always make a notch in concrete piles, follow the instructions and standards of the - Makita EK6101 | Operation Manual - Page 11
of water. MAKITA offers the planned cut. This groove will then guide the Power Cut accurately guring the actual cutoff. Power Cut, follow the instructions in the chapter on "Periodic care and maintenance". ALWAYS empty the fuel tank and run the carburetor parts and people well away out of range - Makita EK6101 | Operation Manual - Page 12
instructions issued by trade associations and insurance companies. NEVER make any modifications to the Power Cut! You will only be putting your own safety at risk! Perform only the maintenance and repair works described in the operator's manual. All other work must be carried out by MAKITA Service - Makita EK6101 | Operation Manual - Page 13
EK6101 Displacement cu in (cm3) 3.7 (60.7) 3.7 (60.7) Bore in (mm) 1.85 (47) 1.85 (47) Stroke in (mm) 1.38 (35) 1.38 (35) Max. power Carburetor (diaphragm carburetor - when using MAKITA Synthetic oil 50 0.2" 2) Arbor diameter in 0.8" 0.8" V‑belt no. 965 300 501 965 300 510 - Makita EK6101 | Operation Manual - Page 14
24 Identification plate (9) Indicate when ordering spare parts EK6101 2013.09 123456 23 22 21 20 Makita Corporation, Anjo, Aichi, Japan Made in Germany XXX.XXX.XXX Typ 315 Serial number Year of manufacture 13 14 15 16 19 18 17 1 Handle 2 Air filter cover 3 Tubular handle 4 Protection hood - Makita EK6101 | Operation Manual - Page 15
Carburetor adjustment screwdriver Place the Power Cut on a stable surface and carry out the following assembly steps: Mounting the cutting disc Inspect the disc for damage. See SAFETY INSTRUCTIONS cutoff disc until a hole (11) in the V-belt pulley is visible in the counter-holding opening (10) - Makita EK6101 | Operation Manual - Page 16
Fuel mixture This tool is powered by a high‑performance air-cooled two‑stroke engine. It ratio: 50:1 When using MAKITA synthetic two-stroke engine oil, i. e. 50 parts gasoline to 1 part oil. 50:1 When using fuel and fuel mixtures can cause starting problems and damage the engine. Purchase only - Makita EK6101 | Operation Manual - Page 17
gets on your clothing, change clothes immediately. Fuel mixture 3 meters Starting the engine if necessary CAUTION: Observe the SAFETY INSTRUCTIONS on page 7 and 8! Start the Power Cut only after complete assembly and inspection! Move at least 3m (10 feet) away from the place where you fuelled - Makita EK6101 | Operation Manual - Page 18
18 Cold starting: Grasp front handle firmly with one hand and press the Power Cut against the ground. Place left toe in the rear handguard. Prime the NOTE: If the engine was switched off only for a short time, the saw can be started without using the combination switch. Important: If the fuel tank - Makita EK6101 | Operation Manual - Page 19
service center. SERVICE 7 For correct adjustment of the idling speed the following steps must be carried out: T Start the engine and run it until it is warm (about 3 - 5 minutes). L Adjust the carburetor with the screwdriver (7, Order No. 944 340 001) included with the Power Cut. It has a lug - Makita EK6101 | Operation Manual - Page 20
manual are vital to the safety of the unit, and because all parts are subject to a certain amount of wear and tear, it is important for your own safety that you have the unit checked and maintained regularly by a MAKITA service center. IMPORTANT: If the cutting wheel breaks during cutting, the Power - Makita EK6101 | Operation Manual - Page 21
per month and 4 clean if necessary. To clean the air filter insert, spread it out slightly and carefully tap it against a clean surface. Replace the air filter insert every 500 operating hours. Replace it immediately if there is a drop in power, drop in speed, or smoke in the exhaust. Before - Makita EK6101 | Operation Manual - Page 22
gloves! The spark plug (Order No. 965 603 021) must be replaced in case of damage to the insulator, electrode erosion (burn) or if the electrodes are very dirty or oily. Remove the filter cover and hood. See Cleaning / changing the air filter. Pull the plug cap (1) off the spark plug. Use only the - Makita EK6101 | Operation Manual - Page 23
(2) near the holder (15). Bend the air guide tab (4a) slightly to the side and carefully remove the air guide (3) from the fan housing. CAREFUL! Injury hazard! Do not unscrew screw (7) if the return spring is under tension. If the starter cable is to be replaced although it is not broken, it will - Makita EK6101 | Operation Manual - Page 24
and you will notice some resistance when pulling the starter cable. If you notice this, check the spring (6) and replace if necessary. 1 Mounting the fan housing Insert the air guide (3) in the fan housing so that the five recesses (4) engage. Position the fan housing on the machine, apply slight - Makita EK6101 | Operation Manual - Page 25
and nuts Monthly Air filter insert Every 3 months Suction head Fuel tank Annually Entire Power Cut Storage Entire Power Cut Cutting disc Fuel tank Carburetor Clean exterior, check for damage. In case of damage, have repaired by a qualified service center immediately Inspect - Makita EK6101 | Operation Manual - Page 26
with the address of your nearest MAKITA service center. Spare parts Reliable long-term operation, as well as the safety of your Power Cut, depend among other things on the quality of the spare parts used. Use only original MAKITA parts, marked Only original parts are from the same production line - Makita EK6101 | Operation Manual - Page 27
defective, STOP switch defective. Decompression valve dirty Air filter dirty, wrong carburetor adjustment, muffler clogged, exhaust channel in cylinder clogged, spark arrester screen clogged. SPECIAL ACCESSORIES Diamond cutting discs MAKITA diamond cutting discs meet the highest demands in - Makita EK6101 | Operation Manual - Page 28
Extract from the spare parts list Use only original MAKITA parts. For repairs and replacement of other parts, see your MAKITA service center. EK6100 EK6101 14 15 16 9 8 17 18 19 20 5 6 22 28 - Makita EK6101 | Operation Manual - Page 29
parts list Use only original MAKITA parts. For repairs and replacement of other parts, see your MAKITA service center. EK6100 EK6101 Pos. MAKITA-No ,4 mm Hex screw M8x25 V-belt (EK6100) V-belt (EK6101) Suction head Tank cap, compl. (fuel) Inner filter Air filter insert (paper cartridge) Disk - Makita EK6101 | Operation Manual - Page 30
USEPA ou EPA), le California Air Resources Board et MAKITA ont le plaisir de vous pr adressez-vous au service garantie MAKITA en appelant le 1-800-4-MAKITA (462-5482). garantie. (2) Toute pièce garantie pour laquelle les instructions écrites fournies prévoient seulement une inspection réguliè - Makita EK6101 | Operation Manual - Page 31
l'utilisation d'une pièce complémentaire ou modifiée non exemptée. (11) MAKITA, en tant qu'émetteur de la garantie, fournira tout document décrivant les proc dans les cinq jours ouvrables à compter de la demande par l'Air Resources Board. LISTE DES PIÈCES GARANTIES (ÉVAPORATION) : La réparation ou - Makita EK6101 | Operation Manual - Page 32
ces instructions risque d'entraîner des blessures mortelles! Seulement pour EK6100, EK6101 / remplacer le filtre à air 49 Remplacement de bougie 50 d'entretien périodiques ... 53 Service d'atelier, pièces de de la liste des pièces de rechange 56-57 Emballage Votre découpeuse MAKITA est emball - Makita EK6101 | Operation Manual - Page 33
la fourniture, veuillez vous adresser à votre vendeur! Symboles Vous rencontrerez les symboles suivants sur l'appareil et dans le instructions d'emploi: Lire instructions d'emploi et suivre les consignes de sécurité et d'avertissement! Danger et attention particulirs! Interdit! Ne jamais utiliser - Makita EK6101 | Operation Manual - Page 34
Instructions de sécurité Note : Les figures dans les consignes de sécurité varient en fonction du modèle! Utilisation conforme aux prescriptions Découpeuse La découpeuse ne doit être utilisée en plein air et avec prudence. Le serveur est d'autre part responsable par rapport à des tiers. - Ne - Makita EK6101 | Operation Manual - Page 35
le commutateur combiné fonctionnement correctement et si les poignées sont propres et sèches (Marche/Arrêt (E/S), starter). - Ne mettre la découpeuse qu'en service après l'avoir complète- ment assemblée et vérifiée. En principe, la découpeuse ne doit être utilisée qu'à l'état complètement mont - Makita EK6101 | Operation Manual - Page 36
de démarrer, le guide de la découpeuse doit prendre une position stable. - Ne démarrer la découpeuse que selon les instructions indiquées dans la pour recourir à toute panne, il est impératif de mettre le moteur hors service (14). - En cas de changement audible ou sensible dans le découpage, ar - Makita EK6101 | Operation Manual - Page 37
et lancée en avant avec une grande énergie en direction du guide-découpeuse (risque de blessure!). Pour éviter tout rebond, respecter les consignes provoquer des blessures. - Lors du tronçonnement de pièces, utiliser un support stable et le fixer si nécessaire pour ne pas qu'il ne glisse. - Makita EK6101 | Operation Manual - Page 38
pas exposer les disques à découper en résine synthétique à une humidité de l'air trop élevée ou à la pluie! Utiliser les disques à découper en résine synth vitesse périphérique et coupent par conséquent moins bien. - Tronçonner les supports en double T ou cornières par étapes, voir figure 21. - On - Makita EK6101 | Operation Manual - Page 39
manière égale des deux côtés. Dans la gamme MAKITA, vous trouverez à toute fin d'utilisation le bon d'enlever proprement le morceau saillant sur un support plat (25). ATTENTION! Fixer impérativement Elle ne doit pas être stockée en plein air. Toujours démonter la découpeuse. Ne jamais laisser la - Makita EK6101 | Operation Manual - Page 40
doivent être effectués par le Service Après Vente de MAKITA. 28 N'utiliser que les pièces détachées et accessoires MAKITA d'origine. En cas d'utilisation de me nerveux peuvent se produire chez des personnes souffrant de troubles circulatoires et trop souvent soumises à des vibrations. Les - Makita EK6101 | Operation Manual - Page 41
Caractéristiques techniques EK6100 EK6101 Cylindrée cu in (cm3) 3.7 (60.7) 3.7 (60.7) Alésage in (mm) 1. .6 (0.7) Dosage mélange (carburant/huile 2 temps) - avec utilisation huile synthétique MAKITA 50:1 50:1 - avec utilisation autre huile synthétique (échelle de oualité JASO - Makita EK6101 | Operation Manual - Page 42
22 21 20 Makita Corporation, Anjo, Aichi, Japan Made in Germany XXX.XXX.XXX Typ 315 Numéro de série Année de construction 13 14 15 16 19 18 17 1 Poignée 2 Couvercle de filtre pour filtre à air 3 Poignée-étrier 4 Capot de protection 5 Set à eau 6 Vis de réglage 7 Ouverture de contre-support - Makita EK6101 | Operation Manual - Page 43
3. Tournevis (pour le réglage du carburateur) Poser la découpeuse sur un support stable et effectuer les opérations suivantes pour le montage du disque à dé çage intérieur de 25,4 mm). La non-observation de ces instructions risque d'entraîner des blessures mortelles! Observer le sens de rotation du - Makita EK6101 | Operation Manual - Page 44
synthétique pour moteurs à deux temps refroidis à l'air (échelle de qualité JASO FC o ISO-L-EGD utilisant l'huile deux temps de haute performance MAKITA, ceci signifie mélanger 50 parties d'essence être différentes maladies de peau. D'autre part, on connait les réactions allergiques. Le contact - Makita EK6101 | Operation Manual - Page 45
Changer aussitôt de vêtements si de l'essence a été renversée sur les vêtements. 3 mètres Démarrer le moteur si nécessaire ATTENTION: Respecter impérativement les Instructions de sécurité de la page 35 et 36. La découpeuse ne peut être mise en marche qu'après le montage complet! Démarrer le moteur - Makita EK6101 | Operation Manual - Page 46
2 Mettre le capot de protection (1) en position optimale (cf. Figure) en fonction de l'utilisation faite. 2a 1 Le capot de protection (1) peut être orienté à l'intérieur des butées dans les deux sens de la flèche. Note : Le raccordement d'une alimentation en eau (réservoir à eau sous pression - Makita EK6101 | Operation Manual - Page 47
régime de ralenti. Les modifications au niveau des vis de réglage (L) et (H) ne doivent être effectuées que par un atelier spécialisé MAKITA ! 7 SERVICE Les opérations suivantes sont nécessaires pour un réglage correct du régime de ralenti: T Démarrez le moteur et laissez-le tourner jusqu'à ce - Makita EK6101 | Operation Manual - Page 48
SERVICE IMPORTANT: Etant donné que nombreuses pièces non abordées dans une certaine usure, une vérification et maintenance régulière doit être effectuée par un atelier spécialisé MAKITA pour garantir votre sécurité. ATTENTION: Si le disque à découper se fracture pendant la découpe, l'appareil doit - Makita EK6101 | Operation Manual - Page 49
fois par mois la cartouche de filtre à air, et la nettoyer si nécessaire. Déployer légèrement la cartouche de filtre à air et la frapper avec précaution contre un support propre. Remplacer la cartouche de filtre à air toutes les 500 heures de service. La remplacer immédiatement en cas de perte - Makita EK6101 | Operation Manual - Page 50
éder à un remplacement de la bougie (N° de commande 965 603 021). Retirer le couvercle du filtre et le capot, voir Nettoyage / Remplacement du filtre à air. Retirer la fiche de la bougie (1) de la bougie. Démonter la bougie uniquement avec la clé combinée comprise dans la fourniture. ATTENTION: Pour - Makita EK6101 | Operation Manual - Page 51
Dévisser les quatre vis (1). Retirer le carter du ventilateur (2). Introduire un petit tournevis dans la fente à air de refroidissement au dos du carter du ventilateur (2) dans la zone du support (15). Courber légèrement le collier (4a) du déflecteur sur le côté et séparer avec précaution le - Makita EK6101 | Operation Manual - Page 52
Remplacer la cassette de ressort de rappel / Remplacer le ressort de démarrage Démonter le carter du ventilateur (cf. Chapitre "Remplacer le cordon de lancement"). Séparer le déflecteur du carter du ventilateur (cf. Chapitre "Remplacer le cordon de lancement"). Détendre le ressort de rappel sur le - Makita EK6101 | Operation Manual - Page 53
travaux non compris dans cette liste ne doivent être exécutés que dans un atelier spécialisé de MAKITA. Page Généralités Découpeuse à découper ne doit pas tourner) 47 Nettoyer pour garantir un parfait guidage de l'air de refroidissement. 42 Vérifier s'il n'est pas détérioré 51 Vérifier la pr - Makita EK6101 | Operation Manual - Page 54
Service origine vous sont proposées par votre vendeur spécialisé. Il dispose des listes de pièces de rechange nécessaires pour déterminer le numéro de pas les frais qui en découleraient. Garantie MAKITA garantit un qualité irréprochable et supporte les frais pour une amélioration par remplacement - Makita EK6101 | Operation Manual - Page 55
tèmes peuvent être mis en cause Filtre à air encrassé, faux réglage du carburateur, silencieux bouché, confort de travail et de fournir une solution économique lors des découpages, la gamme MAKITA contient des disques à découper au diamant. Elles servent au découpage de toutes les - Makita EK6101 | Operation Manual - Page 56
Extrait de la liste des pièces de rechange N'utilisez que des pièces de rechange d'origine MAKITA. Pour les réparations et la rechange pour d'autres pièces, votre atelier spécialisé MAKITA est compétent. EK6100 EK6101 14 15 16 9 8 17 18 19 20 5 6 22 56 - Makita EK6101 | Operation Manual - Page 57
Extrait de la liste des pièces de rechange N'utilisez que des pièces de rechange d'origine MAKITA. Pour les réparations et la rechange pour d'autres pièces, votre atelier spécialisé MAKITA est compétent. EK6100 EK6101 Pos. N°MAKITA pcs. Désignation 1 966 121 151 1 966 141 151 1 966 144 151 1 - Makita EK6101 | Operation Manual - Page 58
58 - Makita EK6101 | Operation Manual - Page 59
59 - Makita EK6101 | Operation Manual - Page 60
. WARNING! Some dust created by power sanding sawing, grinding, drilling, and other construction dust masks that are specially designed to filter out microscopic particles. Les gaz d'échappement sans préavis Makita U.S.A., Inc. 14930 Northam Street La Mirada, CA 90638-5753 Makita Canada Inc.
-
 1
1 -
 2
2 -
 3
3 -
 4
4 -
 5
5 -
 6
6 -
 7
7 -
8
-
9
-
10
-
11
-
12
-
13
-
14
-
15
-
16
-
17
-
18
-
19
-
20
-
21
-
22
-
23
-
24
-
25
-
26
-
27
-
28
-
29
-
30
-
31
-
32
-
33
-
34
-
35
-
36
-
37
-
38
-
39
-
40
-
41
-
42
-
43
-
44
-
45
-
46
-
47
-
48
-
49
-
50
-
51
-
52
-
53
-
54
-
55
-
56
-
57
-
58
-
59
-
60
 |
 |

EK6100
EK6101
Operator’s and Safety Manual
for Gasoline Power Cuts
(page 2 - 29)
Manuel d’instructions et de sécurité
de découpeuse thermiques
(page 30 - 57)
WARNING!
Read and understand this Manual. Always follow safety precautions in the Operator’s and Safety Manual. Improper use can cause serious injury!
Preserve this Manual carefully!
WARNING!
FUELS WITH MORE THAN 10% ETHANOL ARE NOT APPROVED FOR USE IN MAKITA 2-STROKE ENGINES!
Use of alternative fuels, such as E-20
(20% ethanol)
, E-85
(85% ethanol)
or any fuels not meeting MAKITA requirements are not approved for use in MAKITA 2-stroke gasoline engines!
USE OF ALTERNATIVE FUELS CAN CAUSE THE FOLLOWING PROBLEMS:
Poor engine performance, loss of power, overheating, fuel vapor lock, improper clutch engagement, premature deterioration of fuel lines, premature deterioration of gaskets,
premature deterioration of carburetors.
USING ALTERNATIVE FUELS AND/OR 2-STROKE OILS NOT ACCORDING TO JASO FC OR ISO-L-EGD IN MAKITA 2-STROKE ENGINES WILL VOID YOUR ENGINE WARRANTY!
ATTENTION!
Suivez toujours les conseils de sécurité du présent manuel d’emploi et de sécurité. Une utilisation incorrecte de la tronçonneuse peut entraîner des blessures graves!
Lisez et comprenez ce manuel.
Conservez avec soin ce manuel!
ATTENTION!
LES CARBURANTS CONTENANT PLUS DE 10 % D’ÉTHANOL NE SONT PAS AUTORISÉS POUR L’UTILISATION DANS LES MOTEURS 2 TEMPS!
Les carburants alternatifs, tels que E-20
(20 % d‘éthanol)
, E-85
(85 % d’éthanol)
ou tout autre carburant n’étant pas conformes aux exigences MAKITA ne sont pas autorisés
pour l’utilisation dans les moteurs essence à 2 temps MAKITA!
L’UTILISATION DE CARBURANTS ALTERNATIFS PEUT CAUSER LES PROBLÈMES SUIVANTS:
Faible performance moteur, Perte de puissance, Surchauffe, Bouchons de vapeur dans la conduite d’essence, Embrayage incorrect, Détérioration prématurée des conduites
d’essence, Détérioration prématurée des joints d’étanchéité, Détérioration prématurée des carburateurs.
L’UTILISATION DE CARBURANTS ALTERNATIFS ET/OU D’HUILES 2 TEMPS NON-CONFORMES À LA NORME JASO FC OU ISO-L-EGD DANS LES MOTEURS À 2 TEMPS
MAKITA ANNULERA VOTRE GARANTIE MOTEUR!