Makita EK6101 Operation Manual - Page 23
Replacing the starter cable
 |
View all Makita EK6101 manuals
Add to My Manuals
Save this manual to your list of manuals |
Page 23 highlights
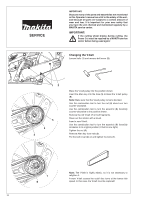
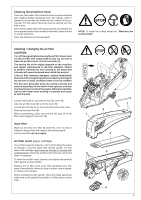
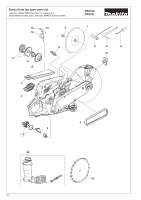
Replacing the starter cable Unscrew four screws (1). Remove fan housing (2). Insert a small screwdriver through the ventilation slit on the back of the fan housing (2) near the holder (15). Bend the air guide tab (4a) slightly to the side and carefully remove the air guide (3) from the fan housing. CAREFUL! Injury hazard! Do not unscrew screw (7) if the return spring is under tension. If the starter cable is to be replaced although it is not broken, it will be necessary to first de-tension the cable drum return spring (13). To do this, use the grip to pull the cable all the way out of the fan housing. Hold the cable drum with one hand, and with the other push the cable into the space (14). Carefully let the drum turn until the return spring is no longer under tension. Unscrew screw (7) and remove the carrier (8). Remove any pieces of old line and take out the spring (6). Carefully remove the cable drum (5). Put the spring (6) back in the cable drum (so that its lower end fits in the notch, see the arrow in the close-up). Thread a new cable (dia. 3.8 mm, length 1000 mm) as shown in the illustration (don't forget the washer (10)) and knot both ends as shown. Pull the knot (11) into the cable drum (5) and press it into the space. Pull knot (12) into the starter grip (9). Put the cable drum and spring back on, and turn it slightly until the return spring catches. Guide the hole (16) in the carrier (8) over the end of the spring, press down the carrier and turn it slightly counter-clockwise until it is flush on the cable drum. Insert screw (7) and tighten. Guide the cable into the slot (14) on the cable drum and turn the drum with the cable clockwise three times. Hold the cable drum with your left hand and with your right hand untwist the cable, pull it tight and hold it. Carefully release the cable drum. The spring will wind the cable around the drum. Repeat the procedure once. The starter grip should now stand straight up on the fan housing. NOTE: With the cable pulled all the way out, it must still be possible to turn the pulley another 1/4 turn against the return spring. CAUTION: Danger of injury! Secure the cable grip when pulled out! It will whip back if the cable pulley is released by accident. 1 16 8 6 3 1 Mounting the fan housing 2 Insert the air guide (3) in the fan housing so that the five re- cesses (4) engage. 12 Position the fan housing on the machine, apply slight counter- pressure, and pull the starter grip until the starter mechanism engages. Tighten screws (1). 9 10 2 7 14 11 5 4 13 15 23
-
 1
1 -
2
-
3
-
4
-
5
-
6
-
7
-
8
-
9
-
10
-
11
-
12
-
13
-
14
-
15
-
16
-
17
-
 18
18 -
 19
19 -
 20
20 -
 21
21 -
 22
22 -
 23
23 -
 24
24 -
 25
25 -
 26
26 -
 27
27 -
 28
28 -
29
-
30
-
31
-
32
-
33
-
34
-
35
-
36
-
37
-
38
-
39
-
40
-
41
-
42
-
43
-
44
-
45
-
46
-
47
-
48
-
49
-
50
-
51
-
52
-
53
-
54
-
55
-
56
-
57
-
58
-
59
-
60
 |
 |
