Makita EK6101 Operation Manual - Page 24
Replacing the return spring pack/Replacing the, starter spring, Replacing the starter spring
 |
View all Makita EK6101 manuals
Add to My Manuals
Save this manual to your list of manuals |
Page 24 highlights
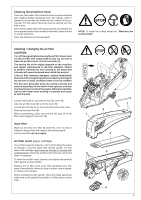
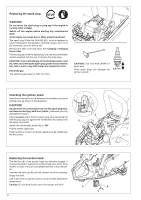
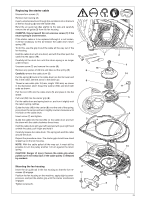
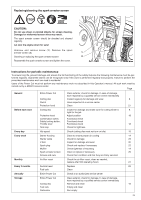
Replacing the return spring pack/Replacing the starter spring Remove the fan housing (see "Replacing the starter cable"). Remove the air guide from the fan housing (see "Replacing the starter cable"). Detension the return spring on the cable drum and remove the cable drum (see "Replacing the starter cable"). Note: Unspool the starter cable from the drum only. Do not pull it out of the cable drum or the starter grip! 7 CAREFUL! Injury hazard! The return spring can pop out! Always wear eye protection and protective gloves! 8 Lightly tap the fan housing on a wooden surface with the entire surface of the hollow side, and hold it down. Now lift the fan housing carefully and in small steps. This will allow the return spring pack (13), which should now have fallen out, to relax in a controlled manner if the return spring has popped out of the 5 plastic pack. If the return spring pops out, it can be wound back into the cassette as shown (15). Make sure the direction of winding is correct. Carefully insert a new return spring cassette and press down until it engages. Put the cable drum (5) and spring back on, and turn it slightly 13 until the return spring catches. Put on the carrier (8) and bolt it on with bolt (7). Tension the return spring (see "Replacing the starter cable"). 3 Replacing the starter spring NOTE: If the spring (6) in the Featherlight-Starting system is broken, more effort will be required to start the engine and you will notice some resistance when pulling the starter cable. If you notice this, check the spring (6) and replace if necessary. 1 Mounting the fan housing Insert the air guide (3) in the fan housing so that the five recesses (4) engage. Position the fan housing on the machine, apply slight counterpressure, and pull the starter grip until the starter mechanism catches. Tighten screws (1). 15 6 4 24
-
 1
1 -
2
-
3
-
4
-
5
-
6
-
7
-
8
-
9
-
10
-
11
-
12
-
13
-
14
-
15
-
16
-
17
-
18
-
 19
19 -
 20
20 -
 21
21 -
 22
22 -
 23
23 -
 24
24 -
 25
25 -
 26
26 -
 27
27 -
 28
28 -
 29
29 -
30
-
31
-
32
-
33
-
34
-
35
-
36
-
37
-
38
-
39
-
40
-
41
-
42
-
43
-
44
-
45
-
46
-
47
-
48
-
49
-
50
-
51
-
52
-
53
-
54
-
55
-
56
-
57
-
58
-
59
-
60
 |
 |
